When Apple released macOS Ventura, many were excited about its new features. From Stage Manager to Continuity Camera, as well as improvements to the standard features of Apple’s OS. However, not all Mac users are lucky enough to update their computers to macOS Ventura successfully. Some users have faced problems wherein macOS Ventura won’t install on their Macs.
In this article, we take a closer look at the most common reasons why macOS Ventura won’t install. Of course, we will not leave you hanging, as we will also examine the different ways that you can resolve the issues.
Why macOS Ventura Won’t Install
While updating to macOS Ventura should be a straightforward process, it’s unavoidable for some users to find instances where the update won’t install on their machines. Below are some of the reasons why macOS Ventura won’t install.
- Device compatibility
- Apple server problem
- Insufficient storage space on your Mac
- Poor internet connection
- Some files on your Mac might be corrupting the macOS Ventura download and installation
macOS Ventura Won’t Install: Solutions
1. Check the compatibility of your Mac with macOS Ventura
Apple has a long list of devices that can run macOS Ventura. Before you check the list, make sure you know your Mac’s model information. To do so, follow the simple steps below.
- Click the Apple icon in the top left corner of your Mac.
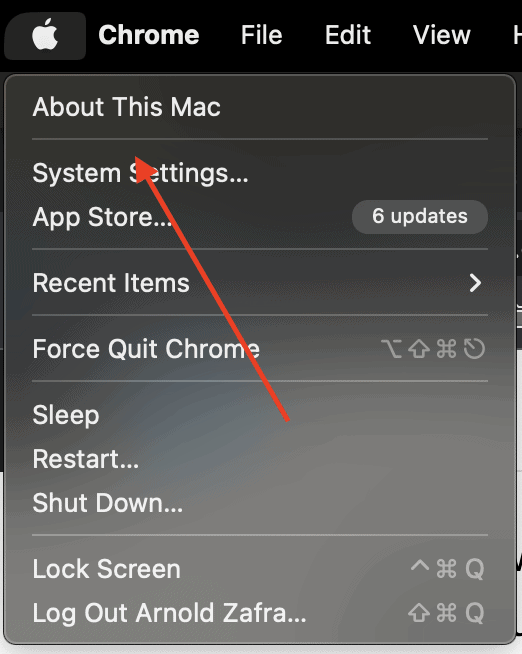
- This will bring up a drop-down menu. Pick the top option: About This Mac.
- The resulting window should show you the information you need, e.g. MacBook Air (M2, 2022)
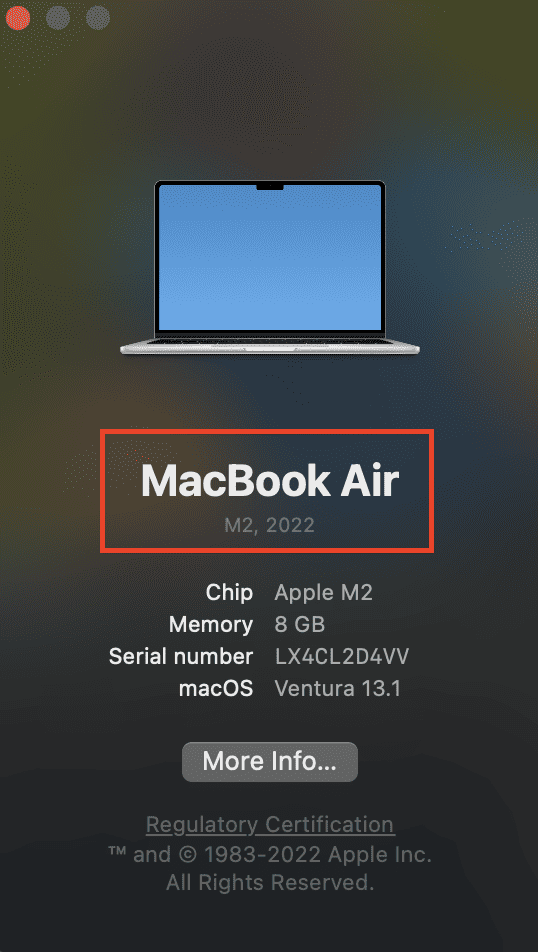
- Check if your Mac is supported by macOS Ventura from the list below:
Mac Models Supported by macOS Ventura
- iMac 2017 and later
- iMac Pro 2017 and later
- MacBook Pro 2017 and later
- MacBook 2017 and later
- MacBook Air 2018 and later
- Mac Mini 2018 and later
- Mac Pro 2019 and later
- Mac Studio 2022
If you find your Mac model in the list, then it’s safe to say that device compatibility is not causing macOS Ventura not to install on your Mac.
2. macOS Ventura Won’t Install Due to Apple Server Problems
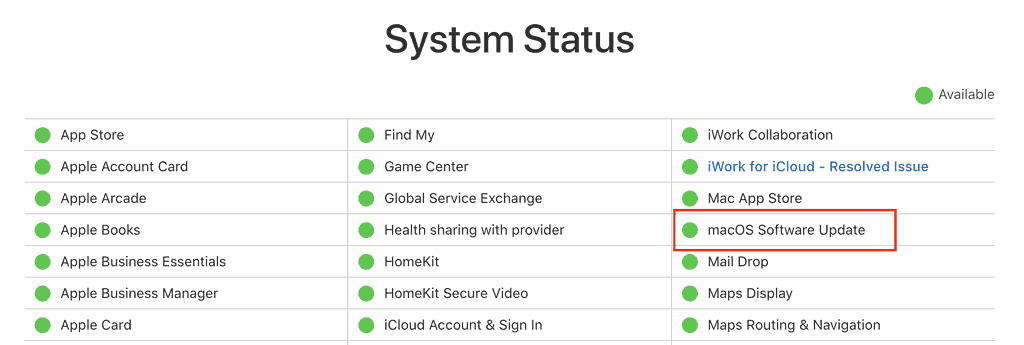
There may be some instances in which Apple’s servers encounter problems while you are downloading the macOS Ventura update. If this happens, the download may get stuck. Check the Apple System Status page to find out if the Apple Server problem is causing the macOS Ventura download issue.
- Go to Apple’s System Status webpage
- Look for macOS Software Update
- Check if the circle next to macOS Software Update is red or green. A green circle means the appropriate Apple service is working fine, while a red circle signifies that Apple is experiencing server problems.
3. Lack of Required Storage Space Causes macOS Ventura Installation Problem
As mentioned, macOS Ventura installation requires storage space. The amount of storage space depends on what version of macOS your machine is currently running. If your Mac is running Sierra or a similar version, macOS Ventura requires at least 26GB of storage space. If you’re running Yosemite and earlier macOS versions, then your Mac would need to spare at least 45 GB of storage space. To check your Mac’s storage space, follow the steps below.
1. Go to System Settings
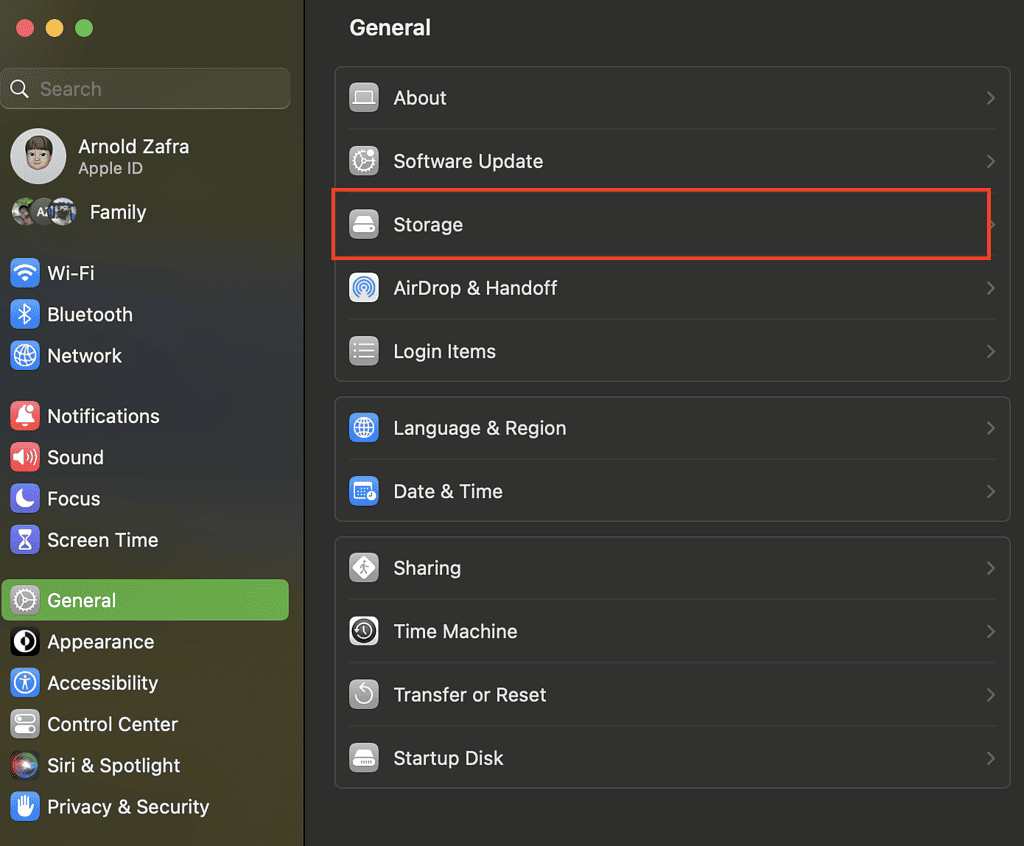
2. Click General from the sidebar
3. Click Storage

It’s always a good practice to have more storage space than the amount required by any software updates. This will help free you of various installation troubles.
If your Mac lacks the required storage space for the macOS Ventura upgrade, you should try to free up storage space. The easiest way to do this is by simply going to Apple Menu > About This Mac > Storage > Manage Storage. Apple’s storage management system will recommend how to free up some space on your Mac.
3. Check the Internet Connection of Your Mac
Another reason why macOS Ventura won’t install could be due to a poor internet connection. During the installation, your Mac should be continuously connected to the internet, so a poor internet connection will definitely affect the update process. Therefore, it would be wise to check your Mac’s internet connection first before proceeding with the macOS Ventura installation.
There’s really no foolproof way of improving your internet connection while installing macOS Ventura. However, you can try troubleshooting any connection issues by following the steps below.
- Restart your web browser
- Restart your Mac
- Position your Mac as close as possible to your router
- Try connecting to the internet using your other devices
- Restart your router
Once your internet connection becomes stable, you can start the macOS Ventura installation, and barring any other issues, your Mac will be able to finish the process without any glitches.
4. Mac Files Corrupting macOS Ventura Download and Install
Junk files on your Mac may also be corrupting the macOS Ventura download and install processes. These junk files could include those left behind by applications you’ve deleted, launch agents, and temporary files that you forgot to delete. You must take care of these files to avoid facing certain macOS Ventura installation problems. One way of dealing with these junk files is by deleting them using third-party Mac file-cleaning software.
You can delete these junk files manually and free up storage on your Mac by:
- Clearing cache files including system, user, and browser cache files
- Removing user log files
- Deleting system log files
- Removing localization files
- Deleting app leftovers
- Deleting unused.DMGs
- Removing large and old files
- Removing Xcode junk files
As a quicker alternative, you can try efficient software, such as Intego Washing Machine, designed to erase junk files, clean caches, and others to keep your Mac optimized. You can download it free, or if you actually want to pay, go for it because it is such a fair price for all the features it has to offer.
5. Other Things That May Cause MacOS Ventura Not to Install on Your Mac
Aside from the reasons preventing macOS Ventura installation mentioned above, there are other things that may be causing the problem. These include firewall settings and outdated macOS versions running on your machine. It would be best to address these problems and try installing macOS Ventura again.
Bonus: After trying the tips mentioned above and macOS Ventura still won’t install, you may try installing macOS Ventura from Recovery Mode. See below to find out how you can install macOS Ventura in recovery mode whether you have an Intel-based Mac or Apple Silicon Mac.
Apple Silicon Mac
Turn on your Mac and continue to press and hold the power button until you see the startup options window. Click the gear icon labeled Options, then click Continue.
Intel-Based Mac
Turn on your Mac and immediately press and hold Command (⌘)-R until you see an Apple logo or other image.
As soon as you see the utility window in macOS Recovery, select Reinstall macOS, then click Continue and follow the onscreen instructions.
There you have it. We hope that following any of the steps described above could resolve the issue wherein macOS won’t install on your Mac. And yes, when you have successfully done it, enjoy the new features of macOS Ventura, including Stage Manager and Continuity Camera.
Yup, 2015 and 16 iMac and a 2013 MacBook Pro. Not gonna happen around our house.
Some might call you fortunate, although I’ve personally had almost no trouble with Ventura. The System Settings app is definitely a step in the wrong direction, but I’m hoping Apple will realize that shortly.