Need some of the best optimization tips for your Mac for smooth performance? Well you’re in luck. When it comes to owning a Mac, one of the best things about the devices is that they typically require very little maintenance. However, there are times where there’s a couple of things users will need to do to make sure that their system is running at its absolute best.
Bearing all of that in mind, I’m going to take a look at some of the best ways you can optimize your Mac to keep things running smoothly. After all, a clean machine is a happy machine, and a happy machine typically makes an even happier user. Furthermore, I’ve done my best to list these in order from easiest to hardest, giving users a starting point towards a cleaner machine. I also make a couple of recommendations concerning apps that can make the entire process far easier. Let’s get started.
Mac Optimization Tips: Basic Tasks
There’s a couple of really basic things you can do before we get into the larger ideas. Many of these are rather simple, though they can be easy to forget from time to time.
- Restart your device.
- Empty your Trash.
- Clear your Downloads folder. Select Files and put them in the Trash or a new Folder.
- Remove unnecessary files from your Desktop. Drag them to a new folder or to the Trash.
- Close apps you are not using.
- Uninstall older apps you are no longer using.
- Update macOS
Right out of the gate, one of the most important things you can do is be sure that macOS is up to date. Considering how often this can be easy to overlook, as an update can take a fair bit of time, making sure that you are running the latest operating system is one of the most basic ways to ensure that you are getting the most out of your device. Keeping up to date is not only important for ensuring that your device stays fresh and clean, but macOS updates also carry vital security updates.
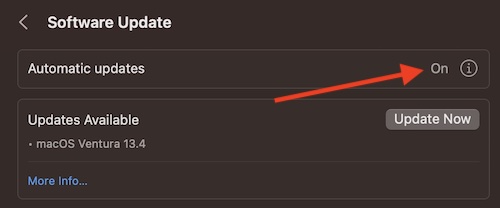
You can always check for a macOS update by going to System Settings > General > Software Update. While you’re there, make sure that Automatically updates is enabled.

Best Mac Optimization Tips: Check Your Apps
If you feel that your device is running a bit slower than normal, be sure to check your Activity Monitor. This handy built-in tool gives you a precise list of apps that are currently running on your device, while also giving you the low-down regarding the amount of resources each app is using. Unless it has been moved, Activity Monitor will be in your Utilities folders.
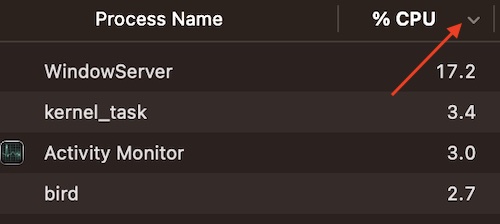
When in Activity Monitor, you’re going to want to look for apps that are using the most of your CPU. You can click the %CPU column to list apps by the amount of power they’re using. You are then able to close an app through Activity Monitor by clicking on the app and then clicking the X in Activity Monitor’s menu bar. The X will be next to the Information button.

Users can also check out this guide on how to optimize their CPU.
Furthermore, while you’re concerning yourself with Apps, it would be a good idea to check all of them for updates as well. You can visit the App Store and select Updates in the left-hand column to see if anything needs an update. Apps not from the App Store will need to be checked separately, likely within the app itself.
Stop Apps on Startup
Ideally, you want as few apps as possible launching immediately upon startup. Having too many apps load right when you login can create potential issues, many of them likely slowing down your device. Ensuring that only the minimal amount of apps load upon startup is a great way to ensure that your Mac is running optimally.
Time needed: 2 minutes
Follow these steps to stop apps from opening on start up:
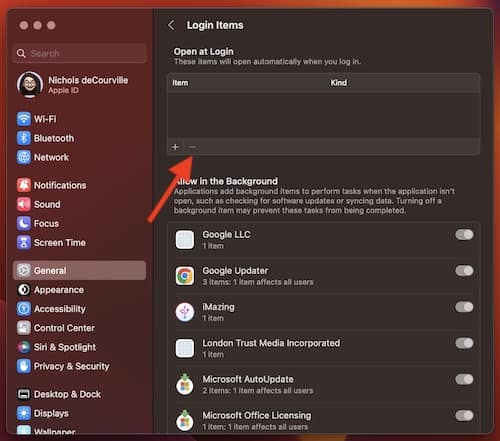
- Go to Apple > System Settings from the Menu Bar.
- Select General.
- Choose the Login Items tab.
- Any app that you do not want there, click on the app, then click the minus (-) button.
Note that older versions of macOS, the steps will be System Preferences > Users & Groups > Login Items. You can follow the rest of the steps, but you will need to click on the Lock and enter your password.
Best Mac Optimization Tips: Check Your Storage
Storage can be a major factor in a Mac running optimally. A good rule of thumb is that users should keep at least ten percent of their hard-drive free to ensure that everything is running as it should. We here at TMO recently posted an article informing users how they can delete duplicate files on their machine, which can be a big help in making sure your device stays clear. For example, you need ten percent of your HD free to ensure that your Mac is running its built-in safeguards. Said safeguards are why users typically do not need to defrag their device.
If you need to, you can always check your storage through the following steps:
- From the Menu Bar, go to Apple > About This Mac.
- Select Storage. Give it a minute to calculate the storage on your device. Once it’s done, you’ll have an idea of how much space is available on your hard-drive.
- You can then also click on Manage to have your device give you recommendations for freeing up space on your device.
Looking at Available Ram
While only certain devices are going to be able to install additional RAM, there’s still some ways all Mac users are able to get the most out of the RAM that they do have. The easiest way to free up the RAM on your Mac is by simply restarting your device. However, just like with your CPU, you can also check your RAM, or Memory, by loading-up Activity Monitor.
Just like how you checked your CPU in the earlier steps above, you can do the same for your Memory on a Mac. All you need to do is load-up Activity Monitor, and then check the Memory column. Just like with your CPU, you can click the top of the column to organize your apps by how much memory they’re using. You can then close these apps by clicking on them and hitting the X.
Check the Health of Your Mac
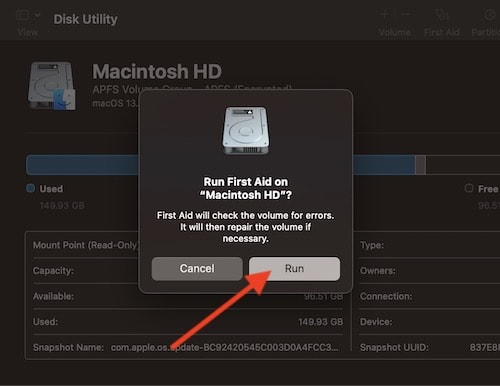
Thanks to Disk Utility, an Apple program that arrives fresh from the box, users can check their hard drive to ensure that it is operating smoothly.
- Open Disk Utility. It is most likely in your Applications > Utilities folder.
- Choose the drive you want to inspect.
- Select the First Aid tab.
- Tap Run. (May be Verify on older versions of macOS.)

From here, if you find any issues, you will need to boot into Recovery Mode to address them. This is because you’ll likely need to boot from a different volume to address these repairs. For Intel Macs, you’ll hold down Command+R during startup. For those sporting an M1 or M2 Mac, you will need to hold down the Power button during startup. You can then run Disk Utility to finalize your repairs.
There’s also options for those running much older Macs. For example, if you have a Mac that’s from June 2013 or earlier, you can run an Apple Hardware Test. Those with an older Mac that’s June 2013 or later can also try Apple Diagnostics. Older Macs also have a Repair Permissions option in Disk Utility. If you have the option, Repair Permissions will be under the First Aid category.
Clear Your Cache
For those not in the know, Macs will use a number of small files, known as Cache, to store information that needs to see multiple uses. While they can increase the performance of a Mac by not having to load certain information over and over, they can eventually accumulate into becoming a problem.
If you want to clear your system cache manually, there is a way to go about doing this. You need to access your cache folder, which is located at ~/Library/Caches. From your Desktop, you can press Command+Shift+G to bring up Go To Folder and then you can type the directions there. Once you find the Cache folder, right-click or Control-click on it and select Get Info. This will let you know how much space your cache is taking up, letting you know if you need to delete it or not. You may also want to look closely at your cache files, as some of them you may want to keep. For example, if you use a program frequently, you may not want to delete the cache for that app.
Additionally, you may want to consider clearing the cache from your browser as well. For those using Safari, I have a guide available.
Use a Third-Party App
While you can go through any or all of the above steps, I would recommend going through a third-party app to accomplish all of this for you. If you are really concerned with the performance of your Mac, or you have a ton of files that you really don’t feel like sifting through, I would highly recommend purchasing or finding an app that can accomplish the same things with much quicker speed.
Personally, I would recommend Washing Machine Secure X9 by Intego. This tool will do a great job ensuring that your device stays clean. If you’re interested in keeping your Mac clean and don’t feel like doing any of the work, I would highly recommend checking out the benefits of Washing Machine which definitely can save you some time down the road. You can also check the App Store to see if anything catches your fancy, but again choosing this app will be the best decision when talking about boosting your Mac’s overall performance.
Clean Device for Cleaner Living
At the end of the day, keeping your Mac clean can be hard work. These are just some of the better tips when it comes to optimization and your Mac. Just like anything else in the world, your system may start to wear down and corrode if you don’t perform routine maintenance. While this guide provides several ways you can keep your Mac clean on your own, there are options to help you with these processes as well. At the end of the day, users obviously want a machine that’s working optimally for them, and following these suggestions will get your Mac on the right track.
If you’ve got issues, we more than likely have answers. For those that are really trying to clean their Mac system, you can also check out our guide on how to spot and remove malware on your Mac device. If you find yourself getting stuck during a macOS install, we have a solution for that as well. While wanting to cry out to Mother Mary in times of trouble may seem like the right thing to do, finding the right solution typically works far better.

