Believe it or not, there are iPhone owners who have never backed up their devices since the day they started using them. Either they don’t see the need to do it or they don’t know how to back up their device. So, if you want to know how to back up your iPhone, this guide will walk you through the various backup methods that you can perform.
How to Backup iPhone to iCloud
The first way that you can back up your iPhone is through Apple’s cloud storage service, iCloud. Before you do so, ensure you have enough storage space on your iCloud account. Even if you have the free 5GB iCloud account, you can still back up your iPhone. You just need to select the files that you can back up and not the entire contents of your device. For instance, you may opt not to use iCloud Photos to backup photos on your iPhone. Still, it would be better if you have an iCloud account with an upgraded storage plan.
Time needed: 1 minute
Follow the steps below to backup your iPhone to iCloud.
- Connect your iPhone to your Wi-Fi network. Wi-Fi connections should be stable while the backup process is going on.
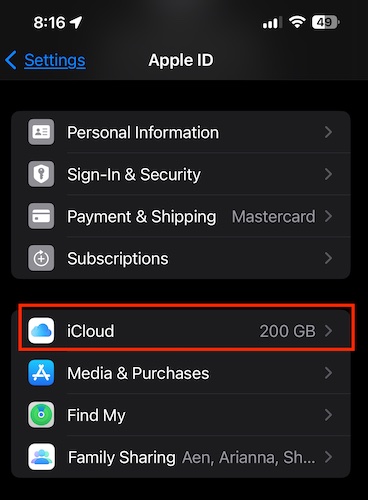
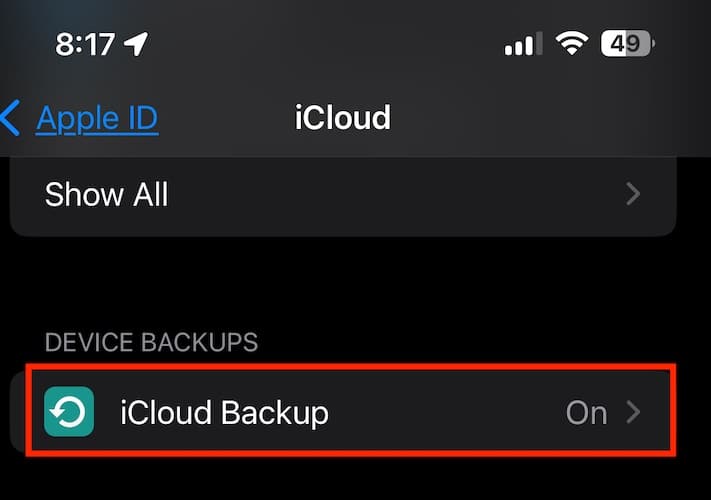
- Go to Settings, then tap your Apple ID > iCloud.
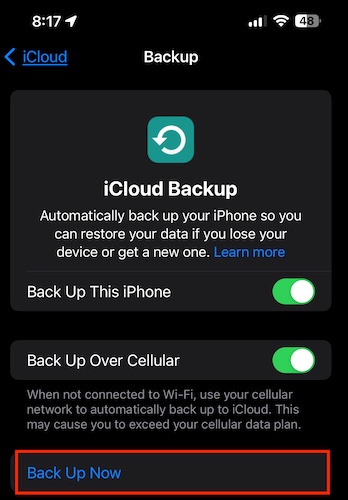
- Next, toggle the iCloud Backup switch.
- Tap Back Up Now to start the process of backing up your iPhone to iCloud.
If you don’t want to manually back up your iPhone to iCloud, you can toggle the iCloud selection at the top of the iCloud Backup page. Ensure that your iPhone is charging and connected to a Wi-Fi network. Of course, you must also ensure enough storage space on your iCloud account. Once this is set, your iPhone can do automatic backups.
How to Back Up iPhone to Mac
Another way of backing up your iPhone is through the Finder app on your Mac. Follow the below steps to backup your iPhone to your Mac.
1. Connect your iPhone to your Mac using the USB cable.
2. Launch the Finder app and locate your iPhone.
3. Check the Encrypt local backup checkbox. This will require you to provide an encryption password.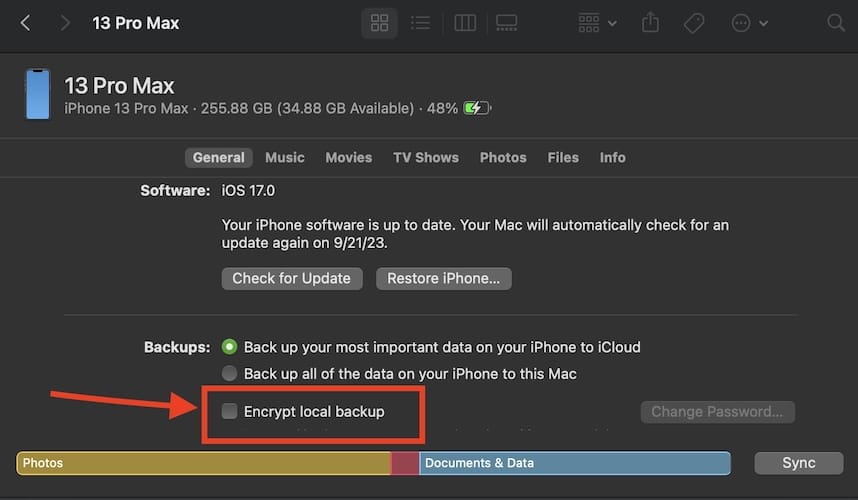
4. Click the Back Up Now button.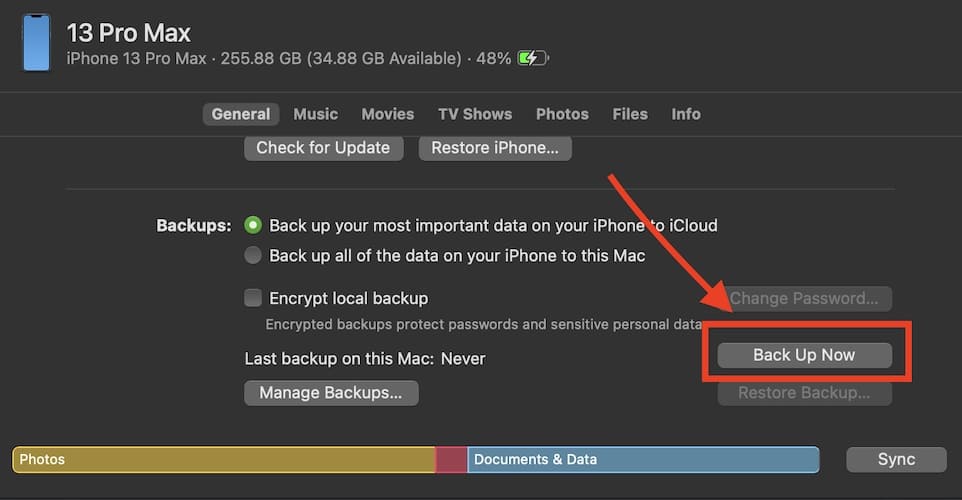
5. Wait for the backup process to finish, and then you’re done.
How to Back Up iPhone with iTunes on a Windows PC
For those who are still using a Windows PC, another backup option is to use iTunes. Follow the steps below to backup your iPhone with iTunes on your Windows PC.
1. Install the latest version of iTunes on your PC.
2. Connect your iPhone to your computer and wait for iTunes to open automatically.
3. If prompted, tap Trust to connect your iPhone to your PC.
4. Select your iPhone in iTunes, and the Summary page will show up.
5. Click either iCloud or Trust this computer under Backups.
6. Click Back Up Now to start the backup process.
What if you don’t have iTunes on your Windows PC? Can you still back up your iPhone? The straight answer to that question is yes. You can back up your iPhone on your Windows PC using third-party software, such as iMazing, Acronis Backup, or FoneTool.
Using third-party software is the only backup solution if you want to back up your iPhone on your PC without using iTunes.
How Long Does It Take to Backup an iPhone?
There is no exact time to back up an iPhone. The duration of the backup process depends on three things:
1. How full your iPhone storage space is. As much as possible, delete or don’t back up video content.
2. The model of your iPhone, including its storage capacity.
3. The iOS version that is currently running on your iPhone.
Conclusion
Now that you know the simple steps of backing up your iPhone, we hope that you will make it a practice to do regular backups of your iPhone. This task may seem trivial but you’ll never know its importance if you haven’t experienced your iPhone crashing before. Having an updated backup of your iPhone would ensure that your digital life will immediately continue if in case your iPhone crashes. With an updated backup, you can immediately restore the content of your previous iPhone using the backup file in case you’re replacing your device with a new one. But remember that the iPhone restore process will depend on how much storage you’ve used up on your previous iPhone.
The funny thing us, that I might consider doing almost the opposite: backing up iCloud to something local.
For those interested:
I’m currently using some 40 out of 200 GB of iCloud. Some 20 GB of that consists of back-ups of 6 iOS devices in use (and probably some obsolete ones), The rest is used by data: some 10 GB by photos, the rest by documents and other data. I have set my macOS devices to offload to iCloud. (Small numbers, but my primary storage is in cross-platform clouds.)
“The iPhone is so well-made, stable and reliable that it almost seems like it doesn’t need to be backed up”.
Well, there is an exception to that, and it is when the iPhone internal storage is almost full. Then, catastrophic events may happen, losing precious data, since there is not a product like DiskWarrior for iOS to repair and prevent that.