The Handoff feature allows you to transfer FaceTime calls from your iPhone to your Mac or iPad and vice versa. Moreover, apart from FaceTime calls, you can also answer cellular calls on your Mac or iPad. Sounds interesting, doesn’t it? Read along to learn how to use Handoff to transfer FaceTime calls from one Apple device to another.
How To Use Handoff To Transfer FaceTime Calls Between iPhone, iPad, and Mac
Handoff lets you start a task on your Apple device and continue working on it from any other Apple device. It has several uses, but we’re focusing on how to use Handoff to transfer FaceTime calls from iPhone to Mac and vice versa.
While Handoff is a comparatively old feature, the ability to transfer FaceTime calls was recently added with iOS 16, iPadOS 16, and macOS Ventura update. Therefore, ensure that your iPhone, iPad, and Mac are running on the aforementioned software version or above.
Also, all of these devices should be using the same Apple ID in order to transfer FaceTime calls from one device to another. Lastly, please ensure that you enable Wi-Fi and Bluetooth on all of these devices to prevent connectivity issues.
Enable Handoff on iPhone, iPad and Mac
Once you ensure that your devices meet all the requirements, the next step is to enable Handoff on iPhone, iPad, and Mac. The process to do so is quite similar on most of these devices. Therefore, read along to learn how to enable the Handoff feature on iPhone, iPad, and Mac.
Time needed: 2 minutes
Steps to enable Handoff on iPhone, iPad and Mac
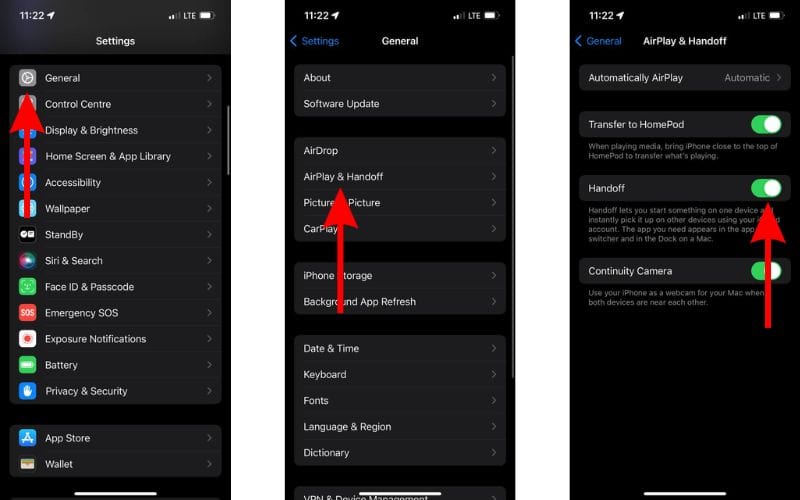
- Open the Settings app on your iPhone or iPad and head to the General option.
- Tap the AirPlay & Handoff option and then enable the Handoff toggle on the next screen.
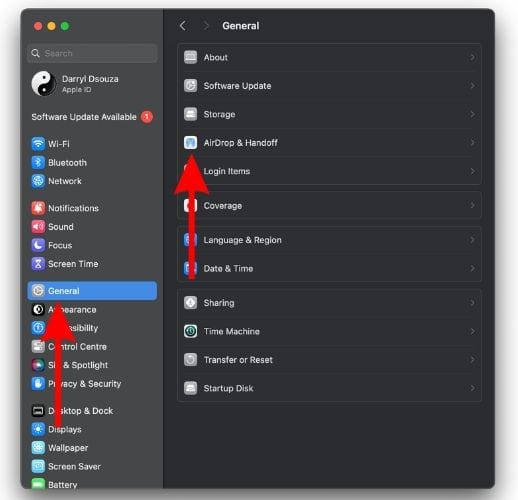
- Similarly, open System Settings on your Mac.
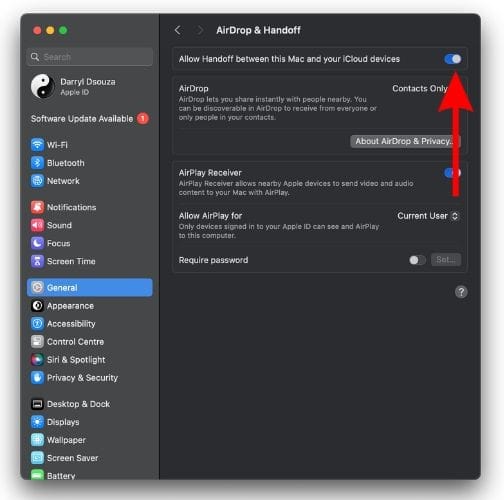
- Click the General option and then select the AirPlay & Handoff option.
- Finally, enable the Allow Handoff between this Mac and your iCloud devices toggle.
And, done. You’ve successfully enabled Handoff on your iPhone, iPad, and Mac.
Transfer FaceTime Calls From iPhone or iPad to Mac via Handoff
If you’re on a FaceTime call with someone on your iPhone, you can easily transfer the call to your Mac. The process is fairly simple if your device meets the requirements and you’ve enabled Handoff on all your devices. If you haven’t, follow the steps mentioned above. With that said, here’s how to transfer FaceTime calls from iPhone to Mac.
- Click the FaceTime icon in the menu bar on your Mac.
- Then click the Switch button that displays the contact with whom you’re currently on a FaceTime call. This will direct you to the FaceTime app on Mac.
- Now, click the Join button located at the bottom left corner. Select or unselect the Mic and Video buttons if you would like to mute or unmute either.
- You have successfully transferred the FaceTime call from iPhone to Mac.
Handoff FaceTime Calls From Mac to iPhone or iPad
MacBooks are typically lightweight and portable, however carrying them around while on a call might not be very convenient. That is when the ability to transfer a FaceTime call from a Mac to an iPhone or iPad becomes extremely useful. While many might find Apple products expensive, their value in terms of such features makes them worth it. Here’s how to Handoff FaceTime calls from Mac to iPhone or iPad.
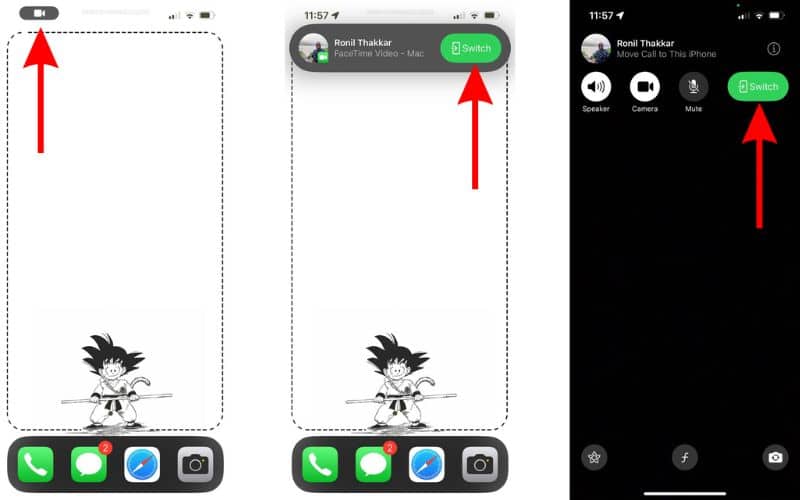
- Unlock your iPhone and tap the FaceTime icon at the top left corner. You can also swipe down from the top left to access the Notification Center and then tap the “FaceTime Video – Mac” notification.
- Next, tap the Switch button in the pop-up and it will redirect you to the FaceTime app.
- Here, tap the Switch button at the top right again and it will transfer the FaceTime Call from your Mac to your iPhone.
How To Transfer iPhone Cellular Calls to Other Apple Devices
Did you know that you can make or answer cellular calls on your Mac? Yes, calls you receive on your iPhone, can be answered on nearby devices such as iPad, Mac, etc. Your device must be running on iOS 9, iPadOS 13, macOS X 10.10, or above.
Make sure that Wi-Fi and Bluetooth are enabled on both the iPhone and Mac, iPad, etc. Also, this feature will only work if both (or all) devices are using the same Apple ID.
Enable Allow Calls on Other Devices
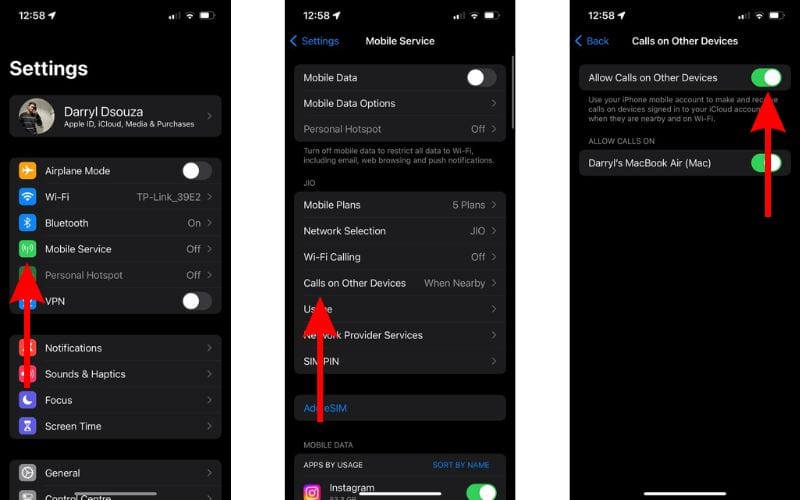
Now that all the requirements are met, follow the steps mentioned below and enable the Allow Calls on Other Device feature on iPhone.
- Open the Settings app on your iPhone.
- Tap the Cellular/Mobile Service option.
- Tap the Calls on Other Devices option.
- On the next screen, enable the Allow Calls on Other Devices toggle. Here, you can also enable toggles for respective devices using the same Apple ID.
How To Make or Receive Calls Through iPad or Mac
If you meet the requirements and enable the previously mentioned settings, you can answer and make cellular calls from your iPad or Mac. When you do so, the device will make or answer the call on your iPhone too. So, you must ensure that both these devices are in close proximity.
How to Make Cellular Calls on Mac
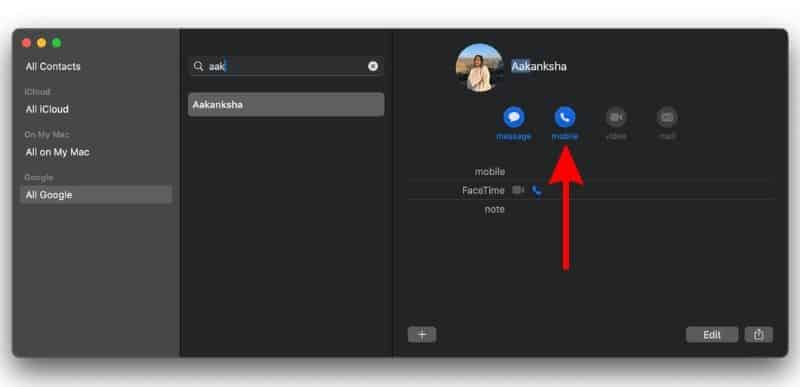
- Open the Contacts app on your Mac and search for the contact you want to call.
- Click the Mobile option to place a call.
- The Mac will place a call using your iPhone and it will display a notification at the top right.
Receive Cellular Calls on Mac
- Whenever you receive a call on your iPhone, if it is near your Mac, a notification will appear.
- Just click the Accept option in the notification to answer the call and continue the conversation on your Mac.

Conclusion
The reason so many people across the globe love Apple products is because of their top-tier ecosystem. The convenience features offered are abundant if you buy into their ecosystem (iPhone, iPad, Apple Watch, Mac, etc.). Wouldn’t you love to answer calls on your Mac, or use the double tap gesture on the Apple Watch to answer calls?
We hope this article helped you learn how to transfer FaceTime calls from iPhone to Mac and vice versa. We also included the other feature which allows you to answer or make cellular calls through your Mac or iPad so that you can make the most of Apple’s ecosystem. If you have any doubts, please let us know in the comments below.
