There have been several reports from users who encountered the error message, “Erase Assistant is not supported on this Mac.” Those users were trying to use the Erase Assistant as a prelude to restarting or factory resetting their Mac. If you encounter the same problem and wonder what’s causing it, there are several possible culprits. Let’s talk about the Erase Assistant tool, who can use it, when to use it, and how to fix an “Erase Assistant is not supported in this Mac” error.
What Is Erase Assistant and Who Can Use It?
Erase Assistant is a new feature that Apple introduced in macOS Monterey. If you are familiar with the Erase All Content and Settings in iOS, Erase Assistant performs the same function, but on your Mac. The tool helps you securely erase all of your Mac’s settings, data, and apps without uninstalling your current macOS. Simply put, it factory resets your Mac.
Why Am I Getting ‘Erase Assistant Is Not Supported on This Mac’?
What’s important to note here is that Erase Assistant only officially supports Apple Silicon and Macs with a T2 Security Chip. Owners of these Mac models can use Erase Assistant to reset their computers to factory settings. Unfortunately, owners of Intel-based Macs that lack the T2 Security Chip won’t be able to use this feature. You will have to use Disk Utility to erase all contents and settings on your Mac.
How Does Erase Assistant Work and Why Do I Need to Use It?
If you’re selling your Mac or giving it to someone, you should make it a point to erase all information contained on the computer so that the next owner can’t access or use it. These could include your bank information, personal data, Apple ID, Touch ID, accessories you’ve used, Apple Wallet information and Find My & Activation Lock. After using Erase Assistant on your Mac, your machine will be in an out-of-the-box state without any of your sensitive data remaining.
How To Use Erase Assistant
Before using Erase Assistant or erasing all contents and settings on your Mac, make sure to back up your data first. You can use Apple’s Time Machine or Acronis for this purpose, but there are also other backup solution you can always rely on. Then you can follow the steps below to erase all contents and settings on your Mac.
Time needed: 5 minutes
To access the Erase Assistant utility, follow these steps.
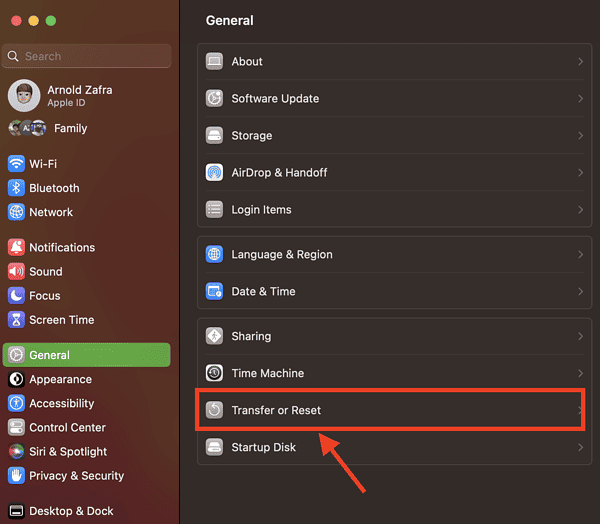
- Go to System Settings > General. If your Mac is running macOS Monterey or earlier, this will be located in System Preferences.
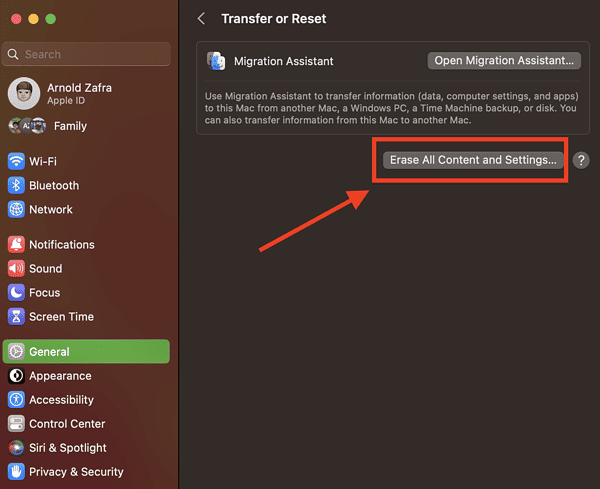
- Click Transfer or Reset > Erase All Content and Settings.
- You can choose to use Migration Assistant to help transfer your data to another computer. Migration Assistant can guide you through transferring your data to another Mac, a Windows PC, a Time Machine backup or an external disk.
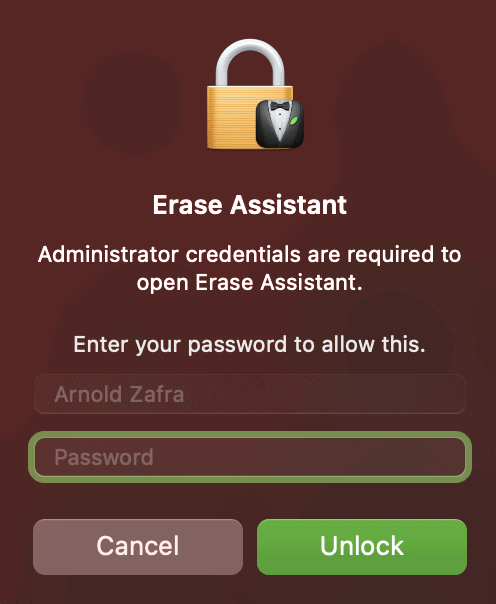
- Enter your Admin Password to unlock Erase Assistant, then click Unlock.
- Click Continue to confirm the removal of all settings, media and data.
- If asked, log out of your Apple ID account and choose Continue.
- Click Erase All Contents and Settings to proceed.
After these steps, your Mac will restart and display a black screen. You can then turn off your Mac, leaving it in its out-of-the-box state without setting it up. This is recommended if you are selling or giving away your Mac. If you are just starting fresh with your Mac, follow the onscreen instructions to set up your computer.
Resolving ‘Erase Assistant Is Not Supported on This Mac’
So what if, after knowing the ins and outs of the Erase Assistant tool, you encounter an error message saying that “Erase Assistant is not supported in this Mac?” Unfortunately, there’s no way of fixing this error if you own an Intel-based Mac lacking a T2 Security Chip. You can, however, still erase all the content and settings on your Mac.
You may refer to this support document outlining the procedures on what to do before you sell, give away, or trade in your Mac. Apple suggests ways to erase your Mac and reinstall macOS. Another method is to use the Disk Utility app to wipe your Mac’s hard drive and then reinstall macOS.


