When it comes to being able to split a track in GarageBand, doing so is rather easy, even on Mac, iPad and iPhone. Being able to split a region from a track is crucial for anyone working with audio. Whether you’re building a podcast, a music album or an audio book, the ability to split tracks is going to be crucial for editing. Of course, understanding how this is best utilized is also important.
As someone who has a bit of experience with recording, I can tell you that while learning how to split a track is rather easy, getting it perfect is an entirely different beast altogether. With that in mind, I’m going to explain what being able to split a track actually means, how you can do it as well as some tips for perfecting this skill.
How Do You Divide in GarageBand?
When it comes to splitting tracks and regions in GarageBand, you are only able to divide tracks from a piece of audio that is separate from another. What I mean by this is that if you are looking to say, remove the vocals from one of your favorite songs, that’s not really what splitting a track entails.
Essentially, splitting a track is for building and editing audio within tracks in GarageBand, not pulling audio away from an already completed audio file. In this sense, splitting a track is for editing purposes. Splitting regions and tracks is for removing unwanted sounds, or for isolating a certain segment for copy and pasting purposes.
Some Things to Know
Within GarageBand, users are able to split a region within the Tracks area, while also being to use these split segments for different spots within their track.
For those that implement MIDIs, splitting a MIDI region will cause any notes at the split point to become shortened to that point. If any note that is split within a MIDI region overlaps any other notes by more than 1/16 a note, a dialog box will appear. It will ask if you want to keep, shorten or split the notes.
For those that are editing a podcast, you will likely not have to worry about MIDI files, unless you plug-in any within the podcast itself. MIDI files are typically for electronic music. If you are unsure of what they are, you are probably not going to be using them.
How Do You Split a Track in GarageBand Mac?
With that in mind, those that need to split up a region into multiple segments can easily follow some steps to accomplish this. After following these steps, users will have a track that is split into various segments.
Time needed: 1 minute
How to split a region within a track for GarageBand on Mac.
- Go to the Tracks area of GarageBand on Mac. Then select the region or regions that you want to split.
- Move the playhead to a point where you want the region to split.
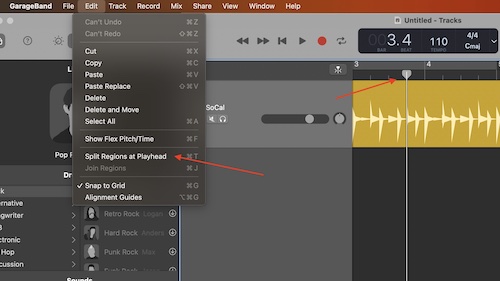
You then have two options: You can select Edit > Split Regions at Playhead from the Menu Bar.
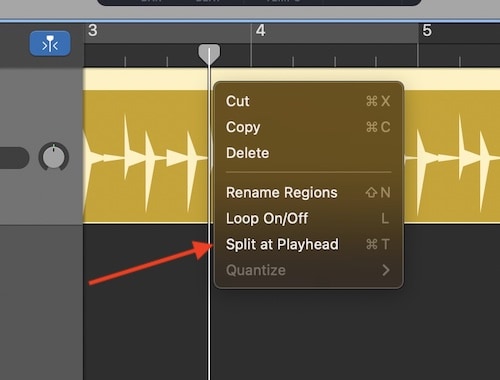
- You can also Control-click a selected region and choose Split at Playhead from the shortcut menu.
Users can also select the area using the Playhead and press Command-T on their keyboard.
Users should know that only the selected region is going to split into two regions from the selected Playhead point. Even if a track is below the playhead, only the selected area is split. Multiple selected regions that are under the Playhead will be split.
How Do I Split a Track in GarageBand iOS and iPadOS?
Of course, users are also able to split regions within tracks using GarageBand on iOS as well. While the iOS version of GarageBand isn’t nearly as powerful of an editing tool as the Mac counterpart, it still offers plenty of functionality. Those producing music may want to eventually switch over to a desktop version of GarageBand, but those recording podcasts and music demos should feel right at home.
Note that these steps are the same for both iPhone and iPad.
To split a region in GarageBand on iOS, simply follow these steps:
- Tap a region to select it.
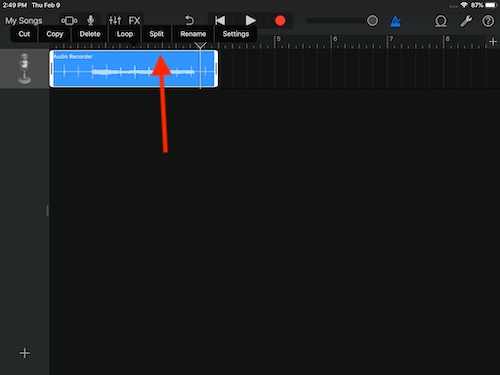
- Give the region another tap, and select split.
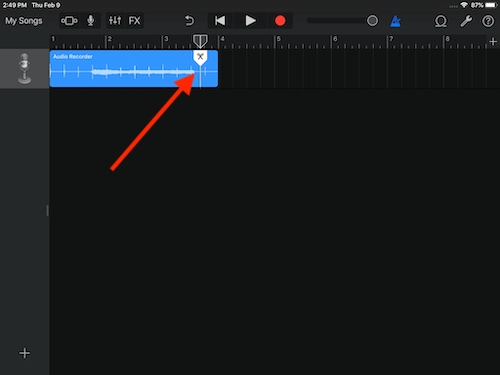
- You will then see a Split marker (featuring a pair of scissors) to the left or the right of where you want to split the region.
- Drag the Split marker down.
If you are looking to cancel the split, tap anywhere outside of the region before dragging the Split marker down. - Users can also make multiple splits by moving the Split marker to different areas of a region and drag-down the marker at each point.
Using these methods, a user is easily able to split regions within a track. An important thing to remember with splitting tracks is that it does take a bit of precision. If this is your first time splitting a track, it’s not that surprising if it takes you a couple of tries to get it exactly how you like it. The undo button is probably going to be your friend here.
Zoom is Your Friend in GarageBand
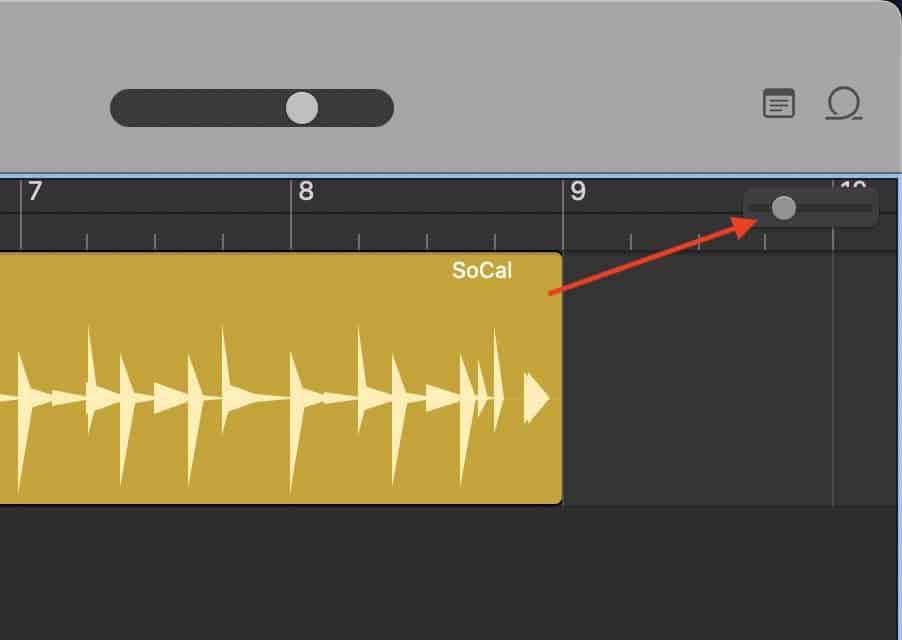
Another nice thing to remember when it comes to splitting a track is that you are able to zoom in and out on your tracks. This can make the region easier to split, as it can give you more of a detail on where you want to position the Playhead.
- In GarageBand for Mac, the Zoom function is in the top-right corner. You can drag it left or right to zoom in and out of the Track.
- Within GarageBand for the iOS, simply use two fingers on each side of the are to pinch and zoom. Kind of like if you were zooming in on a photo, though on a slighter larger scale.
Personally, I would really recommend making sure that you get used to the Zoom feature before splitting your tracks. Zooming in on the sound file will give you a better understanding of where you need to split the track. Once you gain some more experience, you will likely be able to eyeball where you need to perform the split. It may also be helpful to know how to disable the Continuity Mic on your iPhone when using GarageBand on Mac.
Conclusion
Being able to split tracks is an absolute necessity when it comes to editing any sort of audio track. For musicians, it can help remove unwanted space, or could potentially even remove particular notes and sounds you don’t want or need. For those recording a podcast or even an audio book, being able to split a region within a track is crucial for editing out dead-air or mistakes.
While it may take some practice splitting a region within a track, practice does make perfect. Again, the zoom feature is really going to be your friend, and don’t feel discouraged if it takes you multiple tries splitting your track exactly where you want it. Regardless, have fun when using GarageBand, and ensure you follow this tip to get the best sounding audio you can from your tracks.
