Poor system performance can be frustrating. I use my Mac daily, and struggling with a slow MacBook is challenging. Our increasing reliance on devices in today’s digital age often results in an accumulation of files, data, and software versions, which can degrade system performance. Join me as we delve into managing and deleting old software and file versions on MacBooks.
Why Should I Delete Old Software Files
You should delete outdated software files to optimize your Mac and boost its performance. The benefits of removing them encompass freeing up storage space, enhancing device functionality, bolstering security, minimizing system clutter, conserving vital system resources, and making troubleshooting more straightforward. If you want to minimize the effort of doing that, we suggest you try a reliable macOS cleaner. There are a few cleaner options on the market, but we suggest you try the Intego Washing Machine app because it will optimize the system instantly.
Preliminary Steps To Take Before Deleting Old Software Files and Versions
Before you commence cleaning up your Mac’s old software files and versions, you should take some precautionary steps to ensure the safety of your valuable data. Here are the key preliminary actions you should consider:
- Backup your essential data: The cardinal rule before any major file deletion operation is to back up your essential data. While deleting old software files and versions is generally safe, there’s always a risk of accidentally removing something important.
- Check for license information: If you have software that requires a license or activation key, ensure you have this information saved or accessible. Some software may need reinstallation or reactivation after deleting old versions.
- Organize your files: Before diving into software cleanup, take a moment to organize your files. Move important documents, photos, and other data to clearly labeled folders, making it easier to distinguish between essential files and clutter.
How Do I Delete Old File Versions on My Mac
1. Via Software Update
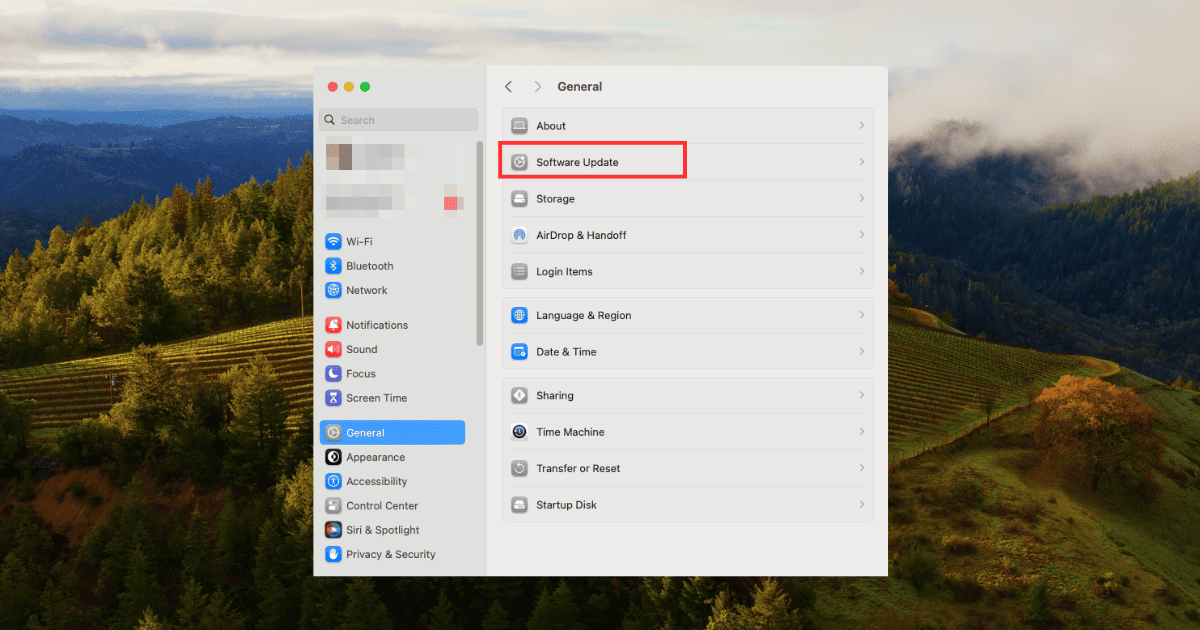
Updating your Mac’s software brings new features, and security enhancements and helps manage and remove outdated software update files. To delete old versions of files on Mac go to Apple Menu > System Settings > General > Software Update.
Time needed: 2 minutes
To delete old versions of files via Software Update, do the following:
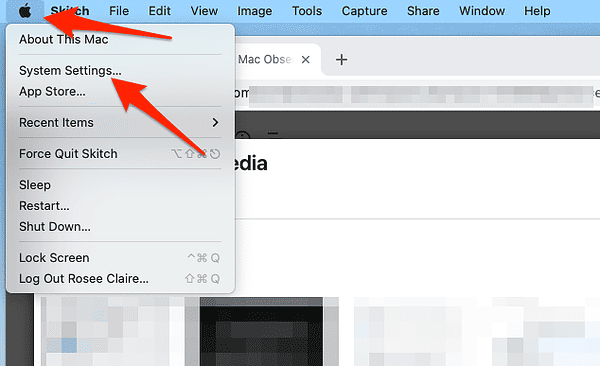
- Go to Apple Menu > System Settings.
- Next, go to General > Software Update.
- macOS will check for available updates and present a list of available updates. Simply click Download and Update.
- After the updates are installed, your Mac may require a restart. Be prepared to save your work and restart your computer.
By regularly using the built-in Software Update feature, you not only keep your Mac’s software current but also remove previous versions, ensuring a cleaner and more optimized system.
2. Via Mac Terminal
Using the Terminal to manage and delete files can be a powerful method, but it comes with risks. Improper use of the Terminal can lead to data loss, system instability, or even damage to your Mac. It’s crucial to exercise caution and follow instructions carefully.
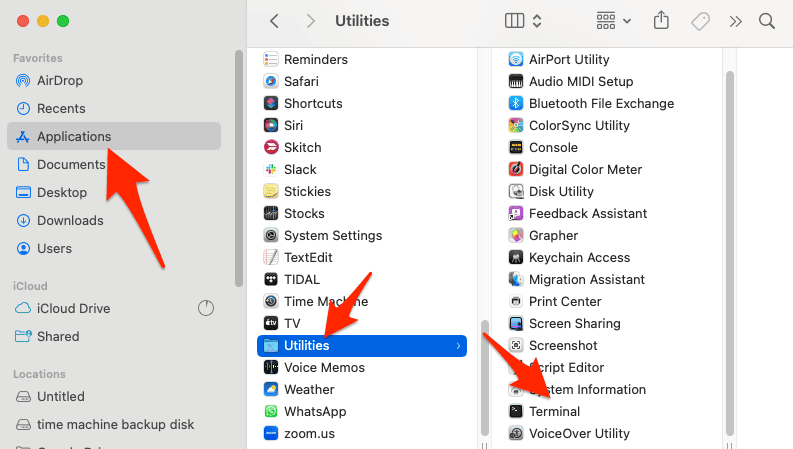
- To launch Terminal on Mac go to Applications > Utilities > Terminal, or use Spotlight Search (Command + Space) and type Terminal.
- To delete the macOS Ventura Update File, type:
sudo rm -rf Install\ macOS\ Ventura. app/ - To delete the macOS Monterey Update File, type:
sudo rm -rf Install\ macOS\ Monterey. app/ - To delete the macOS Big Sur Update File, type:
sudo rm -rf Install\ macOS\ Big\ Sur.app/ - You will be prompted to enter your password and the update file will be deleted instantly.
3. Through the App Store
The App Store on your Mac does more than offer new applications; it also helps you manage and remove old updates efficiently. Here’s how to locate and delete old updates using the App Store:
- Open Apple menu > App Store.
- Click the Updates tab to see available updates.
- Look for apps that have updates listed ( they have Update next to them) but are already updated to the latest version. These are the updates you can delete.
- Click the Update button next to the app with the old update. macOS will verify the app’s current version and notify you that you already have the latest version installed.
- After confirming that you have the latest version, the App Store will remove the old update from the Updates tab. This effectively deletes the old update files from your system.
4. From the Library
Another method to delete old software files and updates on your Mac involves manually navigating to the Library folder and directly deleting the files. While this method provides more control, it should be approached with caution to avoid accidental deletions. Here’s how to perform this task:
- Click the Finder icon in your Mac’s dock or use the Command + N keyboard shortcut to open a new Finder window.
- Click the Go menu > Go to Folder.
- In the dialog box, type /Library/Updates and click the Go button.
- Inside the opened folder, you’ll find various subfolders related to your system and installed applications. Browse for old software or updates to delete.
- Right-click on files to Move to Trash or drag to the Trash icon.
- Afterward, empty the Trash to permanently get rid of the files.
5. Deleting Software Update Installation Files
If you found a macOS software update installation file that you earlier downloaded, you can delete it to free up some storage on your Mac. There are two ways to do it.
Method 1: Using Finder
- Open Finder and in the Finder window, go to the Go menu on the menu bar at the top of your screen and select Applications.
- Look for the software update file in the Applications folder and move it to the trash folder by right-clicking on it and selecting Move to Trash.
- Empty the Trash to permanently delete the file.
Method 2: Using Launchpad
- Open Launchpad.
- Locate the macOS software update file.
- Press and hold the Option key until an X button appears.
- Click the X and the file will disappear.
How To Delete System Data on macOS
System data on macOS contains vital components, including the operating system, core files, and cached data crucial for your Mac’s performance. While manual deletion can risk system stability, you can still optimize your device by removing non-essential elements like old Time Machine backups and outdated software updates.
Can I Delete Install macOS Monterey?
Yes, you can delete the Install macOS Monterey file. This 12GB file from the App Store aids in installing macOS Monterey but doesn’t house the operating system itself. Deleting it only means sacrificing 12GB and potentially re-downloading it if needed later. This holds true for other versions of Install macOS files as well. For step-by-step deletion guidance, refer to Jeff Butt’s guide.
Additional Tips and Information
In addition to the methods mentioned earlier, here are some additional tips and information to enhance your Mac management and optimization experience:
1. Uninstalling an iOS Update on a Mac
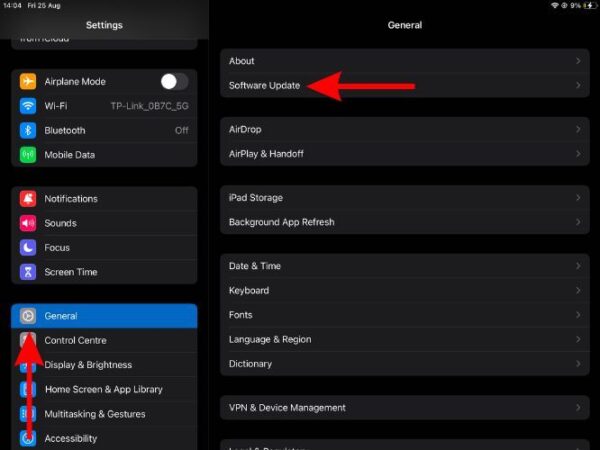
If you’ve downloaded an iOS update using your Mac, you can uninstall it. Connect your iPhone or iPad to your Mac, open Finder, select your device from the sidebar, and click General in the device window. There, you can select and delete the downloaded iOS update file.
2. Is It Safe To Delete Update Files?
When deleting update files, it’s generally safe to remove old software updates, temporary files, and cached data. However, exercise caution when using Terminal or manually navigating to system folders, as deleting critical system files can harm your Mac’s functionality. Stick to well-documented paths and folders to avoid accidental deletions.
To find reliable guidance for deleting system files or system data on your Mac, refer to this article on fixing huge system data
3. Keeping Your Mac Optimized: Regular Clean-Ups and Updates
Optimizing your Mac isn’t a one-time task, it’s an ongoing process. Make it a habit to:
- Regularly clean up cluttered files, old applications, and cached data.
- Keep your macOS up-to-date to benefit from performance enhancements, security updates, and bug fixes.
- Monitor your storage space to ensure you always have sufficient free space for your Mac to run smoothly.
- Consider using maintenance apps or built-in utilities like Disk Utility to verify and repair disk errors.
Conclusion
And that’s a wrap! I love to hear from you all, so feel free to share your experiences, tips, or challenges related to Mac optimization, in the comments below. Also, don’t miss out on future Mac-related tips and tutorials.


“I admit that every time I use them, I always try to put them back in the case the wrong way. You’d think I’d get used to it, but so far, nooooooope!”
They should be color coded red and green like the running lights on a ship. ?
I am impressed with how light in weight that they are, how well they stay in place, and the sound is very good for such a device.
You make me smile, Lee. 🙂
Glad you got your AirPods! I admit that every time I use them, I always try to put them back in the case the wrong way. You’d think I’d get used to it, but so far, nooooooope!
A pretty good tip!
“maybe you’ve got one version of a Pages document where you wrote “My boss is a stupid jerk-face” 500 times before you wised up and erased it. I know I’ve done that myself! ”
Same here, but before we were using personal computers. I would write the scathing report to get it out of my system, then shred that document. Once that was done I would write the diplomatic report.
Sidebar: My Airpods were delivered yesterday! Two weeks before the initial estimated delivery date and two days before the date on the shipping notification. I like them very much and am pleased with the purchase. The one improvement I would like to see is the orientation of the ear pieces in the charging case, I would want them rotated 180° so that they are easier to grasp and remove; the lid gets in the way.