Installing new macOS versions on a Mac is typically expected to be simple and uncomplicated. However, there are occasions where unforeseen challenges may arise, causing the installation to deviate from the intended path. What are the steps to resolve issues encountered when macOS installation becomes stuck? Keep reading to find out, it’s easy!
General Fixes for macOS Install Being Stuck
Try these tips one by one to fix your macOS install getting stuck woes:
1. Check Your Internet Connection
A poor internet connection could be the reason your installation is taking so long. To fix this, here are a few things you should try:
- Make sure your device is close to the router.
- Turn WI-FI on and off.
- Change your Wi-Fi connection.
- Restart your Mac.
2. Check Apple’s System Status
Apple occasionally experiences server issues; hence, it’s worth taking a moment to check the system status. To do this:
- Go to Apple’s System Status page.
- Locate macOS Software Update in the list to see if there are any issues.
3. Turn Off and Turn On Sleep Mode:
Please note that downloads won’t continue if your Mac is in Sleep Mode. Therefore, ensuring that your Mac remains turned on to download the update successfully is vital. Here’s how:
- Select the main Apple menu > System Preferences > Battery.
- Select Battery from the left-hand list and toggle the setting for “Turn the display off after” to “Never.” You may switch it back to your preferred settings when you are done with the installation.
4. Remove System Junk
Temporary, corrupt, or broken files can interfere with Mac’s performance. Removing this clutter from your system with a reliable tool like Intego Washing Machine can give it the needed boost to perform otherwise simple tasks such as downloading and installing an operating system.

Intego Washing Machine
Increase your Mac performance and delete all malfunctioning and build-up files.Steps to Resolve macOS Ventura Install Stuck
If macOS Ventura is taking forever to install, try these tips one-by-one to fix the issue:
1. Consider External Storage
Sometimes, freeing up space on your Mac may prove to be very challenging. It may feel like you need every file on the system, and there is simply nothing to delete. If this is the case, you should consider getting an external storage device.
2. Install in Safe Mode
Installing the Ventura update in Safe Mode is a very effective way to solve the macOS Ventura stuck issue. To do this for Intel-based Macs:
- Shut down your Mac from the main menu.
- After about 10 seconds, switch it back on while pressing down the Shift key.
- As soon as you see the login window, release the key.
For Macs with Apple silicon:
- Shut down your Mac from the main menu.
- After about 10 seconds, switch it back on while pressing down the Shift key.
- As soon as you see the login window, release the key.
- Select “Macintosh HD” (startup disk).
- Hold down the Shift key, then press Continue and release the key.
3. Optimize Mac Storage
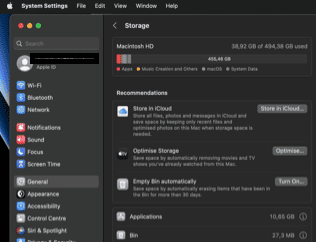
Apple has a native, built-in storage optimization tool, which is a great way to free up space on your Mac.
Time needed: 1 minute
To manage your storage, follow these steps:
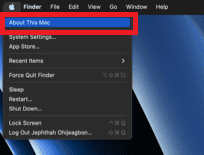
- Click on the Apple menu and Select About This Mac
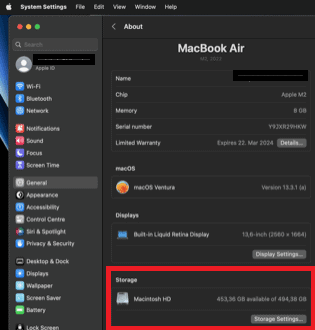
- Click on Storage
- In the sidebar, click on Recommendations.
- Follow the on-screen instructions to enable a recommendation.
What to Do If Your macOS Monterey Install Gets Stuck
It may happen that the best solution to fix macOS Monterey taking forever to install is to be a little patient. Keep in mind that the installation process can take a significant amount of time. So, instead of panicking, simply wait or occupy yourself with other activities. However, if there is still no progress after a considerable amount of time, it’s time to take action.
1. Restart Mac to refresh the macOS Monterey update
Manually restart your Mac. This will cancel the installation of the update, and you will need to restart the update process. The software update will resume from where it stopped, but it’s likely to finish the update faster than if you did not restart the system.
2. Disable FileVault on Mac to solve macOS install taking forever
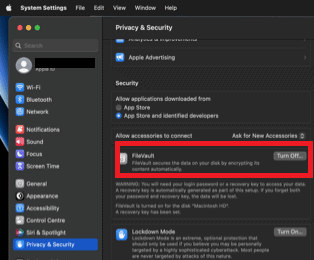
FileVault is a powerful security feature integrated into Mac to identify and combat unauthorized data access. However, this tool can sometimes interfere with the update process, and you may need to turn it off to successfully install macOS Monterey. To do this:
- Navigate to the Apple menu on the home screen and click on it.
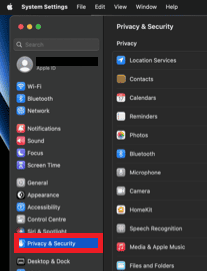
- Select System Settings.
- Click on Privacy & Security.
- Navigate to FileVault tab. and select Turn off.
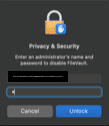
- Fill in the administrator name and password, and click on Unlock button.
- Update the system and check if the issue persists.
3. Update macOS Monterey in Safe Mode
To do this, follow the steps listed and explained under the “macOS Ventura Install Stuck” section (install in safe mode). You may also want to try re-downloading and installing macOS Monterey.
macOS Sierra Install Stuck
Here are the fixes to try if your macOS Sierra install is stuck.
1. Reinstall macOS in Recovery Mode
Reinstalling macOS in recovery mode ensures that you install Sierra without losing any data, ensure you choose the best macOS version. To do this:
- Restart your Mac and hold down Command + R to boot your Mac into recovery mode.
- Restart your Mac once again while holding down Command + Option + R to enter Internet Recovery mode.
- Choose “Install a new copy of macOS” and wait until the installation is complete.
2. Reset NVRAM and SMC
If the above steps have failed, you can try resetting NVRAM and SMC as a last resort. NVRAM is a section of your Mac that deals with computer memory. It stores data like screen resolution and volume settings.
To reset NVRAM, hold down Command + Option + P + R for about 20 seconds during the startup process. Similarly, to reset SMC, hold down Shift + Control + Option on the left side of the keyboard, and press the power button at the same time. Additionally, remember to back up your important data before attempting any troubleshooting steps.
If you’ll like to see more fixes, click here to view some tips provided by Andrew Orr.
macOS Catalina/Mojave Install Stuck
After downloading macOS Catalina or Mojave, it often happens that your Mac may get stuck when installing the new OS. Follow the steps below to fix macOS Catalina taking forever to install:
1. Check Your Mac’s Compatibility
A major reason why macOS installation gets stuck on estimating time remaining is that it’s not fully compatible with the requirements of macOS Catalina/Mojave for your Mac. You need to check the requirements of the new macOS and ensure that it’s compatible with your Mac version.
2. Check Your Available Storage Space
A lack of sufficient storage space is another common issue that Mac owners face when installing macOS Catalina/Mojave updates. Remember that macOS Catalina/Mojave requires a significant amount of storage space.
Because of this need for ample storage space, Apple recommends having at least 20 GB of free disk space on your MacBook to install these macOS versions effectively. To check your Mac’s available storage space:
- Go to the Apple Menu.
- Navigate to About This Mac > Storage.
3. Install macOS Catalina or Mojave in Safe Mode
If you’re experiencing installation issues, try installing macOS Catalina or Mojave in Safe Mode. This can help bypass any conflicting software or drivers. Refer to the “macOS Ventura Install Stuck” section on this page and follow the steps listed to install macOS Catalina or Mojave in Safe Mode.
Reinstall macOS From ‘macOS Recovery’ Option
If the installation is still stuck, you can try reinstalling macOS from the “macOS Recovery” option. This allows you to perform a fresh installation without losing your data. Refer to the “macOS Sierra Install Stuck” subheading and follow the steps listed to reinstall macOS Catalina or Mojave from “macOS Recovery” option.
Frequently Asked Questions
There can be several factors responsible for macOS taking a long time to reinstall. The most prominent factors include device storage space, compatibility issues, and network problems.
Ideally, it takes about 45 minutes to reinstall macOS. It’s important to ensure that you have a stable internet connection and that you are using the latest version of the software. Additionally, remember to back up your data before starting the reinstallation process.
If macOS gets stuck on terms and conditions or estimating time remaining during the installation process, you can take the following steps to Fix macOS Install Stuck: restart your Mac, free up storage space on your Mac, perform a clean install, reset the NVRAM, use recovery mode to reinstall macOS, install the operating system from an external drive.
If you encounter issues during the installation of macOS Big Sur, try the following steps:
Shut down your Mac. Hold down the Option + Command + P + R keys for about 20 seconds.
Wait until your Mac restarts and then attempt to reinstall macOS Big Sur.
Conclusion
Dealing with macOS install getting stuck can be a challenging situation. It is crucial to approach the issue with patience and explore the various avenues for resolution listed earlier. If you do, you will successfully overcome this deeply annoying installation obstacle and successfully complete the process.
Would you like to be more informed about the best macOS version for your Mac? Check out Jeff Butts’s advice on how to choose the ideal version for your Mac here.

The problem I’m having is the install freezes on my iMac (2010 27″) for ANY installer I try. I can manage to get 10.8 or 10.9 to install, but anything newer (straight-up El Capitan or High Sierra, patched Catalina or any OpenCore patched releases) hang somewhere around 30% in (sometimes more, but never past 50%). I’ve even tried installing Fedora 39 (from USB as well as from DVD) and that ALSO hangs around the 30% mark.
I’ve tried upgrades from a running 10.8 (hangs as above) or from a fresh/unpartitioned disk. I’ve swapped in an SSD, have brand new memory, and an upgraded processor, cleaned the dust out of everything, still no change.
It seriously looks like this is a parts machine now (except for the mainboard, which is obviously c(ar)p at this point). At least at this point the pieces I’ve bought can be reused elsewhere, from here I’d have to buy iMac-specific parts I couldn’t repurpose.
Nice!