The Finder app is probably the most used and abused built-in tool on Mac. I could not imagine any Mac owner who has not used the Finder app for various purposes. Although not immune to troubles, the app definitely does what it was meant to do. However, some folks still encounter various issues when using the Finder app. If you’re one of them, here are some quick fixes to Mac Files not showing on Finder error.
Use the Powerful Finder Search Engine
In case you’re not aware (which means you’re not using it), the Finder app comes with a powerful built-in search function. If you haven’t noticed it, you can find the search on the top-right corner, when you open the Finder app.
So, if you’re looking for a file, you can simply type its name on the search bar. If the Finder app can’t find it, check the search parameters. Make sure that you set the correct search parameters so that the Finder search function can properly find it.
Time needed: 1 minute
Follow the steps below to check the search parameters of the Finder app on your Mac.
- Open the Finder app, then click on the search bar at the top-right corner of the screen.
- Click on the + button beside the Save option.
- Select the correct parameter, then click on the search conditions.
- Type the corresponding conditions to limit the search result.
Relaunch the Mac Finder App
For those who use the Finder app heavily, you may not notice it but doing so can affect your Mac’s performance rendering it a bit sluggish and less responsive. Once those happen, you may encounter the issue of Mac files not showing on the Finder app.
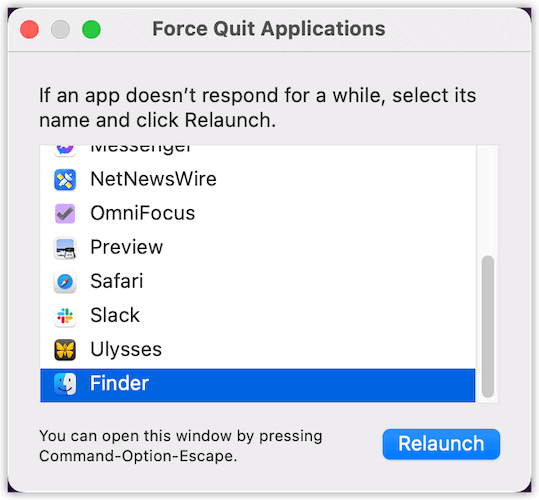
To fix the issue, try relaunching the Finder app. Follow the steps below to do so.
- Press Command + Option + Esc keys at the same time.
- Scroll to the bottom of the window that pops out.
- Select Finder, then click Relaunch.
- Launch the Finder app again.
Show Hidden Files on Your Mac
In case you’re not aware, Apple intentionally hid some types of files on your Mac. This is Apple’s way of ensuring the safety of your machine. But then, you may need to find these hidden files to check whether they are causing your Mac to malfunction, including its inability to show files. So, you cn try showing the hidden files temporarily. Follow the steps below to do so.
- Launch the Finder app.
- Navigate to Macintosh HD, then click Home.
- Press Command + Shift + . (dot).
All hidden files on your Mac are now visible.
An alternative way of showing hidden files on your Mac is by using Terminal. See the steps below on how to show hidden files.
- Open Terminal.
- Type the script below:
$ defaults write com.apple.Finder AppleShowAllFiles true
$ killall Finder
Final Words
When the Finder app fails to show hidden files on your Mac if you need to unhide them, the troubleshooting steps above can quickly fix the issue. There’s really no reason why your Mac won’t show all files on your Mac. Well, that is of course, unless you intentionally hide files to make sure that no one can find them.


