After a long week, you’re ready to relax and enjoy some videos saved on your iPhone from YouTube and other sites. You settle in, hit play, looking forward to a chill time, but quickly notice the audio isn’t matching up with the video. It’s not just one clip; many saved videos have the sound coming in too early or too late. We’ll cover why this happens and how to fix it, so you can get back to enjoying your videos the way they were meant to be seen and heard.
Why Is My Audio and Video Out of Sync on My iPhone?
Audio and video not syncing up on your iPhone can happen for a few reasons, like software glitches in apps or the operating system, network problems causing disruptions due to unstable internet or congestion, app-specific issues where bugs or compatibility problems mess with playback, and the iPhone’s processing limits getting hit hard by high-definition videos or complex audio tasks. These factors can all lead to the frustrating experience of audio and video falling out of sync.
Fix iPhone Saved Videos Not in Sync With the Audio
When encountering audio out-of-sync issues while saving videos to the photos app on your iPhone, it’s important to explore various solutions to address the problem. This is because there may be various factors responsible for the issue. To fix audio out-of-sync issues when saving videos on your iPhone, you can try the following solutions:
1. Update Your iPhone’s iOS Installation
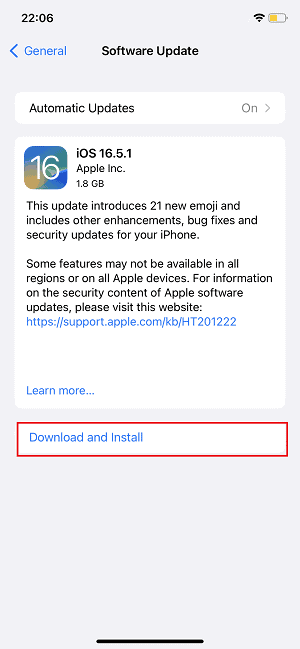
Keeping your iPhone’s operating system up to date is crucial. Software updates often include bug fixes and improvements that can specifically target and resolve audio sync problems. By ensuring your iPhone is running the latest version of iOS, you increase the likelihood of resolving the issue. To update your iPhone’s software, follow these steps:
Time needed: 10 minutes
Steps to update your iOS installation to the latest available version.
- Ensure that your iPhone has enough battery power or connect it to a power source before initiating an update. This will prevent your device from powering down during the update process.
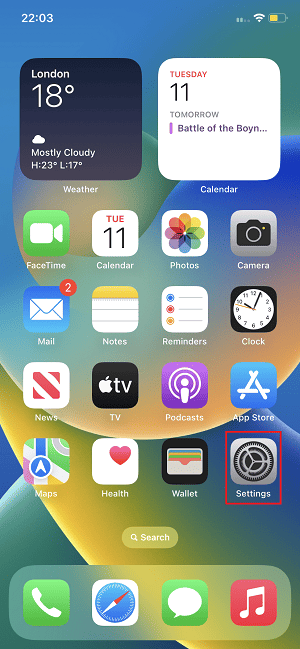
- Locate the Settings app on your iPhone’s home screen and tap on it to open.
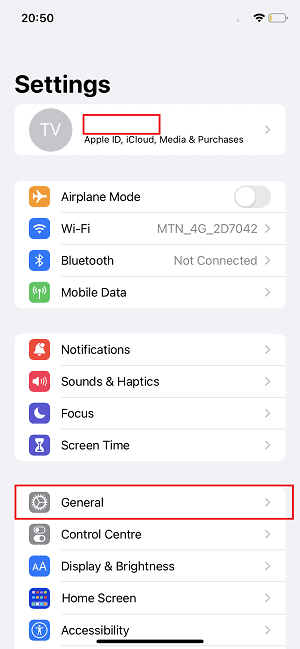
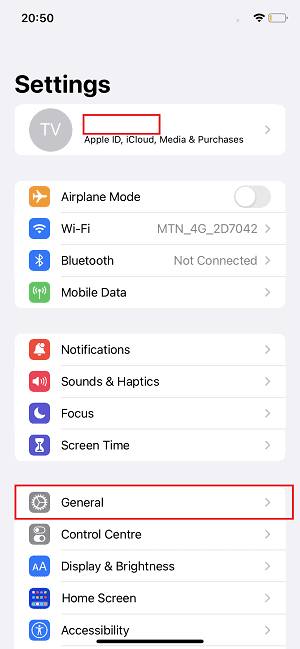
- Next, scroll down and tap on General in the Settings menu.
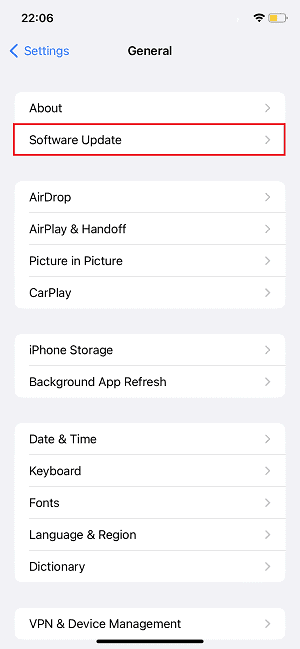
- Look for the Software Update option and tap on it. Your iPhone will now check for available updates.
- If an update is available, tap on Download and Install. You may be prompted to enter your passcode or verify your identity using Touch ID or Face ID.
- The download time will depend on the size of the update and the speed of your internet connection. Once the download is complete, tap on Install. Your iPhone will restart and begin the installation process.
Please note that the typical time required for this process ranges between 8 to 20 minutes. The duration may vary based on the manufacturing date of your iPhone.
2. Restart Your iPhone
Restarting your iPhone can be an effective way to address temporary glitches that may affect audio-video synchronization. By restarting, you give your device a fresh start, closing all running applications and clearing temporary memory. This action can help reset various software components, including those involved in audio playback, potentially resolving the video audio sync problem.
3. Use a Different Video Editing or Conversion App
If you consistently experience video audio sync issues when saving videos with a specific app, it’s worth trying an alternative video editing or conversion app. Different apps may handle audio-video synchronization differently, and using a different app might provide better results.
4. Trim or Cut the Video
Using a video editing app provides you with the flexibility to select the exact sections where the audio appears to be out of sync. You can precisely trim or cut those portions, ensuring that the remaining content maintains proper synchronization. By eliminating the problematic segments, you essentially remove the underlying cause of the video audio sync issue, resulting in a video where the audio and visuals are harmoniously aligned.
5. Contact the App Developer or Support
If the problem persists and is specific to a particular app, reaching out to the app developer or support team can be helpful. They may guide you on resolving the video audio sync issue or release an update that addresses the problem.
Fix for Video Audio Sync Issues in Adobe Premiere Pro
In this case, the source videos shot on an iPhone play well, but when editing them in a video editing tool, the video and audio become out of sync. If you’re facing a similar issue in Adobe Premiere Pro, you can follow these steps to resolve the problem:
1. Check Project Settings
When encountering audio-video sync issues while editing videos in software like Adobe Premiere Pro, check the project settings. The project settings in your editing software should align with the settings of your video and audio files. Mismatched settings between the project and media files can often lead to synchronization problems.
To address this, carefully review and compare the project settings in your editing software to the properties of your video and audio files. Ensure that the frame rate and sample rate of the project match those of the media files you are working with. If there are disparities, make the necessary adjustments in the project settings to align them.
2. Adjust Timeline Settings
When facing audio-video sync issues during video editing, it is essential to examine and adjust the timeline settings within your editing software. The timeline settings dictate how the clips are played back and displayed within the editing interface. Ensuring that these settings align with the project settings is crucial to maintaining proper synchronization between the video and audio elements.
To adjust timeline settings, carefully review the timeline settings in your editing software and compare them to the project settings. Pay close attention to parameters such as frame rate, sample rate, and time base. If there are discrepancies between the timeline settings and project settings, it can result in video and audio being out of sync.
3. Sync Manually
Manually aligning the audio and video tracks can be an effective solution if the automatic sync feature fails to provide accurate results. By taking control of the synchronization process, you can precisely match important moments or utilize reference points to align the audio and video tracks.
To sync manually, carefully examine the audio and video tracks and identify key moments that can serve as synchronization points. These moments can include visual cues like claps, gestures, or prominent actions that generate sound. By selecting these moments as reference points, you can align the audio and video tracks more accurately.
4. Clear Cache and Render Files
Clearing the cache and rendering files in your editing software is a recommended step to address audio-video sync problems. When editing videos, the software generates cache and render files, which store temporary data used for playback and rendering. Over time, these files can accumulate and potentially lead to sync issues if they become corrupted or outdated.
By clearing the cache and rendering files, you essentially remove the stored temporary data and replace it with fresh data. This can help resolve synchronization problems by ensuring that the software is using up-to-date information for both the audio and video components of your project.
5. Update Your Software
Updating your video editing software is an important step in addressing video audio sync issues. Software updates typically include bug fixes and improvements that specifically target and resolve synchronization problems. By installing the latest version of your editing software, you can take advantage of these updates and enhance the performance and stability of your editing process.
Software developers regularly release updates to address known issues and introduce enhancements to their products. These updates may be optimizations to the audio-video synchronization algorithms or fixes for specific sync-related bugs. By keeping your software up to date, you ensure that you are working with the most recent improvements and solutions provided by the developers.
6. Restart Your iPhone
Restarting your iPhone can be a useful troubleshooting step to address temporary video audio sync issues. By restarting, you essentially give your device a fresh start, allowing it to clear any lingering temporary data or processes that may be causing the sync problem. Here are the steps to restart your device:
- Open the Settings app on your iPhone; represented by a gear icon. Scroll down and tap on General.
- In the General settings menu, scroll to the bottom and tap on Shut Down.
- After your iPhone has shut down completely, wait for 30 seconds, then press and hold the side button until you see the Apple logo.
- Release the side button and let your iPhone start up. Note that it may take a few moments for the Apple logo to appear.
Your iPhone will now restart, and you should have a fresh start to potentially resolve any temporary issues, including video audio sync problems.
7. Try Another Device
If you continue to experience playback problems and video audio sync issues with a specific device or software, it may be worth trying your project on an alternative device or using different editing software. Sometimes, compatibility issues or technical limitations can cause synchronization problems on certain devices or within specific software environments.
By trying your project on an alternative device or software, you can assess whether the video audio sync problem remains consistent or if it is resolved. This information is valuable in troubleshooting and determining the underlying cause of the sync issue.
If the problem disappears when using a different device or software, it indicates that the initial device or software may have limitations or compatibility issues affecting synchronization. You may also want to check here for more tips in the Adobe support community.
For further reading, check out what to do if there’s no video sound in the VLC Media Player app on iPhone, iPad, or Mac.
