After the release of iCloud Mail in 2011, millions of iPhone owners have enjoyed having an iCloud email address for several reasons. Some have applauded iCloud email addresses for their ability to back up important files with free 5GB memory while helping owners synchronize data across several devices. Others are more fascinated by the extra layers of security it offers with its two-factor authentication and the 28-digit recovery key.
Regardless of why you are looking to create an iCloud email address, I will take you through an easy-to-understand way of creating an iCloud email address on iPhone, PC, and Mac. I will also open your eyes to an array of benefits you will derive from having an iCloud email address.
Why Choose iCloud Email?
Here are the benefits of iCloud Email Services:
1. Support for All Apple Devices
Do you have several Apple devices? It would be nice for you to create an Apple ID with an Apple-supported iCloud email address. This will create a seamless digital interaction between all your Apple devices. When you have a notification in your email, you will be alerted across several devices. You can also synchronize your iCloud email across several devices, both Apple devices and non-Apple devices like your Windows PC.
2. Several Security Layers
If hackers have ever hijacked your email, you will know the importance of having an email with an extra layer of security aside from the conventional password and username protection at the login stage. The two-factor authentication security layer can be turned on for your iCloud Apple ID account, and it will guarantee that you are the only one with the ability to access your account.
Alternatively, you also generate a 28-digit recovery key that will serve as an extra layer of security for your iCloud account. This is a level of email security that can never be rivaled. Who can successfully guess a 28-digit alphanumeric code? To learn more about these extra layers of security from one of our guides on generating a recovery key, click here.
3. User-Friendly Interface
iCloud emails are easy to use. After signing in, you will see the features arranged in a way that is convenient for everyone. The web interface hands you the opportunity to seamlessly enjoy access to iCloud sync email, contacts, calendar, and several amazing features with a click. The user interface is compatible with every type of browser.
4. Free Spam Filter for iCloud Email Owners
Having an endless bunch of spam emails giving irrelevant notifications every minute can be tiring. However, the iCloud spam filter ensures that spam messages do not regularly find their way into your inbox. Admittedly, no spam filter is perfect, but you can also select messages, mark them as spam, and send them to the folder for junk emails.
How To Create an iCloud Email Account on an iPhone, iPad, or iPod Touch
Time needed: 3 minutes
Here is how to create an iCloud email account on iPhone or iPad.
- Go to your Settings app on your iPhone or iPad.
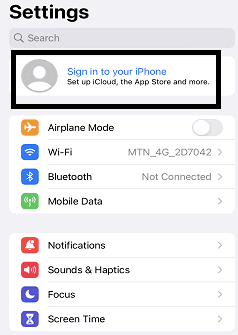
- Tap Sign in to your iPhone or tap your profile picture.
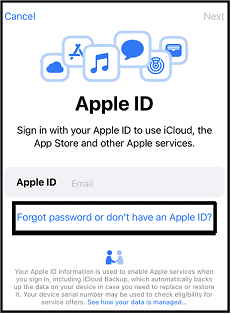
- Tap Forget Password or Don’t Have an Apple ID.
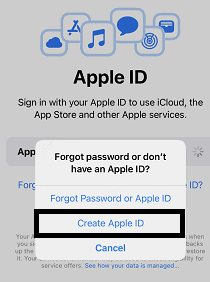
- Tap Create Apple ID.
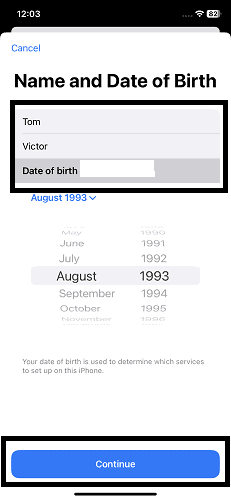
- Input your first name and last name.
- Enter your date of birth and tap Continue.
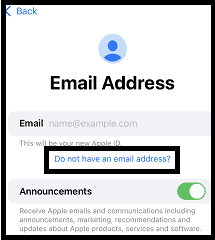
- Tap Do Not Have an Email Address?
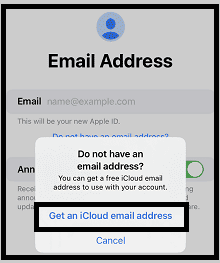
- Tap Get an iCloud Email Address.
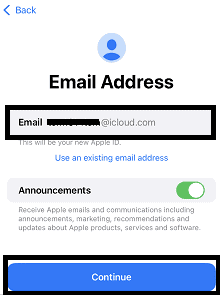
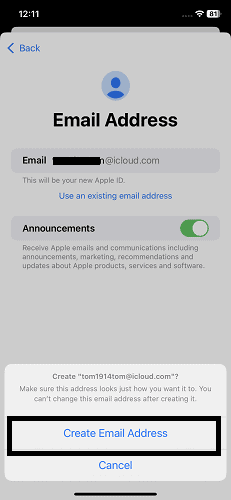
- Enter your new Apple ID and tap Continue.
- Tap Create Email Address. That’s it. You have successfully created an iCloud email address.
How To Create an iCloud Account on macOS
You can also create an iCloud account on MacBook. However, the process depends on the macOS version you are dealing with.
How To Create an iCloud Account on macOS Ventura 13.3 or Later Versions
- Click the Apple logo icon at the top left corner.
- Click System Settings or System Preferences in older versions.
- Click Sign in at the top left sidebar.
- Click Create Apple ID and follow the on-screen instructions. It’s easy.
How To Set up an iCloud Email Account on a Windows PC via Outlook
- Search for Microsoft Store in your Windows search bar, and click Microsoft Store.
- Type iCloud in the Microsoft Store search bar and click the iCloud app. Alternatively, you may click here.
- Click Get to download your iCloud app.
- Wait for the iCloud App to download, and click Open.
- After opening the app, sign in with the iCloud email and password you created on Apple devices like iPhones, iPad, iPods, or MacBooks.
- A verification code will be sent to your phone number. If you input it correctly, you will be granted access to your iCloud account on your PC.
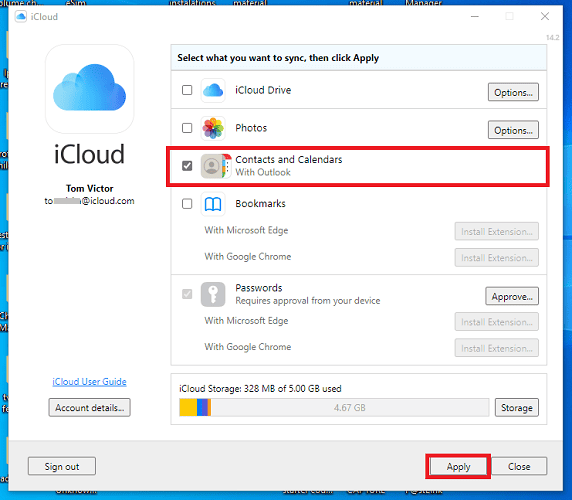
- Select the Contact and Calendar option and click Apply.
- Go to https://appleid.apple.com/.
- Sign in with your iCloud email and password.
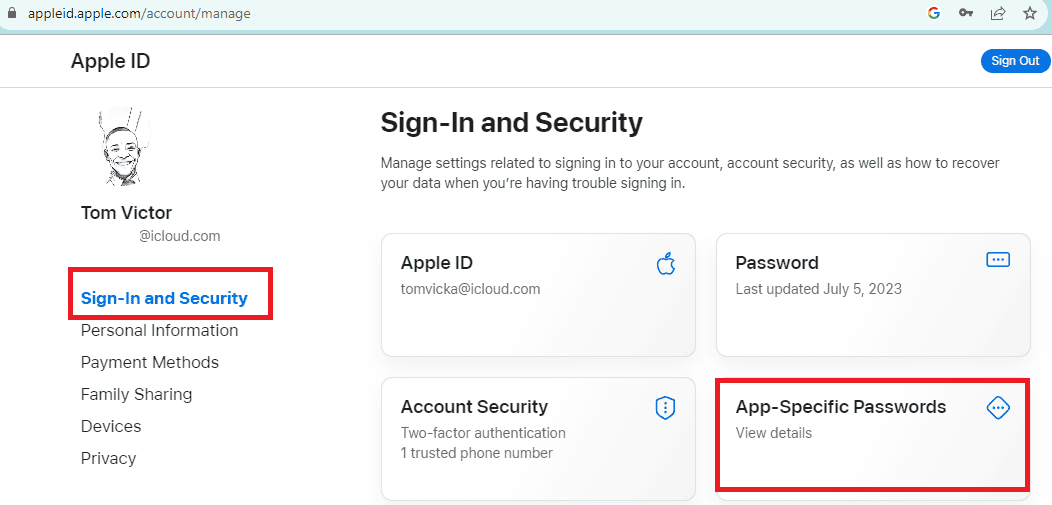
- Locate Sign-In and Security at the left sidebar and click the app-specific passwords.
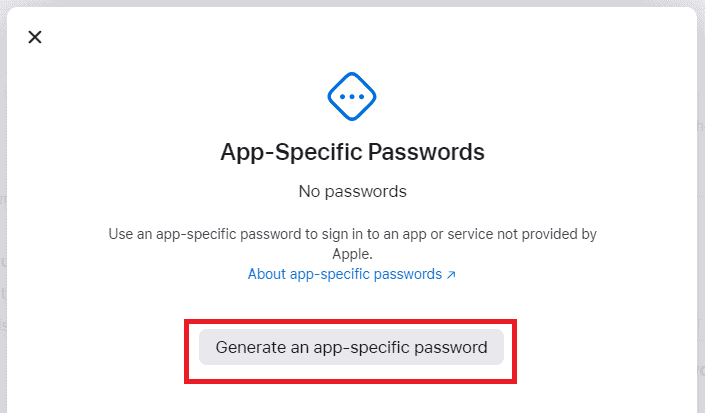
- Click Generate an app-specific password.
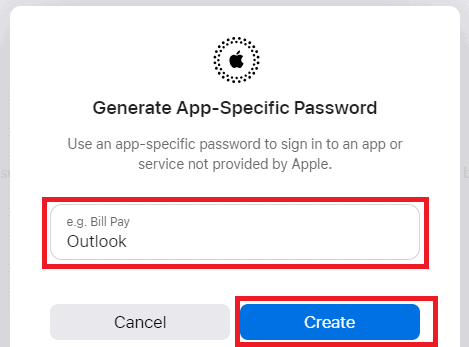
- Type Outlook as a label for the password you are looking to generate. Click Create.
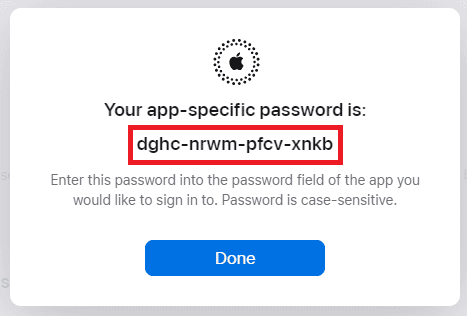
- Copy and save the generated password, and click Done.
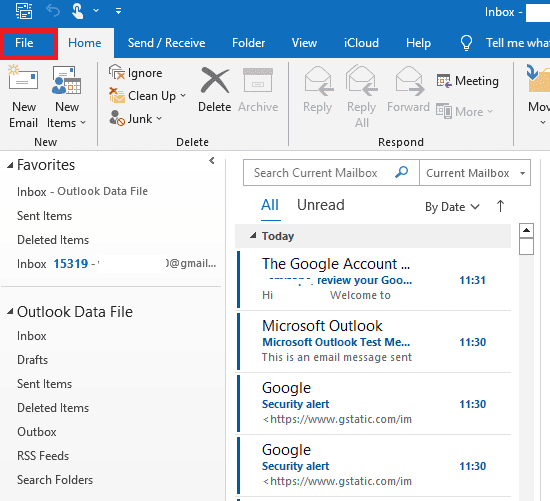
- Go to your Outlook app and click File.
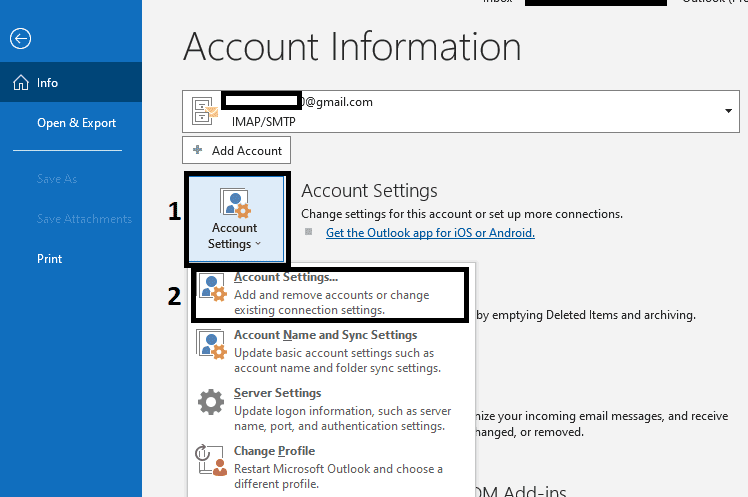
- Click Account Settings.
- Select Account Settings.
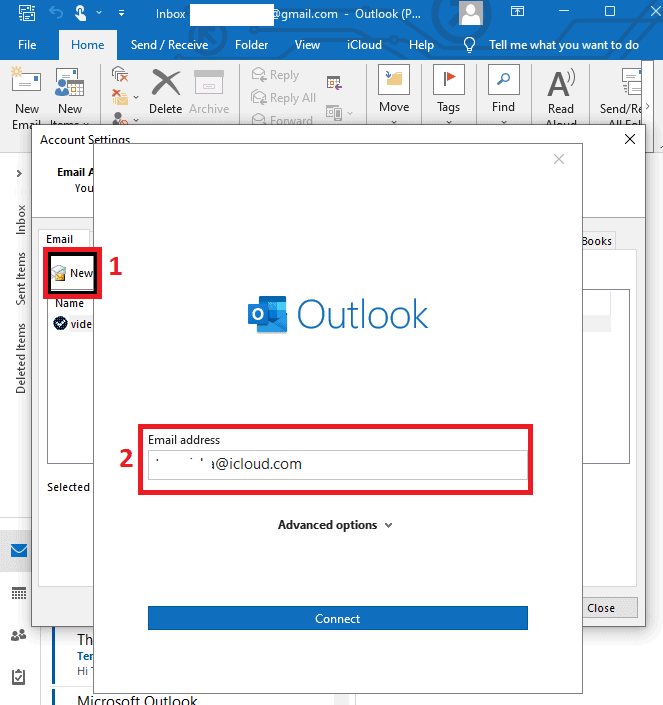
- Click New at the top left corner of the pop-up window.
- Enter the email address for your iCloud account. Click Connect.
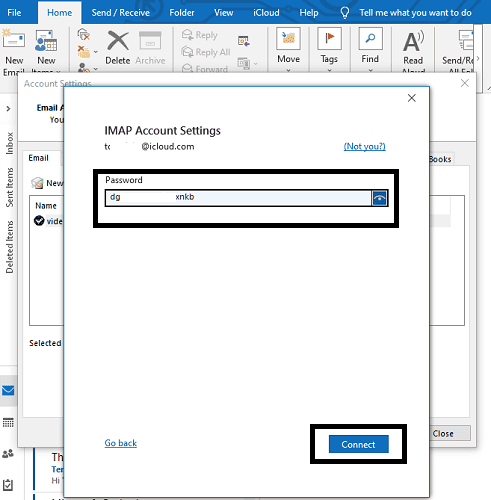
- Paste the app-specific password you copied in step 13, or enter the app-specific password you saved or wrote down. Click Connect.
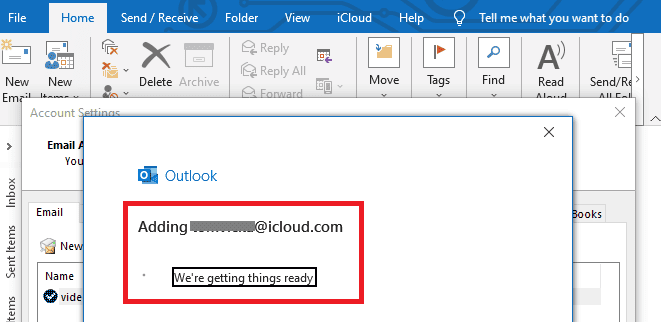
- Wait for a while. You will see “adding Youremail@iCloud.com“.
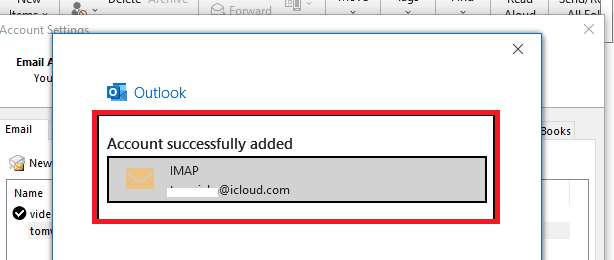
- When you see iCloud email Account successfully added as shown below. Your iCloud account has been added to your Windows PC.
Troubleshooting Common iCloud Email Problems
Here are some possible reasons why your iCloud email is not working as expected. I will also suggest some solutions to help you rectify these issues.
1. iCloud Mail App Not Using iCloud
If you notice that you have not received an email in your iCloud for a while, it is possible that the mail client is misconfigured, which means that your iCloud mail app is not enabled to work with iCloud. The same issue might also be responsible for your inability to send emails with your iCloud email account. Here are some troubleshooting steps you can take for this issue:
It’s possible that the iCloud email app is not enabled on your iPhone. To check this on iPhone:
- Go to your Settings app.
- Tap your iCloud account or Apple ID name.
- Select iCloud.
- Locate apps using iCloud and tap iCloud Mail.
- Enable the Use this iPhone toggle switch.
To enable your mail app on Mac:
- Click the Apple icon at the top left corner.
- Click System Settings or System Preferences.
- Click your Apple ID name.
- From the list on the right, click iCloud email.
- Click Turn On and Done respectively on the pop-up that appears on the screen.
2. Apple or iCloud Services are Down
If your iCloud email is not functioning, or if you’re experiencing other iCloud service issues, first confirm if there is an outage on Apple’s official website. Here is how to do that: Open Safari or any other browser and go to https://www.apple.com/support/systemstatus/.
Examine the system status of the iCloud email. If there is a green circle beside it, then there is no issue with the status of your iCloud email. However, if there is any other color aside from green, this implies that there is an issue with iCloud email services at the moment. Please note that the only solution to this problem is to wait patiently until Apple rectifies the problem. To confirm this, go to https://www.apple.com/support/systemstatus/ and check if the system status has changed to green.
3. Network Connection Issues
Your iCloud mail will not function normally if your cellular network or Wi-Fi connection is not working correctly. Ensure that your device has a stable internet connection.
4. iCloud Storage Is Exhausted
If your iCloud storage is exhausted, your iCloud email will not function properly. Your iCloud email account will not be able to send and receive emails as usual. However, there are a number of things you can do to prevent this from happening.
First, check if your iCloud email memory is full. You can do this from iCloud.com or on your iPhone or iPad.
- On iCloud.com:
- Go to iCloud.com and click your profile picture in the top right corner.
- Click iCloud Settings.
- Click your iCloud storage.
- Check your used memory to confirm if your iCloud storage is exhausted.
On iPhone:
- Tap your Settings app.
- Tap iCloud or your Apple ID name.
- Select iCloud, and check if your iCloud storage is exhausted.
If your iCloud storage is exhausted, you may buy more storage space by purchasing an iCloud+ package. If you are not ready for that, you may need to free up space on your iCloud account to create sufficient space.
How To Create an iCloud Email Alias
If you do not want to reveal your Apple ID iCloud email address indiscriminately while subscribing to newsletters or expressing your opinion in online forums, you may decide to create an iCloud email alias. Your iCloud email alias will be used whenever you do not want to disclose your primary iCloud email address. Here is how to create an iCloud email alias:
- Go to the official iCloud website at iCloud.com.
- Click Mail.
- Click the settings symbol and select Preferences.
- A window will pop up, please click Accounts on the left sidebar.
- Click Add an Alias, note that you can only create a maximum of 3 aliases.
- Fill in your details and click Add.
Follow on-screen instructions to complete the process. It’s easy!
The Benefits of an iCloud Email Alias
- Privacy: An iCloud email alias adds more privacy. It lets you talk to certain people without using your main email. This keeps your main email secret from those you don’t want to share it with. This helps you decide who can use your main email, so you feel safe and in control when you’re online.
- Convenience: An email alias sends any emails you get to your main iCloud email, making things easier by combining everything in one place. This helps you manage your emails better and saves you time, as you don’t have to check two different email accounts.
- Protection against spam: An alias iCloud account helps you stop spam and emails you don’t want. It acts like a shield to block and stop annoying messages from advertisers and scammers. This keeps your email inbox neat and tidy, so you can pay attention to the important messages.
- Easy to Delete: Alias emails are super easy to delete or remove. By deleting it, you have blocked the access of all those with the address to your primary iCloud email address.
Frequently Asked Questions
Yes, you can have two iCloud accounts on your iPhone. However, linking your iPhone with one primary iCloud account is a requirement. This implies that limitations exist when having two iCloud accounts. You can use only your primary iCloud account for backup, cloud drive, and photos. Your secondary iCloud account, any iCloud account other than your primary one, will only work with calendars, contacts, and notes. Remember that the secondary account can also receive and send emails.
Yes, you can. However, note that if your Gmail account has previously served as a rescue email for your primary iCloud account, you will be unable to use it to create an Apple ID. Additionally, be aware that having two Apple IDs on the same iPhone is not possible. Consequently, if you already possess an iCloud Apple ID, there is no need to create another Apple ID using your Gmail account.
Conclusion
Having an iCloud email will introduce you to a unique world of Apple services while helping you synchronize your data across all Apple devices linked to the same iCloud account. You can also create aliases, up to three iCloud alias emails to shield yourself from spammers and secure personal information related to your primary iCloud email account.
Why not extend your iCloud account to all your devices? Your iPhone, iPad, iPod, MacBook, and even your Windows PC? Achieve this by following the step-by-step guidance provided in this article. You can effortlessly receive notifications on any of your devices, making your digital life smoother by embracing these generous offerings by Apple.
Have you depleted your iCloud storage or are you proactively considering how to manage your iCloud email storage when it’s full? Nick has prepared a comprehensive article for your benefit. Don’t miss it!
Encountering difficulties while setting up your iCloud account on Mac, iPhone, iPod, iPad, or PC? If so, feel free to comment below, and I will gladly offer a solution. I’m also eager to hear about your experiences using iCloud successfully.
