Is your Mac displaying a folder with a question mark? Are you wondering what the Mac folder with the question mark means? Well, the Mac folder with a question mark is a fairly common and prominent issue that macOS users encounter. Mostly it happens due to software errors and the inability of the Mac to locate the macOS in the startup disk. No matter what is causing the issue, read along to learn how to fix the Mac folder with the question mark issue on your Mac.
How To Fix the Mac Folder With Question Mark
1. Reset NVRAM To Fix Mac Folder With Question Mark
NVRAM (Non-Volatile Random Access Memory) is the successor to PRAM (Parameter Random Access Memory). Both refer to a small amount of storage on Mac that stores system critical information without needing any power supply. It includes basic booting information, screen resolution, time zone, volume, etc.
Therefore, resetting NVRAM can iron out bugs and allow the system to locate the designated startup disk. Consequently, it will help fix the Mac folder with the question mark issue on your Mac. Also, you cannot manually reset NVRAM on Apple Silicon (M1, M2, M3) Macs as the process happens automatically whenever needed.
Time needed: 3 minutes
If you own an Intel-based Mac, follow the steps mentioned below to reset NVRAM.
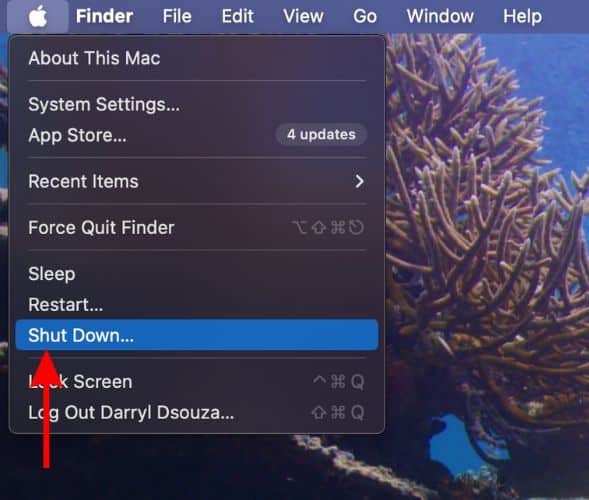
- Click the Apple logo at the top left, click the Shut Down… option, and then click the Shut Down button.
- Wait for a few seconds and let the Mac shut down properly.
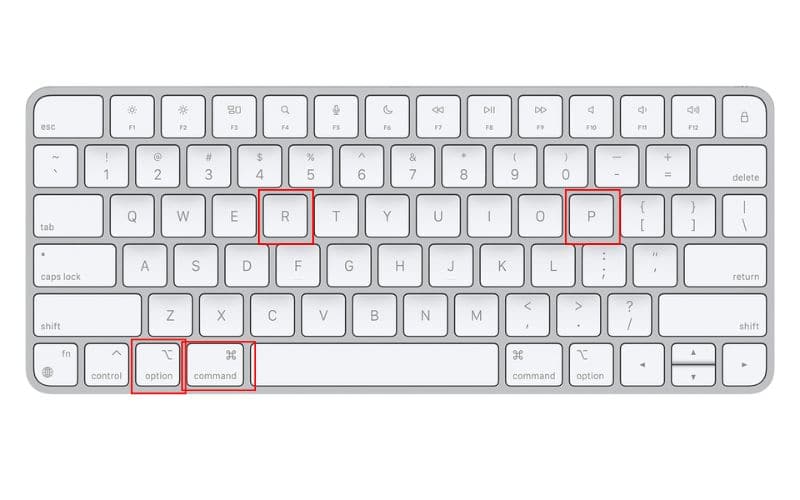
- Now, press the Power button/Touch ID to turn on the Mac and immediately press and hold the Command + Option + P + R keys simultaneously.
- Release the keys after 20 seconds or so. During this period, you might hear the startup sound or see the Apple logo more than once.
In case you have any more doubts regarding NVRAM, refer to our detailed guide on how to reset NVRAM on Mac.
2. Select Startup Disk To Fix Mac Folder With Question Mark
Some saved setting preferences also get reset when you reset NVRAM on Mac. Moreover, if you’re encountering the Mac folder with a question mark issue because the Mac can’t identify the startup disk, now is the right time to select and set up the right startup disk.
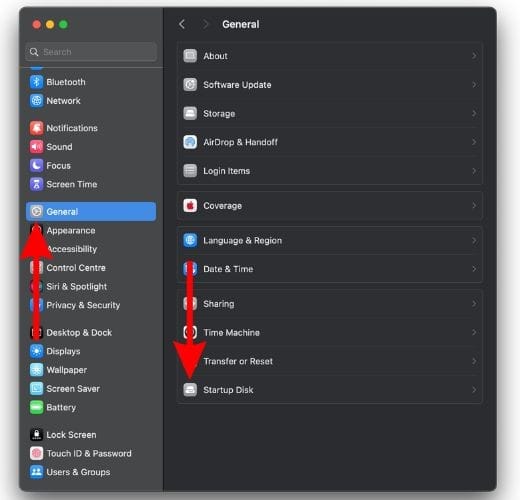
- Click the Apple logo at the top left corner of the menu bar.
- Select the System Settings… option.
- In System Settings head to the General option and then select the Startup Disk option.
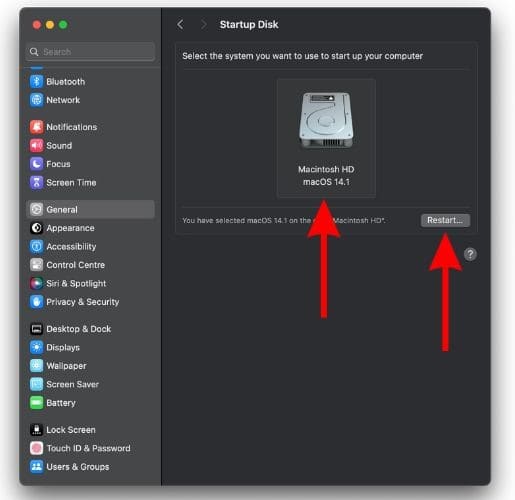
- On the next screen, select the Startup Disk. You can select the Internal or External Drive, whichever you use as a startup disk.
- Enter the passcode if asked.
- Click the Restart… button to apply the changes.
3. Force Restart Mac To Fix Mac Folder With Question Mark
Is your Mac unresponsive/ frozen while just displaying the Mac folder with a question mark screen? Well, in case you can’t move past this screen, the first thing you must try is to force restart the Mac and check if that resolves the issue. Follow the steps mentioned below to learn how to force restart your Mac.
- If you use a MacBook and have plugged the charger, unplug it.
- Next, press and hold the power button (Touch ID button) until your MacBook turns off.
- Similarly, if you use a Mac mini, Mac Studio, or iMac, just unplug the power cable.
- Now, wait for 20 to 30 seconds.
- Press the power button on your MacBook or plug in the power cable to your Mac mini, Mac Studio, or iMac.
4. Select Startup Disk through Startup Options
After restarting, you might land on the same screen where your Mac displays a folder with a question mark. Since you can’t select the startup disk from System Settings, we suggest selecting the startup disk right from the Startup Options screen. If you’re a new Mac user, this might sound overwhelming but trust me it isn’t.
However, it is quite simple to boot to the Startup Options screen. Do note that the steps are different for Intel-based and Apple Silicon Macs.
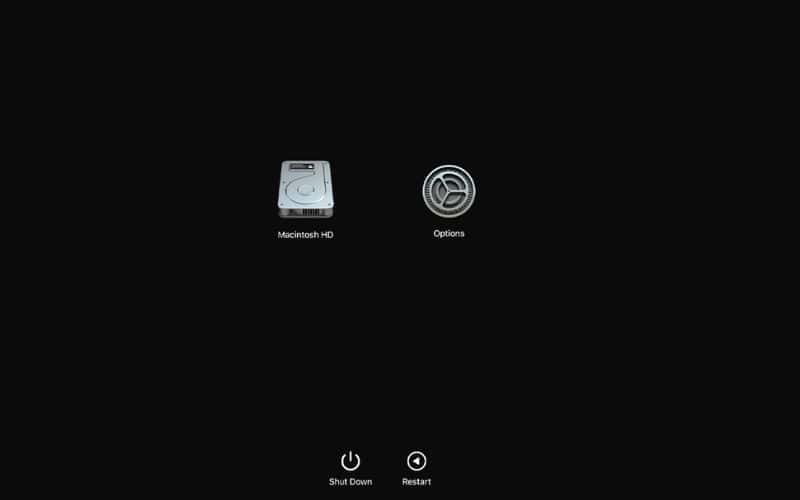
If you have an Intel-based Mac, here’s how to boot your Mac to the Startup Options screen
- Press and hold the power button to shut down the Mac.
- Press the power button again to turn on the Mac and immediately press and hold the Option key.
- Release the Option key once the Startup Options screen boots up.
- Here, pick the startup disk and click Continue to proceed.
If you have an Apple Silicon Mac, here’s how to boot your Mac to the Startup Options screen
- Press and hold the power button to shut down the Mac.
- Now, press and hold the power button until the Startup Options screen boots up.
- Pick the startup disk (Internal or External Disk) and click Continue to proceed.
5. Repair Disk Using First Aid Through macOS Recovery
The Mac folder with a question mark issue could be due to errors in the internal storage device (SSD). To fix these errors, you must run the First Aid program found in the Disk Utility app. But what if your Mac’s screen is frozen and you can’t boot into macOS?
In this case, you can boot into macOS Recovery, access the Disk Utility app, and then run the First Aid program to repair the startup disk. The steps to boot into macOS Recovery mode are different for both Intel-based and Apple Silicon Macs.
Steps to boot into macOS Recovery mode for Intel-based Macs
- Press and hold the power button to shut down your Mac.
- Press the power button to turn on the Mac and immediately press and hold the Command + R keys until you see the Apple logo and boot into macOS Recovery mode.
- Here, click the Disk Utility option.
Steps to boot into macOS Recovery mode for Apple Silicon Macs
- Click the Apple logo and select the Shutdown… option.
- Press and hold the power button until you see the “Loading startup options” message after which you will see the internal and external drives and the Options button on the screen.
- Select Options and click Continue.
- Here, enter your password and then you can access Disk Utility.
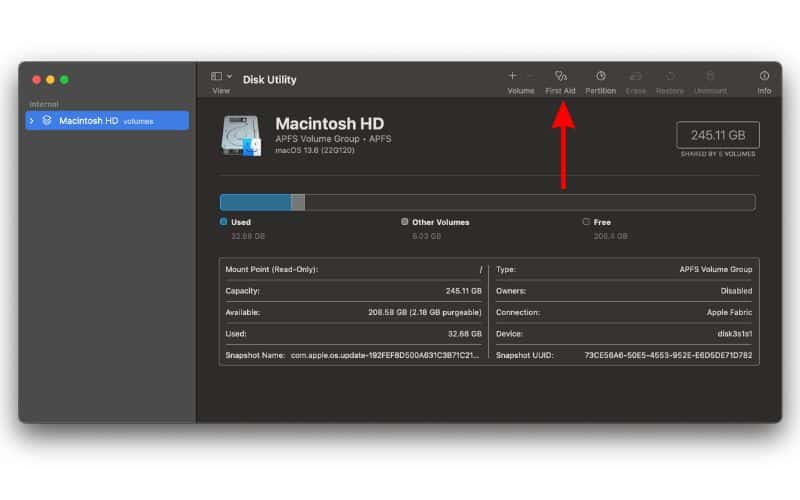
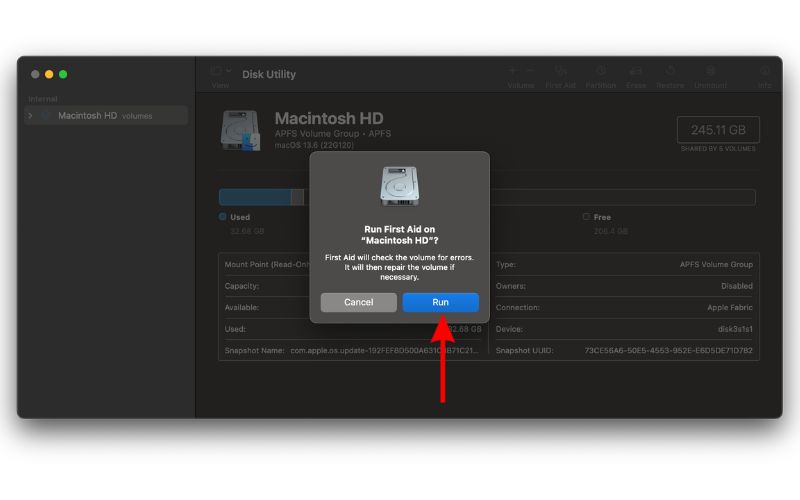
Now that you’ve entered the Disk Utility app in macOS recovery mode, follow the steps below to run the First Aid feature to repair the Startup Disk.
- Click the Disk Utility app and then the Continue button to open the app.
- Now select the First Aid option at the top of the window.
- Select the Run option to check and fix disk errors
After First Aid finishes checking and fixing errors, restart your Mac.
6. Reinstall macOS To Fix Mac Folder With Question Mark
The last troubleshooting step you can try to fix the Mac folder with a question mark issue is reinstalling macOS. While you do this, you will lose all your data. Therefore, we suggest you refer to our guide on how to reinstall macOS without losing data. It has everything you need to know before you take this step. Hopefully, reinstalling macOS fixes the Mac folder with a question mark issue.
7. Contact Apple Support
Now that you’ve tried everything there is, the last option you’re left with is to contact Apple Support. If you have an official Apple Store near you, even better. Because the employees at the Genius Bar can help resolve this issue.
Conclusion
We hope this guide helped you fix the Mac folder question mark issue on your Mac. If you have any other doubts or are aware of any other troubleshooting methods that help resolve this issue, please let us know in the comments below.
