Recently a man in the EU discovered that his Safari browsing history was included in his Apple data download. After I discussed the issue with him and compared my data download, it turns out he received a lot more information than I did.
After this experience, I decided to research and learn different ways to manage your Safari browser history on your Mac and iPhone. But before we dive into this, what exactly is the Safari Browsing History and why is it so important?
How To Check Safari Search History on iPhone?
1. Open Safari.
2. In the Menu bar, look at the lower right corner of the screen and tap the History icon.
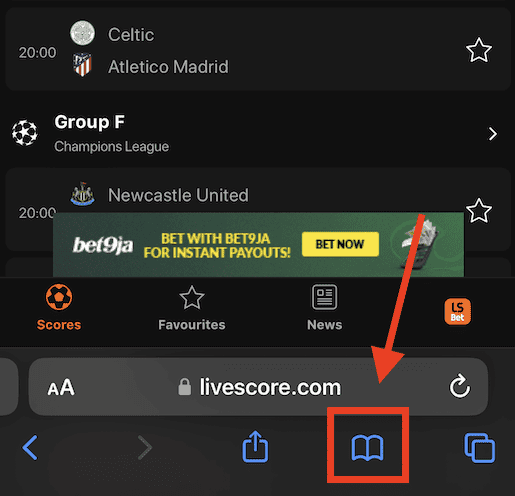
A Pop-up window showing the list of all the websites you have visited in Safari will appear. Also, If you want to, you can search the history for particular websites, and do this:
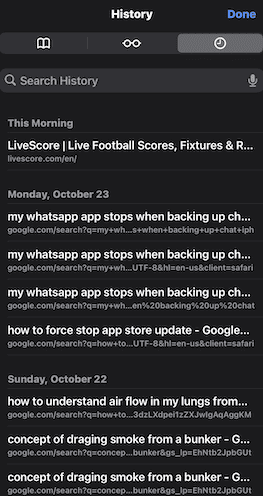
3. Enter a phrase into the search bar at the top of the screen.
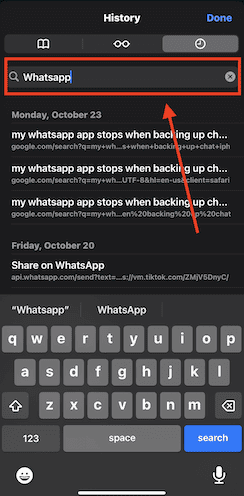
This filters just the websites with that particular keyword or phrase. It is also important to know how to clear your Safari Browsing History.
To do this, follow these simple steps below.
How To Check Safari Search History on Mac?
There are a number of ways you can manage your browser history for Safari on both your macOS and iOS. Here are different techniques and how you can do it. First, let´s consider how to view your browsing history.
Time needed: 1 minute
View Your Safari Browsing History on Mac
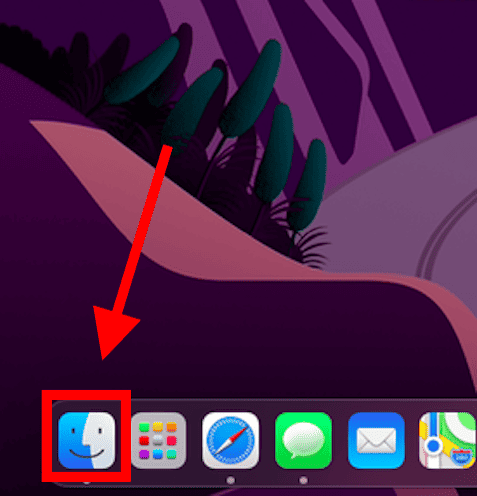
- Open Safari Browser.
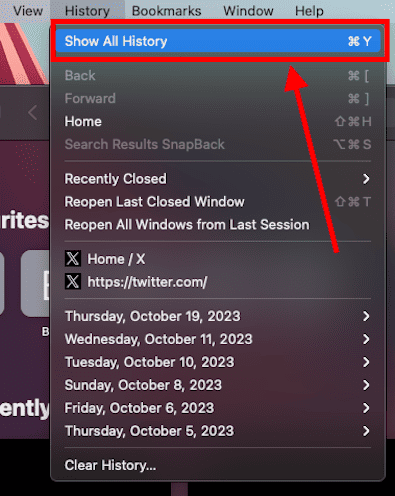
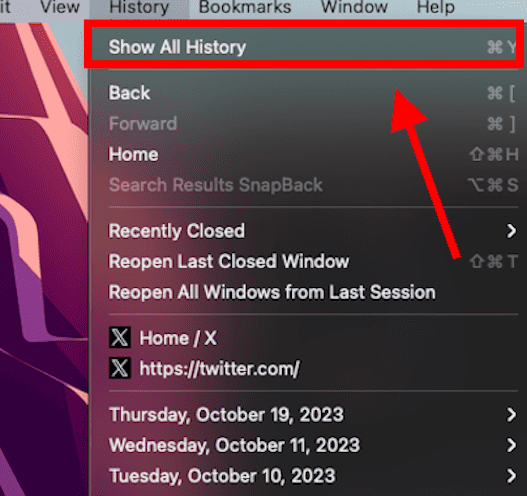
- Click History in the menu bar.
- On the history screen, select Show All History to view the entire history.
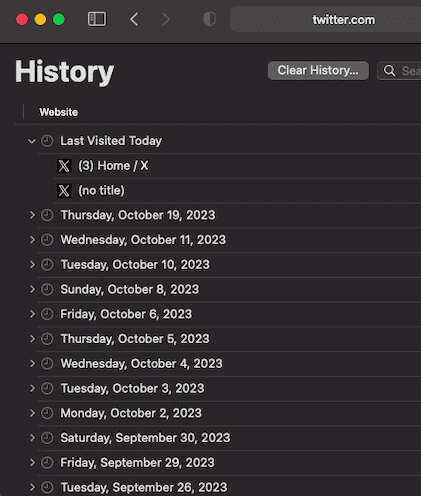
- A pop-up will come up showing all your Browser History.
Follow the simple steps below to view your browsing history on your iPhone as well.
Delete Your Safari Browsing History on your Mac
To clear your browser history on Mac, follow these straightforward steps:
1. Open Safari.
2. Open the History Bar at the top of the screen.
3. Click the Show All History tab in the Menu bar or press Command (⌘) + Y in Safari, which will take you to the history view.
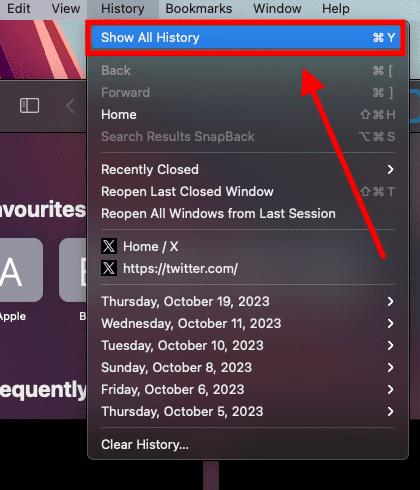
4. Select Clear History.
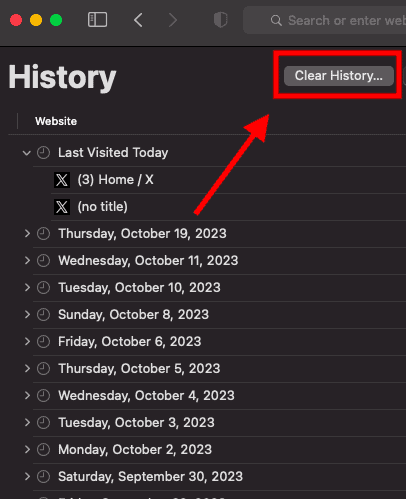
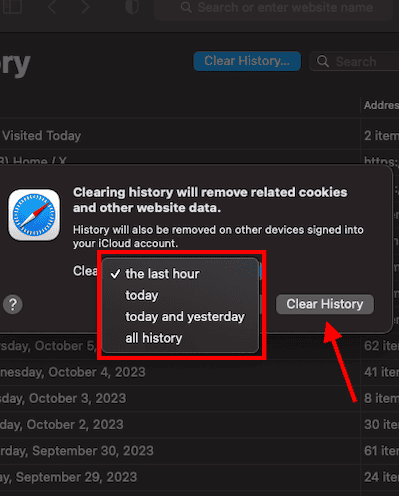
A pop-up menu will come up and it will allow you to choose how far back you want to clear the existing history. This option lets you choose if you want to clear your history from the last hour, day, week, two weeks, a month, or even for all time.
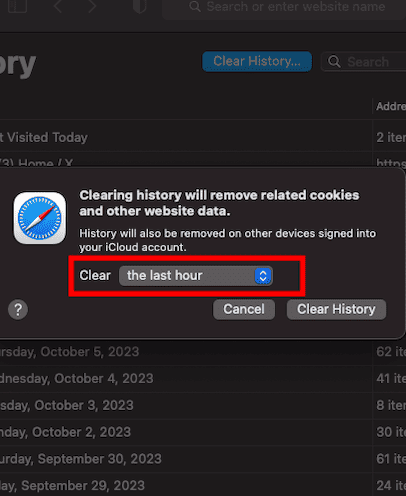
5. Choose your preferred option and click Clear History.
Great! You have successfully cleared your Safari browsing history on Mac. Now, Let´s see how we can do this for iPhone as well.
Delete Your Safari Browsing History on iPhone
Clearing your browsing history on your iPhone is also easy. Follow these simple steps too:
1. Open the Settings app on your iPhone.
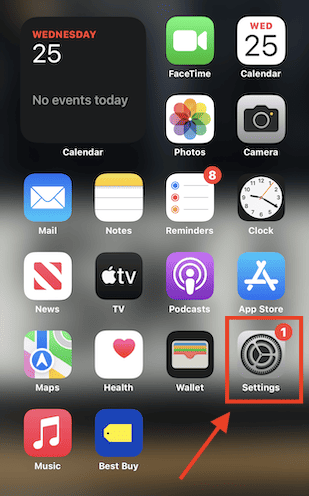
2. Scroll through the options and click on Safari.
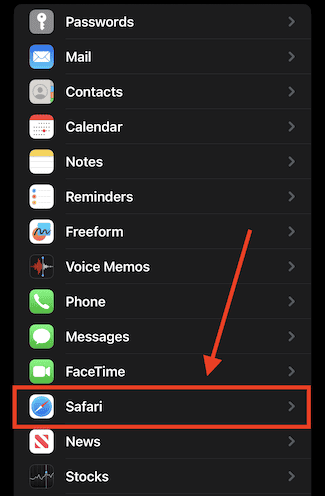
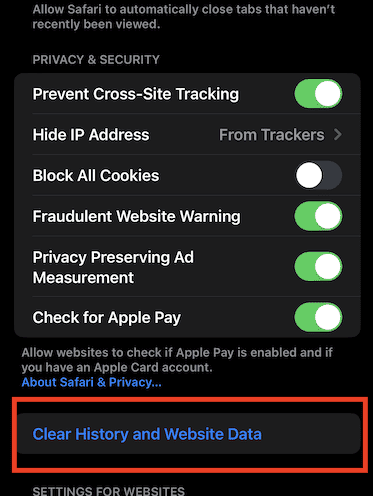
3. Again, scroll and find the Clear History and Website Data option.
4. Tap Clear History and Data.
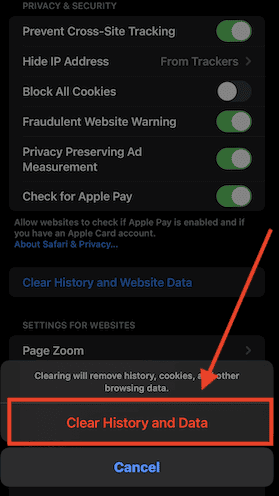
Yes! You have successfully cleared all Browsing History on Mac and iPhone.
Following these next easy steps to remove all the records of the web pages or sites you have visited over the selected period.
1. Open Safari.
2. In the Menu bar, look at the lower right corner of the screen and tap the History icon.

You can also prevent Safari from tracking your browsing history. Let us quickly dive into this too.
Prevent Safari From Tracking Your Browsing History on Mac
Suppose you prevent Safari from tracking the history of the websites you visited. In that case, it means that Safari cannot save any record of the searches you perform or the websites you visit. How can you do this?
1. Open Safari.
2. Navigate to click Safari in the Menu Bar.
3. Select Preferences from the Menu Bar.

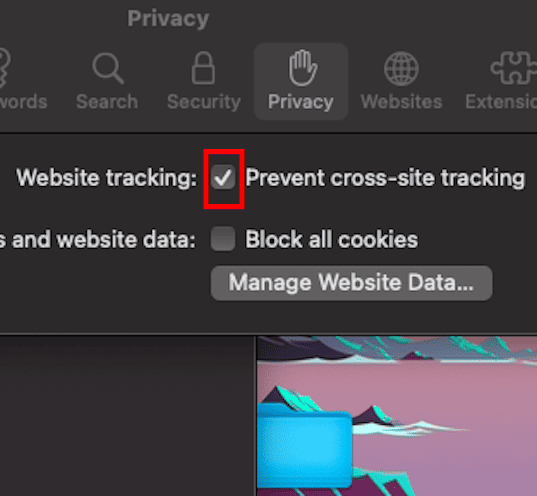
4. Next, Click on the Privacy tab.
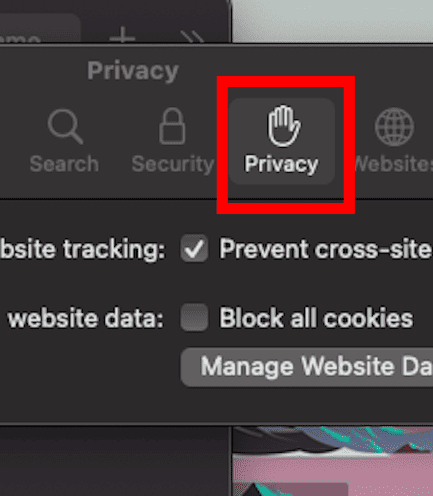
5. You´ll see a box that is next to Prevent cross-site tracking, Check the box.
Let me also walk you through how to do this on your iPhone.
Prevent Safari From Tracking Your Browsing History on iPhone
1. Open the Settings app.
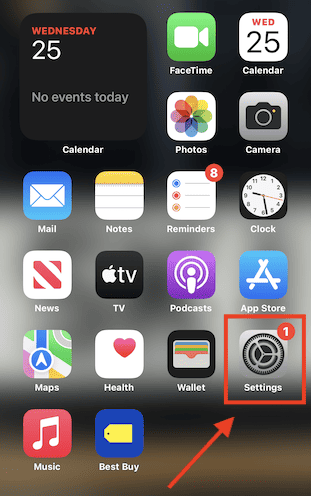
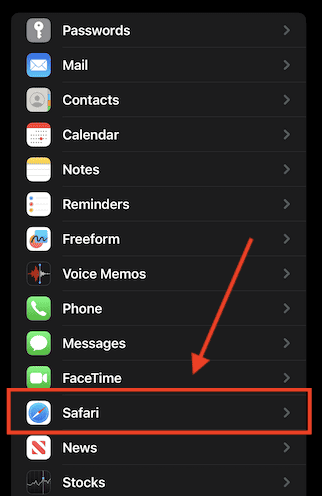
2. Scroll down to the bottom and tap Safari.
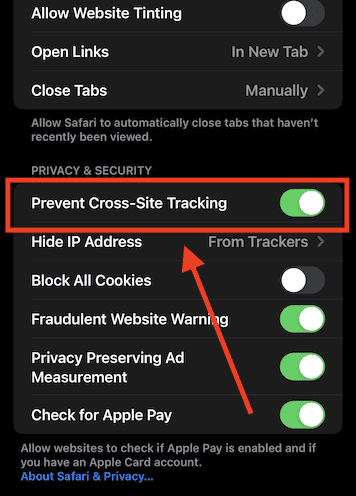
3. On this page as well, scroll down to the Privacy and Security section.
4. Toggle on the switch that is next to the Prevent Cross-Site Tracking.
You have successfully prevented Safari from tracking your browsing history both on your Mac and iPhone!
If you prefer additional protection for your browsing activity and for your iPhone and Mac overall, we recommend a dedicated antivirus like Intego Internet Security that can block malicious websites from accessing your data.
That is not all. Sometimes, you might not want your Safari Browser to save your browsing history, website data, or even cookies. Using the private browsing mode is the solution to this.
Keep Your Browsing History Private on Mac
To keep your browsing history private on Mac, you need to use the private browsing mode. Follow these very easy and straightforward steps to do this:
1. Open Safari.
2. Look at the top of your screen, select File, and click New Private Window.
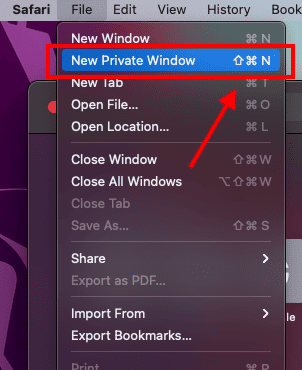
A new window will be opened and this will disallow Safari from saving your Browsing or search history.
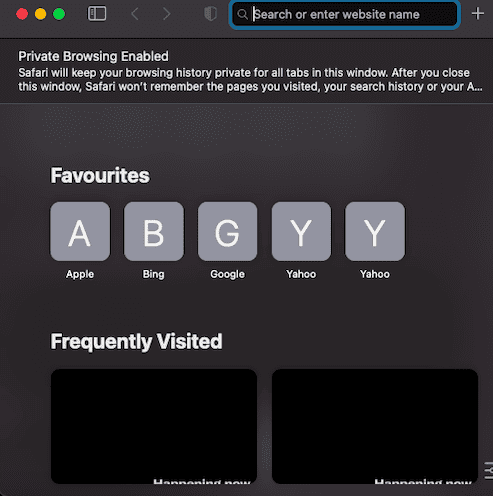
This would also restrict Safari from sending auto-fill information to any website you visit while using the window. You can also do the same on your iPhone.
Keep Your Browsing History Private on iPhone
1. Open Safari.
2. Tap the Page tab in the bottom right corner of the Safari screen.
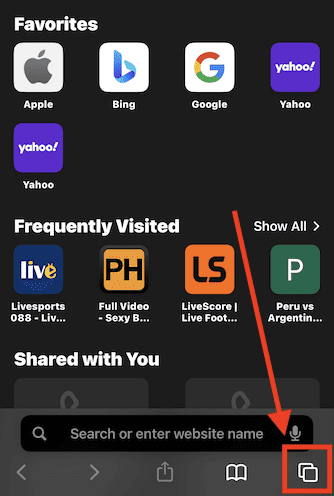
3. Switch the page option to Private.
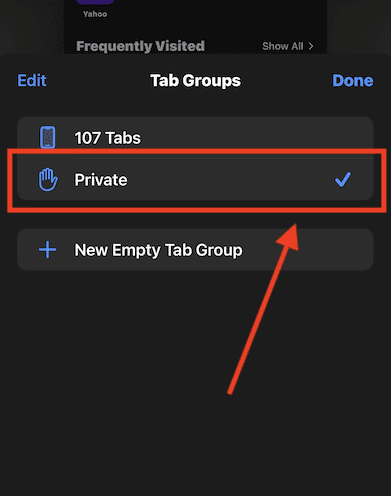
4. Finally, Click the ‘+’ sign at the bottom left corner to open a new private browser.
Keeping your browsing history private is very important, but in some situations, you may have visited a website by mistake or you don´t want another person to see that you visited the website. In this situation, the best thing you should do is delete the individual website from your Browsing history. Let me quickly show you how to do this:
Delete Individual Websites From Your Browsing History for Mac
To delete individual items or websites from your Safari Browsing history, follow these very easy steps:
1. Open your Safari Browser.
2. Click on the History tab in the Menu bar
3. Select the Show All History tab
4. Find the website you want to remove and Right-click on it.
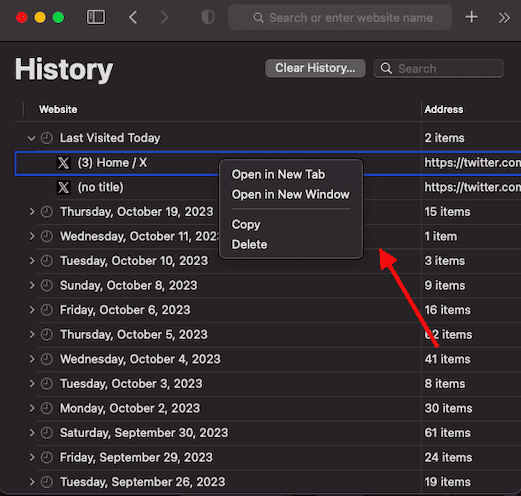
5. Select the Delete from History option.
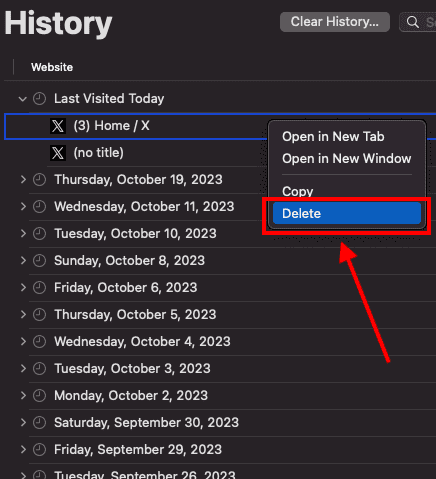
Let me quickly walk you through how to do this on iPhone as well.
Delete Individual Websites From Your Browsing History for iPhone
1. Open the Safari app.
2. Click the history tab at the bottom right corner of the screen of the browser.
3. Look for the website you want to delete from your history and swipe left on it.
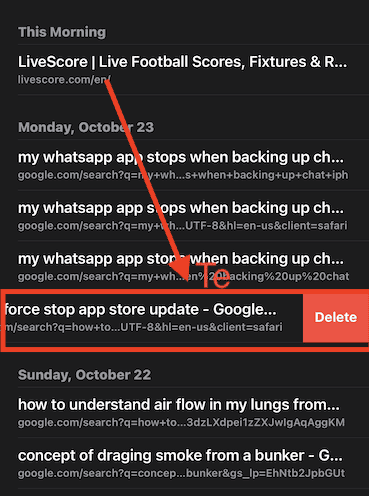
4. Finally, Tap the Delete option.
Yeah! You have successfully deleted individual websites from your browsing history. But if you use Safari on multiple devices of yours such as iPhone, Mac, and maybe your iPad, iCloud sync can help you to keep all your history synchronized across all the devices you own. This means that you can start browsing on your iPhone and continue later on your Mac. Let me quickly show you how to set this up.
Manage Your Safari Browsing History Across Multiple Devices Using iCloud Sync
To use the iCloud sync feature, you must have iCloud enabled on all the devices you own and they all need to be signed in to the iCloud with the same Apple ID.
If you have Safari iCloud syncing turned on and you clear your history, it will also be cleared from all of your other Apple devices with iCloud sync enabled. How can you enable and disable iCloud sync for your Safari browsing history on your Mac and iPhone?
Manage Your Safari Browsing History Across Multiple Devices Using iCloud Sync on Mac
1. Open Safari.
2. Select Safari > Preferences > iCloud Option
4. Check the checkbox next to Safari to make sure that it syncs across all your devices
To sync your browsing history across certain devices, do this:
5. Click on the Manage Devices Button and select the devices you want to sync with.
6. Click Done
Manage Your Safari Browsing History Across Multiple Devices Using iCloud Sync on iPhone
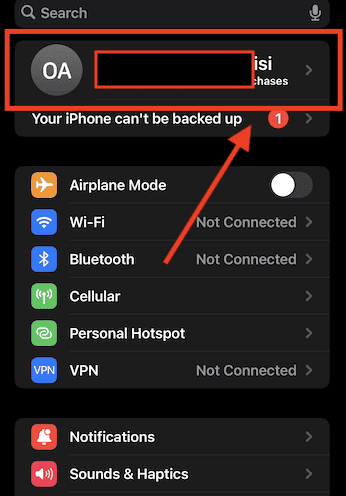
1. Open the Settings app on your iPhone.
2. Click on your name at the top of the settings screen.
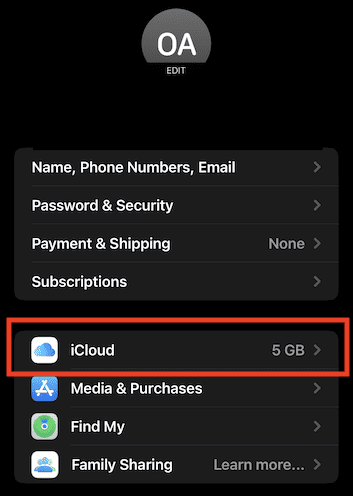
3. Tap the iCloud option.
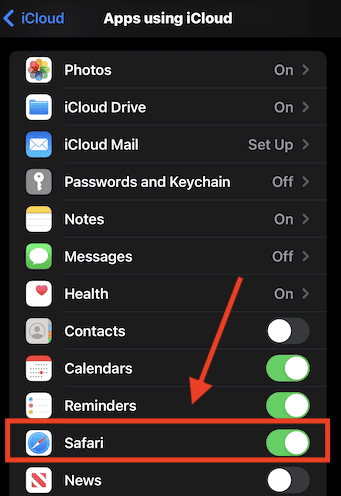
4. Under Apps Using iCloud, select Safari.
5. Finally, toggle on the switch next to Safari.
Great! You have successfully enabled iCloud sync for Safari browsing history and it will be updated on all your devices using the same Apple ID when you visit new websites or close an existing Safari tab.
Conclusion
Suppose you’ve carefully followed the methods and steps I’ve provided in this step-by-step guide. In that case, you will have a great edge over efficiently managing your Safari browsing history on one or even multiple devices.
Which of these methods worked for you? Feel free to share your thoughts here in the comment section. Also, if you are having problems with iCloud syncing on your devices, check out our guide for effective solutions.

I like to use imymac——Browser Cleaner to clean up browser traces, historical records, etc.Browser Cleanup lets you clean up junk files, cookies, and history, eliminate deceleration reasons, clear privacy traces to protect your confidential data and more. It is performed on Mac OS and Mac OS X.