When formatting an external device in preparation for macOS High Sierra (or the public beta of Mojave), an odd bug can appear.

So you have an external SSD which you want to format as APFS and install, say, macOS High Sierra. However, if you’re planning to install a developer version or public beta of Mojave, read this note by Jeff Gamet.
[macOS Mojave Failing to Install on an External USB Drive? Here’s the Fix ]
The first thing to know is that, when you format the external SSD as APFS, you’ll be creating an APFS container and then the desired volume inside it—which you’ll name. If you’re unsure about APFS containers, see:
[An APFS FAQ: Partitions, Volumes, and AFPS Containers ]
Connect the SSD, very likely with a USB-C to USB-A (or USB-C) connector cable.
You may well see, in the Finder, some developer specific tools and/or encryption tools. Here at TMO we almost always ignore those files because we’re going to totally erase the disk. If encryption is needed, macOS supports it. But I always archive those files first, just in case.
Then launch /Applications/Utilities/Disk Utility.app. Disk Utility may or may not come up in the desired mode. Check out this note by Jeff Gamet.
[How to Format a Drive with GUID for macOS High Sierra, Mojave Installation ]
Basically, the trick is to use the View widget at the top left to select “Show All Devices.”
Now We’re Ready to See an Interesting Bug
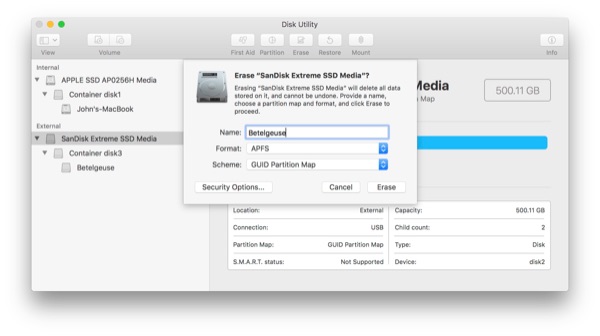
1. Select your device. Then, from the tabs at the top select Erase. As the article just above explains, in the drop-down sheet select: volume name, “APFS” and “GUID Partition Map.” (Note I’m erasing a previously erased device in this example.)

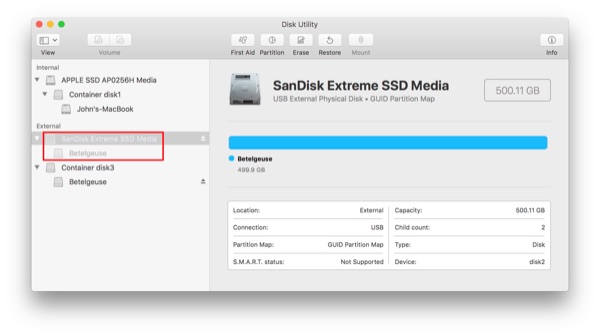
2. In many cases, and even with a hard disk, you may well see a confusing “ghost” device and a “ghost” volume. They’re dimmed. I’ve outlined them in red below. This is a bug in Disk Utility. (My thanks to Mike Bombich of Bombich Software for confirming. It persists in Mojave early betas.)

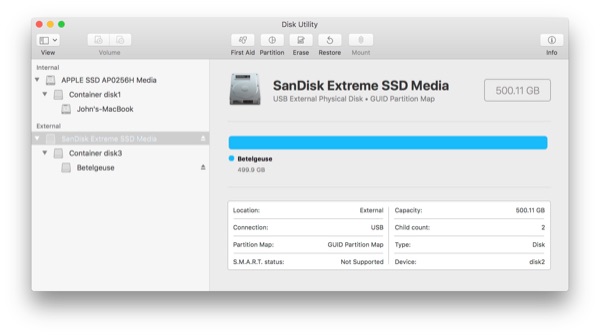
3. If you quit Disk Utility and relaunch it, you should see the proper, cleaned up hierarchy: Device > container > volume. (In this example, named “Betelgeuse.”) It should look like this:

Note that this cleaned up presentation has the same structure as the boot SSD above it. Ghosts are gone. The SSD was ready for a macOS install after the erase, all along, but now there’s no confusion.
This bug has annoyed me for some time now. You may well not see it at all. Hopefully, at some point in the future, Apple will clean this up. Finally, developer Mike Bombich notes that if a quit and relaunch of Disk Utility doesn’t clean up the display of the volumes, a reboot certainly will.

I know this is an older post, However I’m still getting the failure. I’ve quit the utility I’ve restarted yet my restore fails. Yet the new drive shows the information transferred. The new drive isn’t recognized as a bootable drive for start up. My only other option is to do a clean OS install and use migration assistance to move the data.
Hi John,
Thanks much for this article … but it doesn’t answer the question I have (and which I’ve asked on the MacGeekGab Forums, too) … I’ve got a 2012 iMac with an external OWC SSD that I’m currently running the MacOS High Sierra 10.13.6 beta 4 on … it’s my “beta” machine, not my daily driver.
So, can I install the macOS Mojave Public Beta on it or not? Jeff’s article seems to imply that I can’t.
Thanks…
Old UNIX Guy
It’s something we’re still looking into. Eventually, a direct connect has to be supported. But when?