So, the worst just happened: you reached for your iPad, only to find its screen completely blank. Even worse: it’s unresponsive. That’s the dreaded “black screen of death.” Fortunately, there are quite a few fixes to try if your iPad is stuck on a black screen.
Before we get to the fixes, it’s important to note that this issue has multiple possible causes. Methods one and two will help if your situation is less serious. Method three helps determine whether you have a hardware or software issue. Methods four and fi e, in turn, involve restoring your iPad to factory settings.
If your computer recognizes when the iPad is connected, be sure to make a backup before proceeding with these. Let’s dive in.
How to Exit the Black Screen of Death on iPad
1. Force Reboot Your iPad
The “black screen of death” issue is so common Apple has a dedicated page for it. The company’s first recommendation — and mine, too — is to force a reboot. This might be enough to fix your iPad’s black screen freeze. To do that, follow the steps below.
For iPads without a Home button:

- Press and release the Volume Up button (Apple calls it “the volume button closest to the top button”).
- Press and release the Volume Down button (Apple calls it “the volume button farthest from the top button”).
- Press and hold the Power button (Apple calls it “top button”) until you see the Apple logo.
For iPads with a Home button:

- Press and hold both the Home and the Power button (Apple calls it “top button”) until you see the Apple logo.
In both cases, the reboot usually starts in about ten seconds. Sometimes, however, it may require up to a minute of holding the buttons.
2. Make Sure Your iPad Is Charged

If the above doesn’t work, there’s a chance your iPad’s battery has been severely depleted. By now, you have probably tried keeping it on the charger for some minutes. In situations where the battery is completely, flat-out empty, this may not be enough.
The usual process of the device turning on quickly after being plugged in doesn’t apply here. Leave it charging for a few hours, or, ideally, overnight. This may give the battery the required “jump start” for it to get properly working again.
3. Use QuickTime to Confirm Your iPad Is Working
The idea may seem weird, but this method has once helped me, e.g., discover an iPhone simply has a busted backlight. It requires a Mac, though.
QuickTime has a hidden screen mirroring feature, available when you connect an iPhone or iPad with a cable. It can help you sort out if it’s just your iPad’s screen or the whole iPad that isn’t working.

To do that, open QuickTime and select File > New Movie Recording on the menu bar.

On the window that opens, click the downwards arrow next to the recording button and select your iPad’s screen on the menu.
If the iPad’s screen is mirrored to your Mac, then you likely have a faulty display. Your best bet is to take it to an Apple Support center or a repair shop to have it looked into.
If the iPad doesn’t show as an option in the menu, however, it isn’t booting correctly. The good news is that there’s a chance you can fix your iPad’s black screen at home. The bad news is that we’ll need to go the “completely erase your iPad’s storage” way.
4. Fix Your iPad’s Black Screen With Recovery Mode
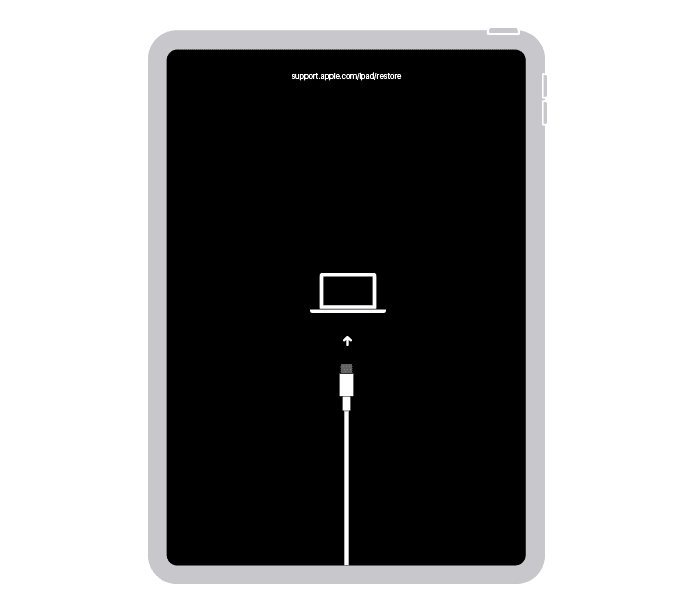
To do that, keep your iPad connected to your Mac using the cable. Now, press the same key combination from step one, but keep pressing until you see the recovery mode screen. It’s an all-black screen with a laptop icon and a cable with an arrow pointing towards the laptop.
On Finder, select your iPad on the sidebar. A dialog should appear warning that there’s a problem with the device. Click the “Update” button and wait for the process to finish. Since this involves downloading a whole iPadOS version, it could take an hour or more, depending on your internet speed.
The procedure above should keep your data intact. If it doesn’t work, however, you’ll need to repeat it, but clicking “Restore” instead. This will wipe your iPad’s internal storage.
5. Fix Your iPad’s Black Screen With DFU Mode
If everything else fails, your last resort is putting your iPad into DFU mode. This is like a “deeper” recovery mode, intended primarily to be used by support technicians dealing with more intricate issues.
To enter DFU mode, you’ll need to keep your iPad connected to a computer. It also needs to be in Recovery mode.
For iPads without a Home button:
- Press and release the Volume Up button.
- Press and release the Volume Down button.
- Press and hold the Power button until the screen turns off. Immediately start holding the Volume Down without releasing the Power button.
- Count five seconds holding both buttons. Then, release the Power button.
For iPads with a Home button:
- Press and hold both the Home and the Power button for eight seconds. Release the Power button, but keep holding the Home button.
On DFU Mode, The iPad’s screen stays black. If the Recovery Mode screen or the Apple logo appears, you likely held one of the buttons for too long.
If successful, your computer should display a dialog similar to the Recovery Mode one. The difference is that this time, there won’t be an option to update. The restore process in DFU mode also takes a long time, so be patient.
 NOTE
NOTE
Check For Possible Recall Programs

If even a DFU restore didn’t work, it’s unlikely you’ll be able to solve the issue by yourself. Probably, the only way to fix your iPad’s black screen is to take it to a professional.
In case your iPad is still covered by warranty (or if you have an Apple Care+ subscription), things are easier. If it’s out of warranty, though, you’ll likely need to pay for the replacement.
There’s one exception: if Apple has issued a recall for your model. The company calls these “Service Programs”, and, for eligible devices, it means free repairs or replacements — sometimes by newer models. The best part: they remain valid for years after the devices’ warranties expire.
As of when this article was first being published, in July 2024, Apple has no active recall program covering iPads. New programs are issued sporadically, so this may change in the future. Follow the link in the previous paragraph to check if you can get your iPad repaired or replaced for free.
A “Black Screen of Death” Doesn’t Always Kill an iPad — There May Be a Fix
At first, bumping into an iPad with an unresponsive screen may seem serious. In fact, this is often a sign of a deeper issue, like failing components or liquid damage.
On the other hand, many “black screen of death” cases on iPads can be fixed with a bit of effort. In more serious situations you may need to let go of your apps and files, that’s true. But that’s better than having to buy a new one entirely, right?
