
The screen is the main output in any computer, and issues with this component are frightening for most people. That’s why it’s completely understandable that some M1 MacBook Air users are worried after seeing their laptop screen flickering.
Although the issue typically stems from hardware faults, it can sometimes be resolved by adjusting the System Settings. Follow these steps.
How To Stop Macbook Air M1 Screen From Flickering
1. Check for Loose Cables
But, before doing that, start by making sure the simplest case has been covered: loose cables. If you use an external monitor, or a dock that includes video outputs, these may interfere with your MacBook’s screen. So, make sure these are firmly connected.
It may be a good idea to check the cables, too. Try a different one, just to cross that possibility from the list.
2. Disable True Tone
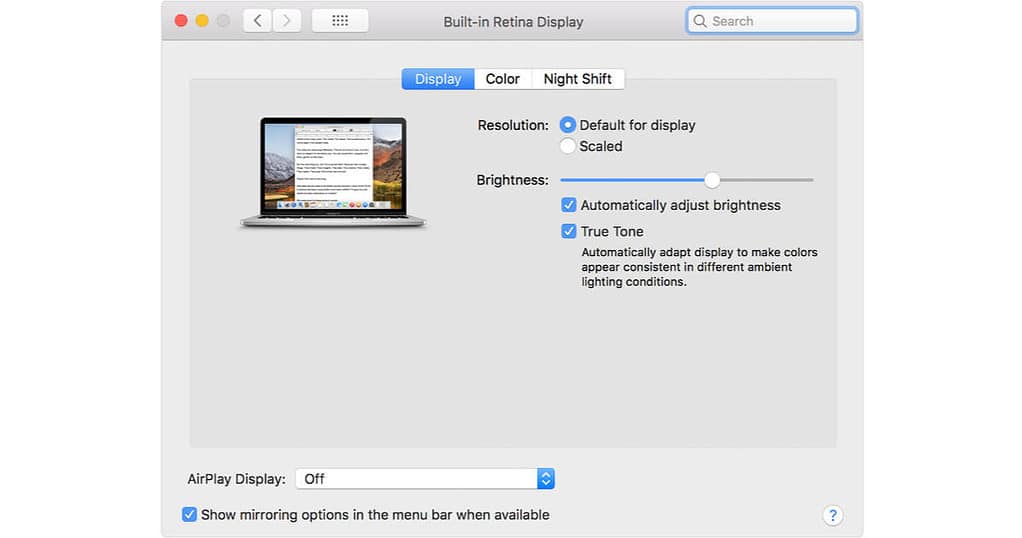
Now for the settings — if the above didn’t solve your issue. The first thing to try is disabling True Tone. It’s a setting designed to help your display show accurate colors in any environment, but that sometimes causes issues.
To do that, go to System Settings > Display > True Tone. If the toggle is enabled, turn it off.
3. Disable Automatic Brightness
Similarly to the above, automatic brightness uses an ambient light sensor to tweak how bright or dim your display is. It may also cause your MacBook Air’s screen to flicker, so try disabling this in System Settings > Display > Automatically adjust brightness.
4. Enable HDR
High Dynamic Range (HDR) is a display technology that allows compatible panels to show a larger amount of colors. Misconfigured settings can cause screen issues like bland colors, blown highlights, and, sometimes, flickering.
One thing that should be noted is that MacBook Airs’ panels aren’t compatible with HDR. Therefore, this solution applies only to those using external monitors — though, normally, these settings shouldn’t interfere with your laptop’s display.
Once again, head to System Settings > Display. Look for a toggle or checkbox with “High Dynamic Range” or “Allow extended dynamic range”. If you see either make sure it’s turned off/unchecked.
5. Change the Color Profile
Color profiles are standardized settings for screens that allow them to be used in a variety of situations. A poorly configured color profile, however, may cause display issues.
To change this, go to System Settings > Display, and look for the “Color profile” drop-down menu. You can change it to any of the options that you prefer. If you need a bit of guidance, we have a list of the best color profiles for MacBooks.
6. Change the Refresh Rate

The refresh rate dictates how many times per second a screen changes what’s being displayed. If it’s a static image at 100Hz, it will switch a hundred times, but to the same image. If you’re playing a 60FPS game, at 60Hz, each time the panel refreshes itself, it will show a new frame.
Setting the refresh rate incorrectly is a common cause of screen flickering, not just for people using a MacBook Air. So, it’s important you check this option is within the correct range.
An M1 MacBook Air’s built-in display can only refresh at up to 60Hz. Usually, macOS shouldn’t allow you to even try an unsupported refresh rate, but it doesn’t hurt to make sure.
Once more, head to System Settings > Display. Check which option to select in the Refresh rate drop-down menu. You can try some of the values listed here to check if they help with the screen flickering. Just don’t go above your display’s maximum supported rate.
7. Fix Your MacBook Air Screen Flickering with SwitchResX
The solutions above all use macOS’s native display settings. In case none of them are enough to fix your MacBook Air display flickering, some third-party tools may work.
The first we’ll try is SwitchResX. In general, it’s a considerably complex app, but we’ll only use basic options.
- Download and run the SwitchResX. It should create a new Preferences Panel on your Settings app.
- To open it, go to System Settings > SwitchResX. Click the icon of a screen with gears, and SwitchResX should open.

- In this first screen, click the “Install helper tool” button and restart. After rebooting, open the app again and click on Launch Daemon.
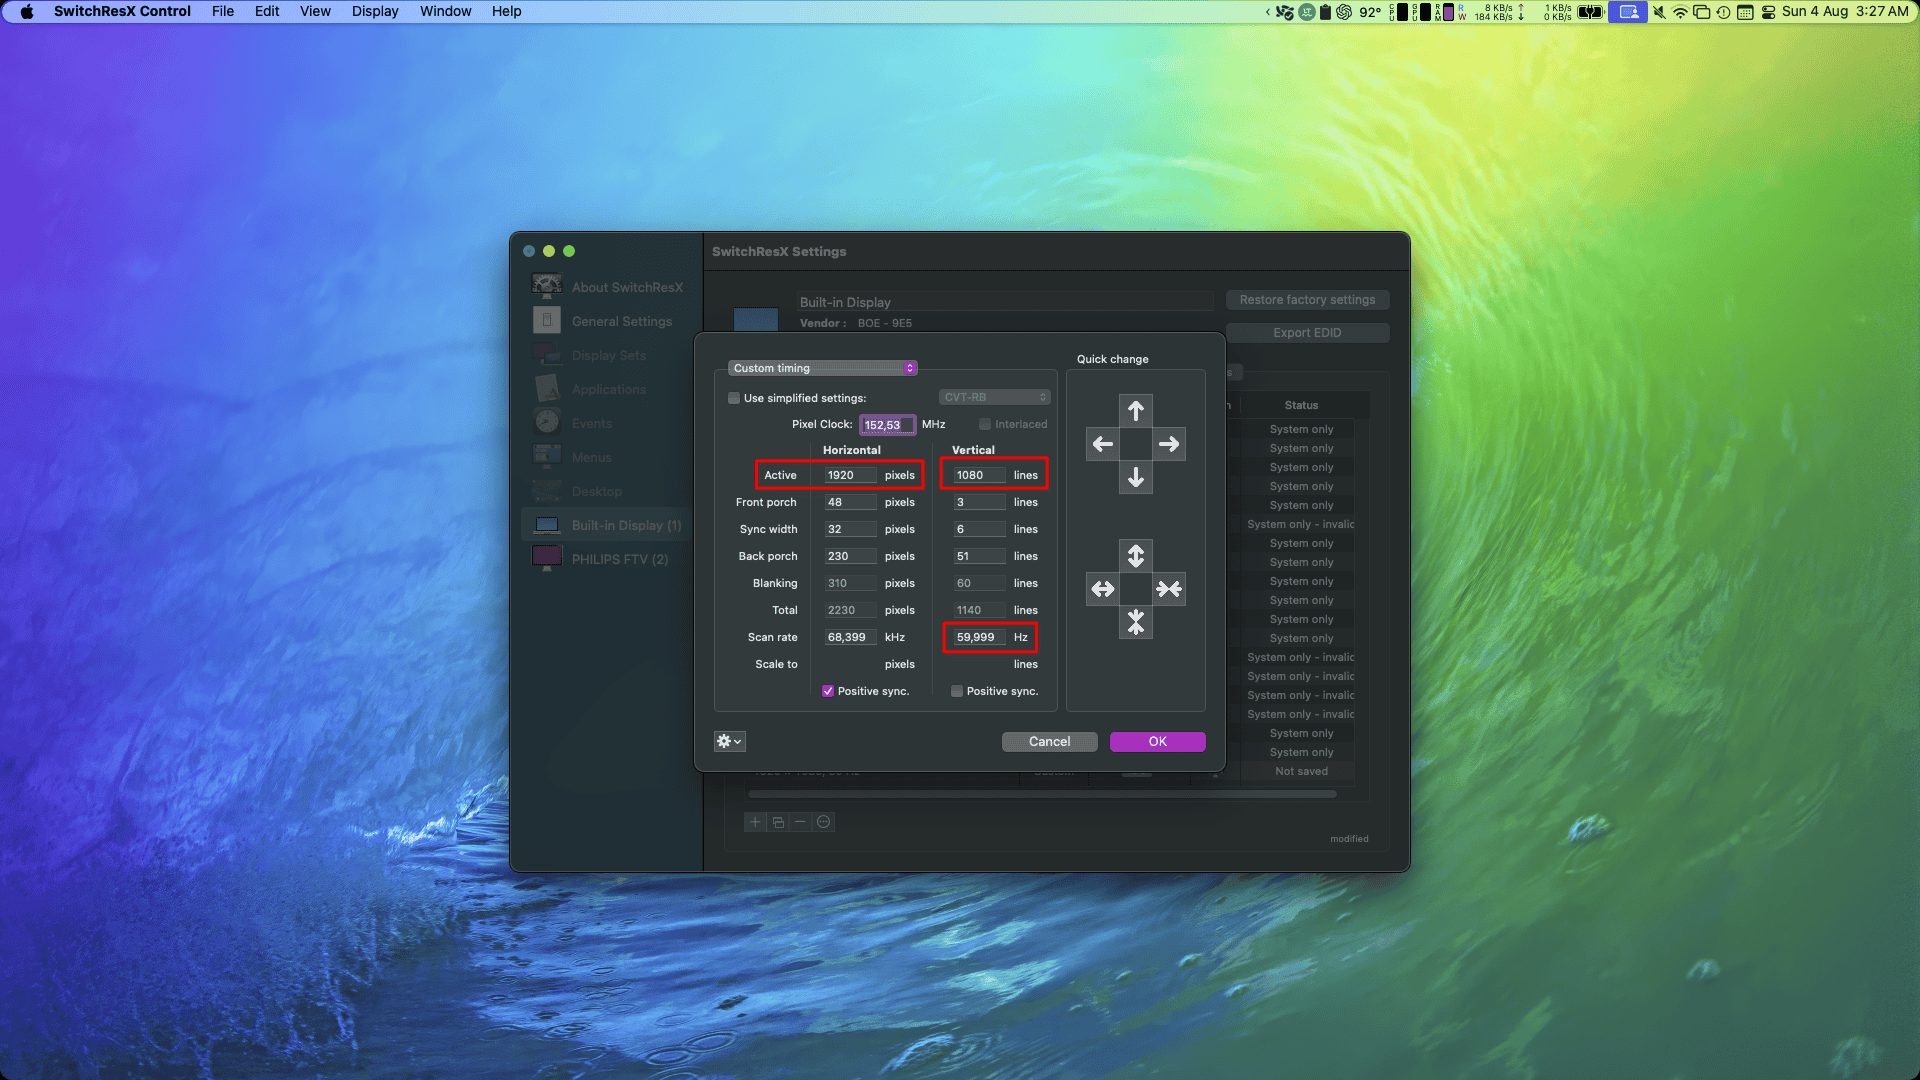
- In this window, go to Built-in Display > Custom Resolutions and click the plus symbol (+) below the list.
- In the dialog that opens, you’ll need only to change three of the fields:
Active, under the Horizontal column: your screen’s width, in pixels (2,560 for a MacBook Air).
Active, under the Vertical column: your screen’s height, in pixels (1,600 for a MacBook Air).
Scan rate, under the Vertical column: a bit below your screen’s native refresh rate (60Hz for a MacBook Air, try using 55Hz for starters). - Click “OK” to close the dialog.
- On the menu bar, select File > Save settings, then restart your MacBook. After the reboot, open SwitchResX again, but, this time, go to Built-in Display > Current Resolutions.
- Mark the “Show frequencies separated” checkbox below the list, and Select the 2560 x 1600 option with 55Hz frequency. Your screen may flicker a few times more while SwitchResX sets up the resolution before working normally.
- If you don’t see the 2560×1600/55Hz option on the list, check the Custom Resolutions tab. If you see “not installed” next to it, the app doesn’t detect you’re on the trial period.

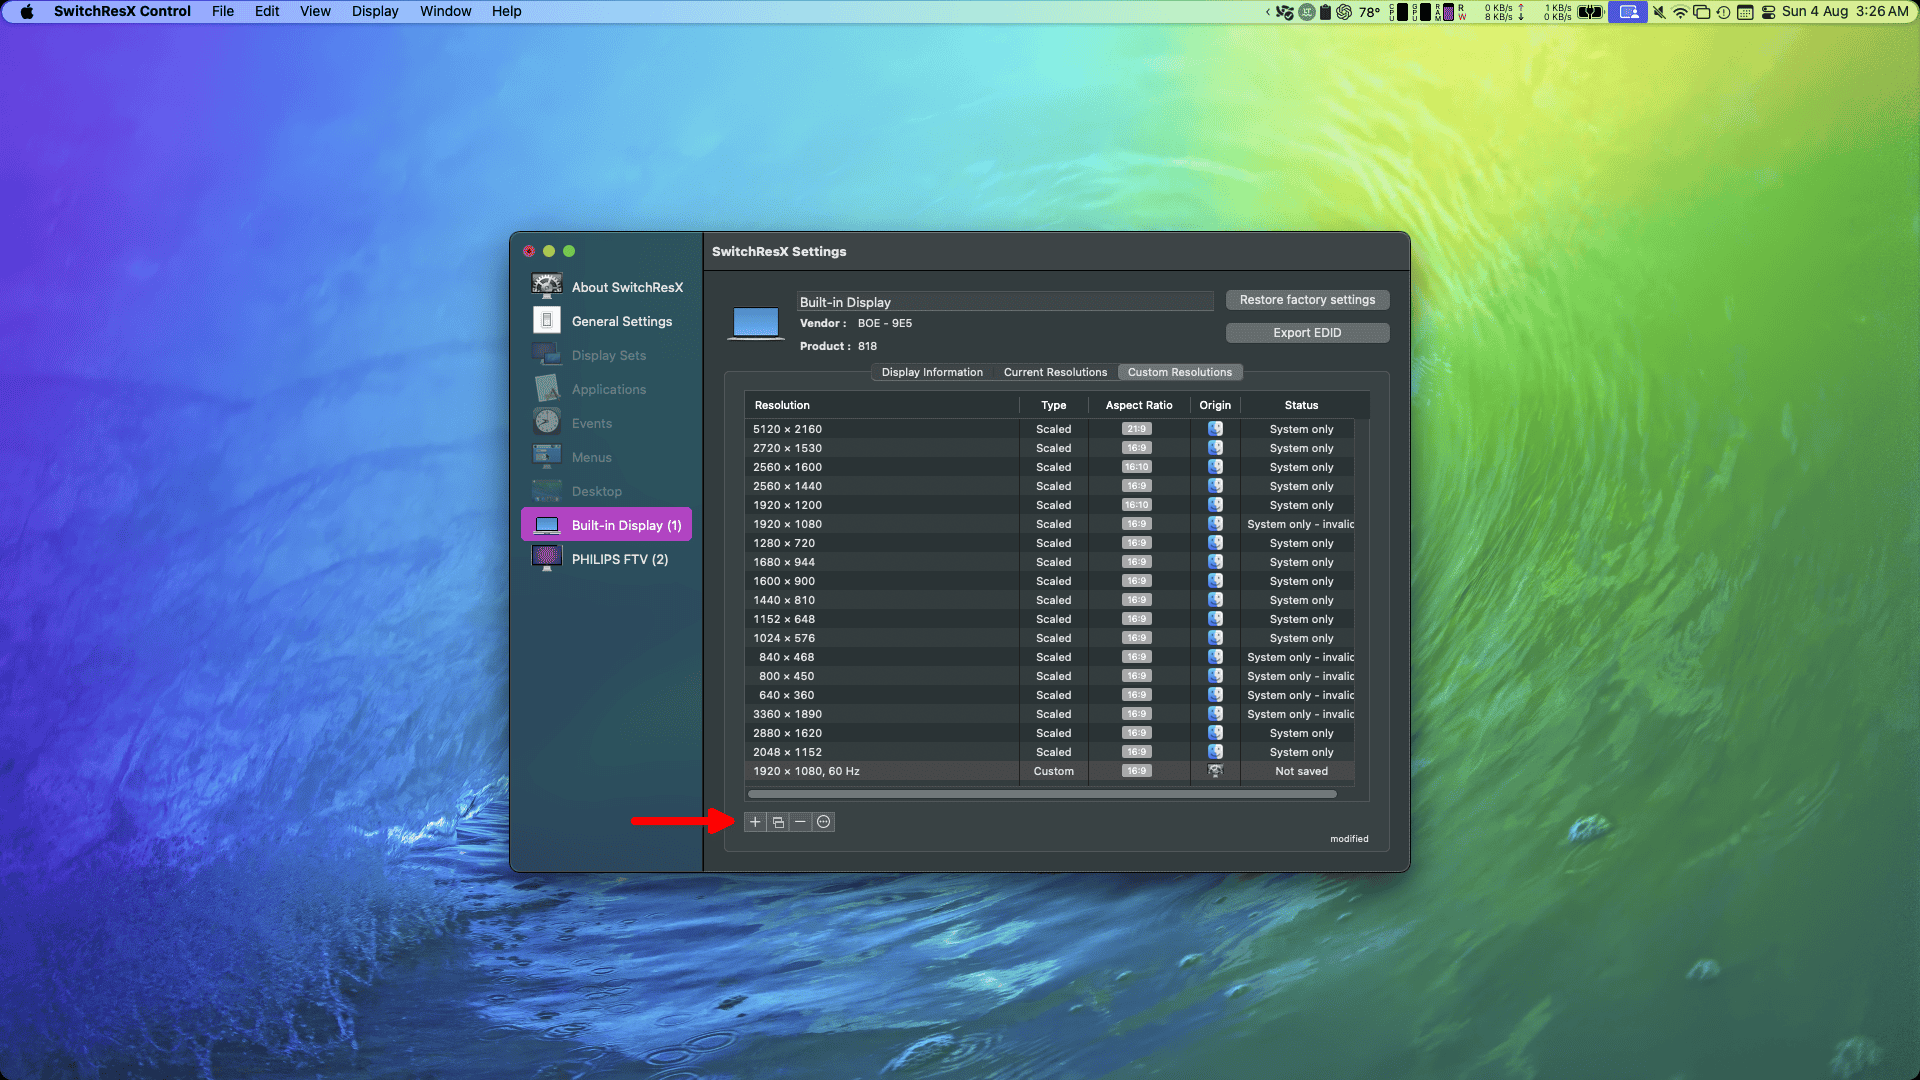
SwitchResX supposedly gives you 10 days before having to purchase the $15 license, but the trial doesn’t always work. If this happens, check the fix below before purchasing the license.
8. Fix Your MacBook Air Screen Flickering with BetterDisplay
For this solution, you’ll do some advanced configuration changes, which can be harmful to your Mac if not followed correctly. Please proceed with caution.
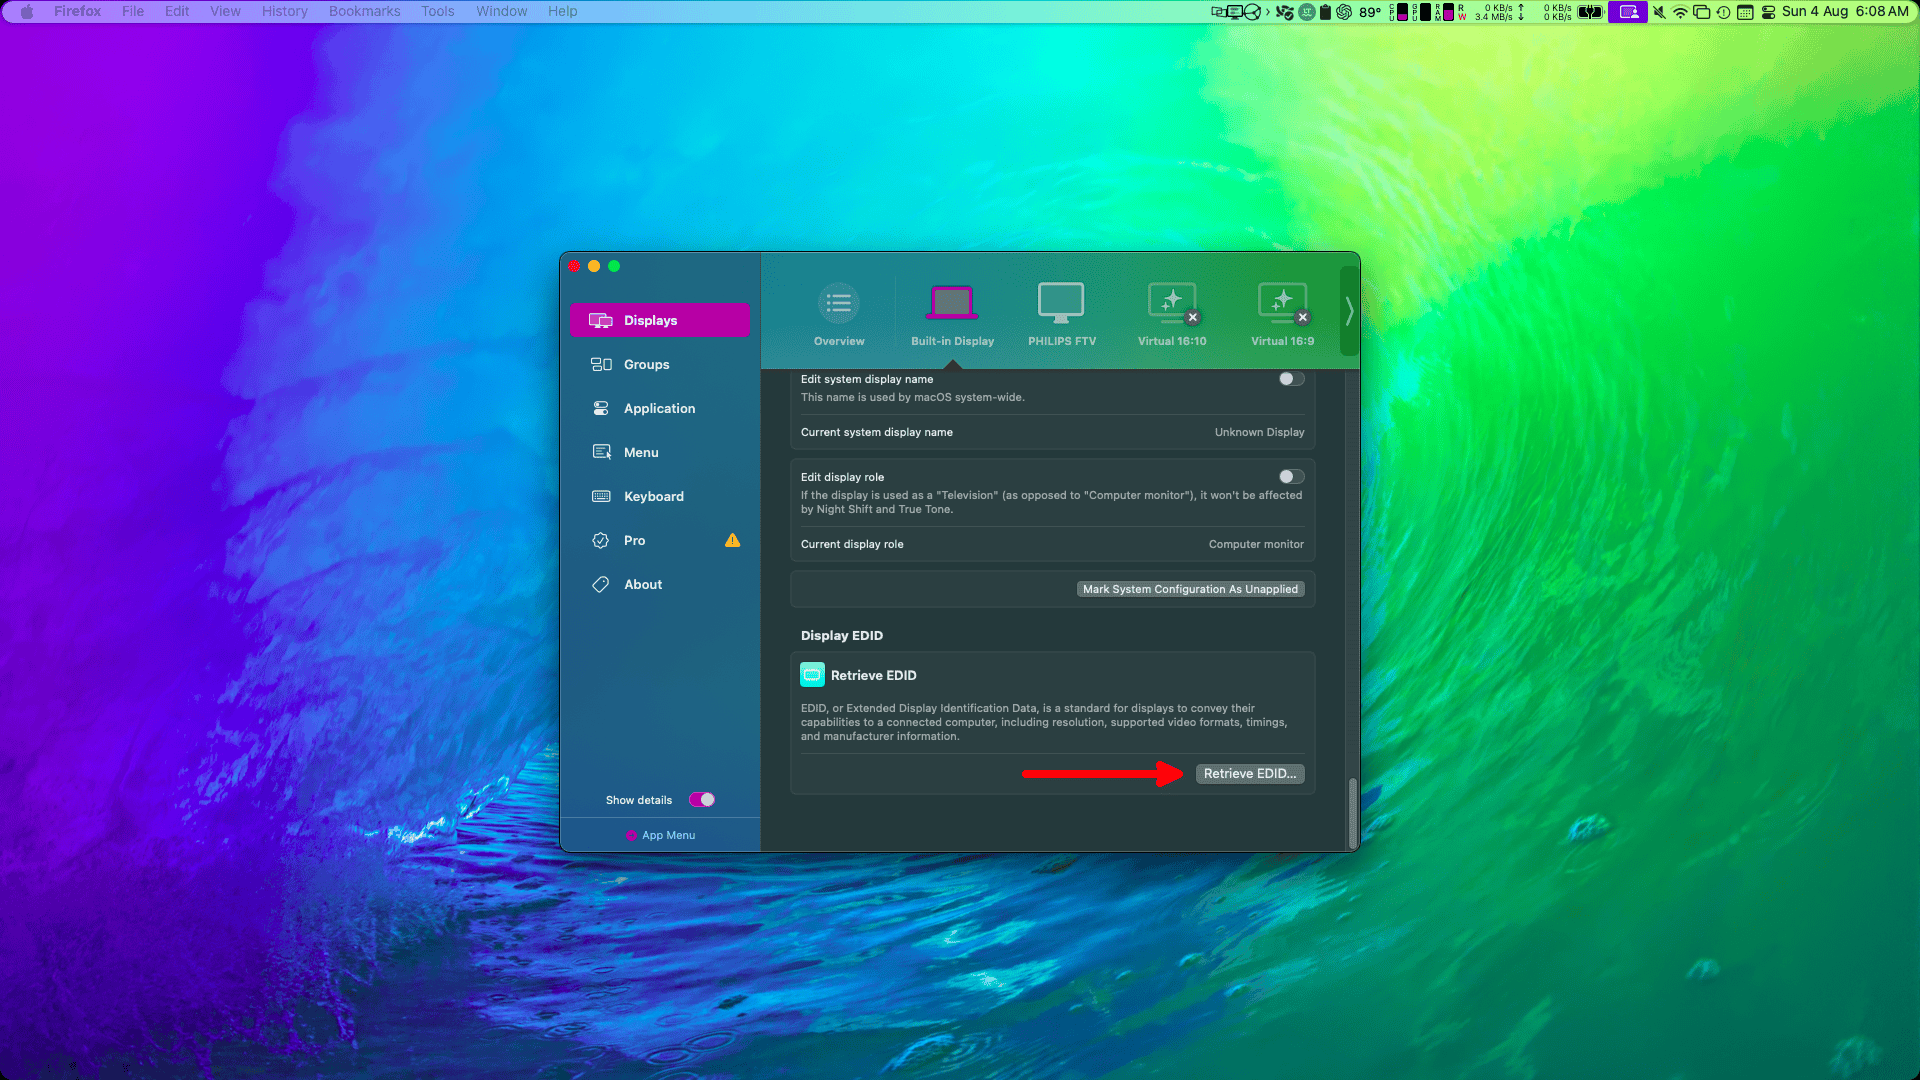
- Firstly, download BetterDisplay. The feature you’ll need is only available on the paid version, but there’s a 14-day trial. You’ll also need to download Analog Way (AW)’s EDID Editor, which is free.
- Install both apps and open BetterDisplay. Go to Displays > Built-in Display > Display EDID > Retrieve EDID. It’s the very last section, so you can scroll all the way down. A dialog will open.
- Select Direct I2C communication and click on Retrieve EDID Data. When the information appears, click Export EDID Data and save the .bin file.
- Open the AW EDID Editor and click “Open”, then select the .bin file you have just saved. The app will display a side menu and a main panel.
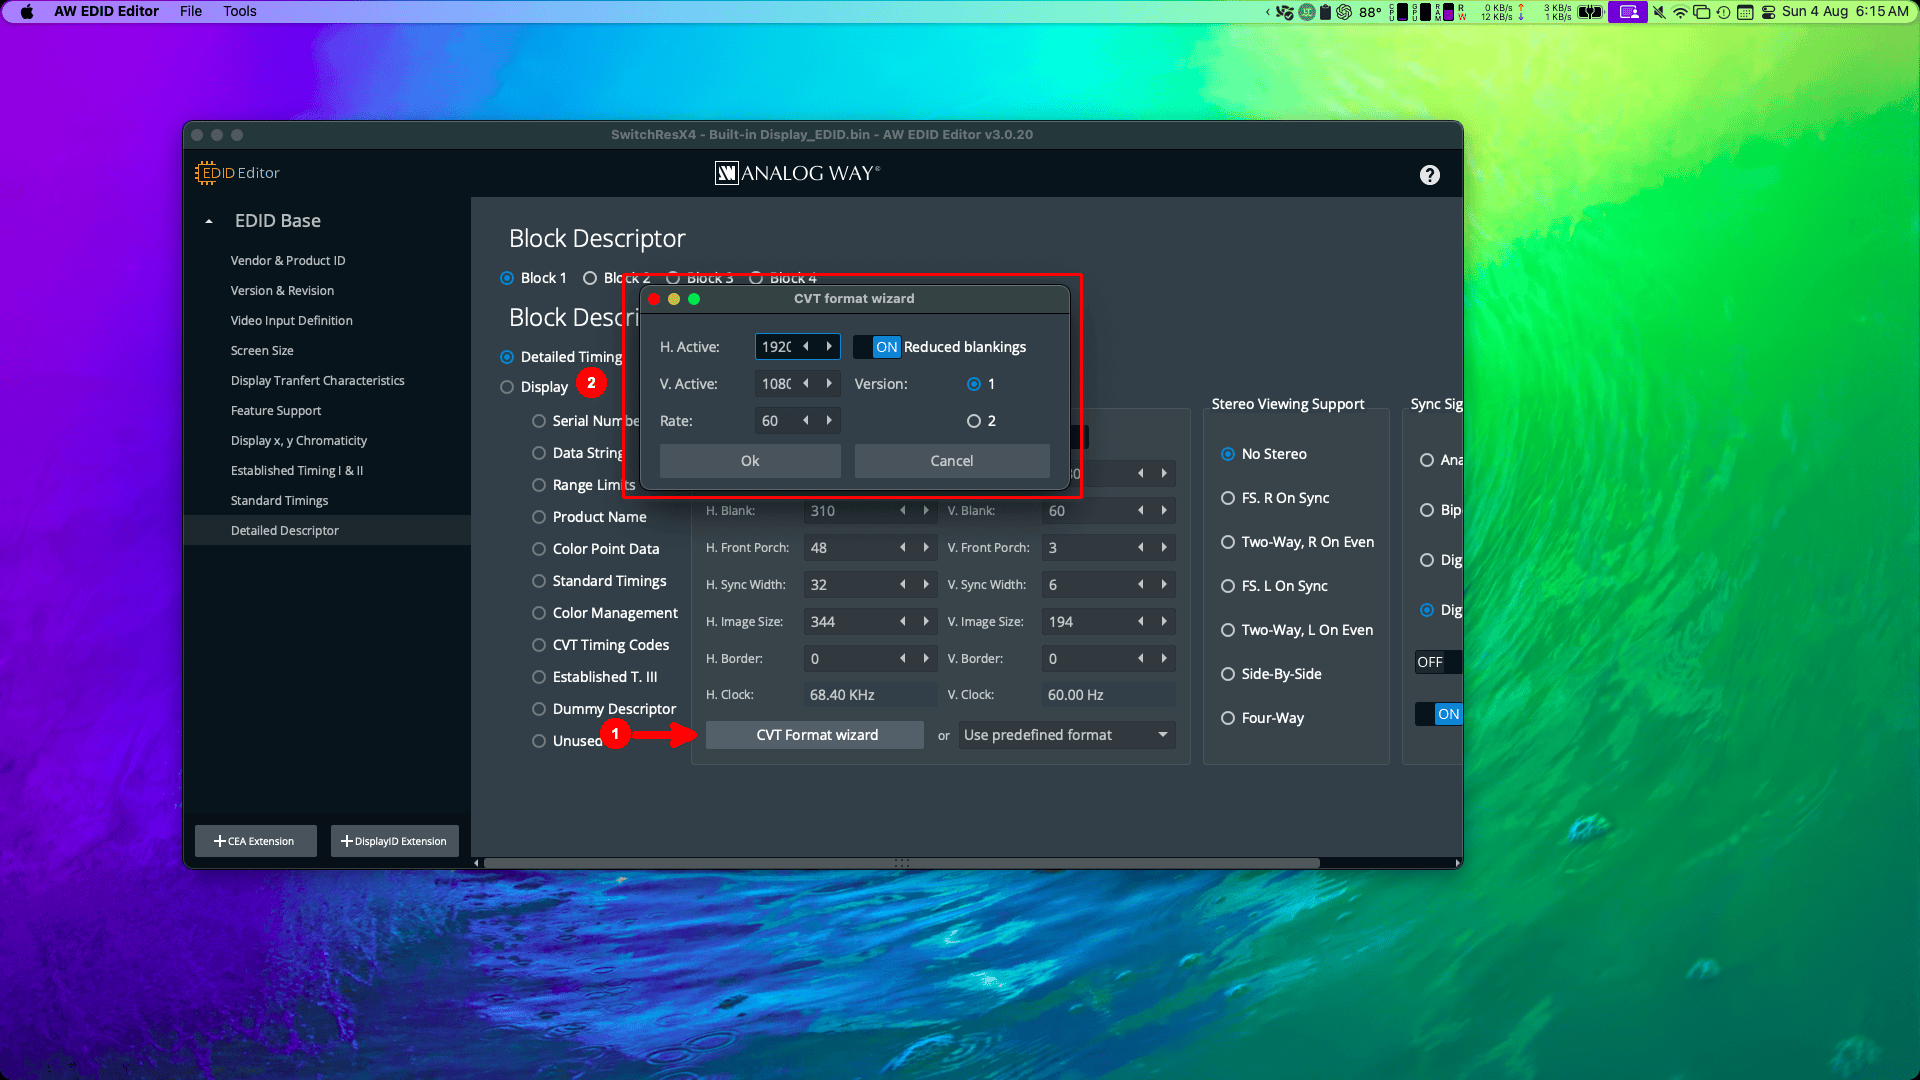
- On the side menu, go to Detailed Descriptor.
- Click the “CVT Format wizard”. Change the “Rate” field to 55, click “Ok”, and then, on the menu bar, select File > Save As. Save the modified .bin file and close the app.
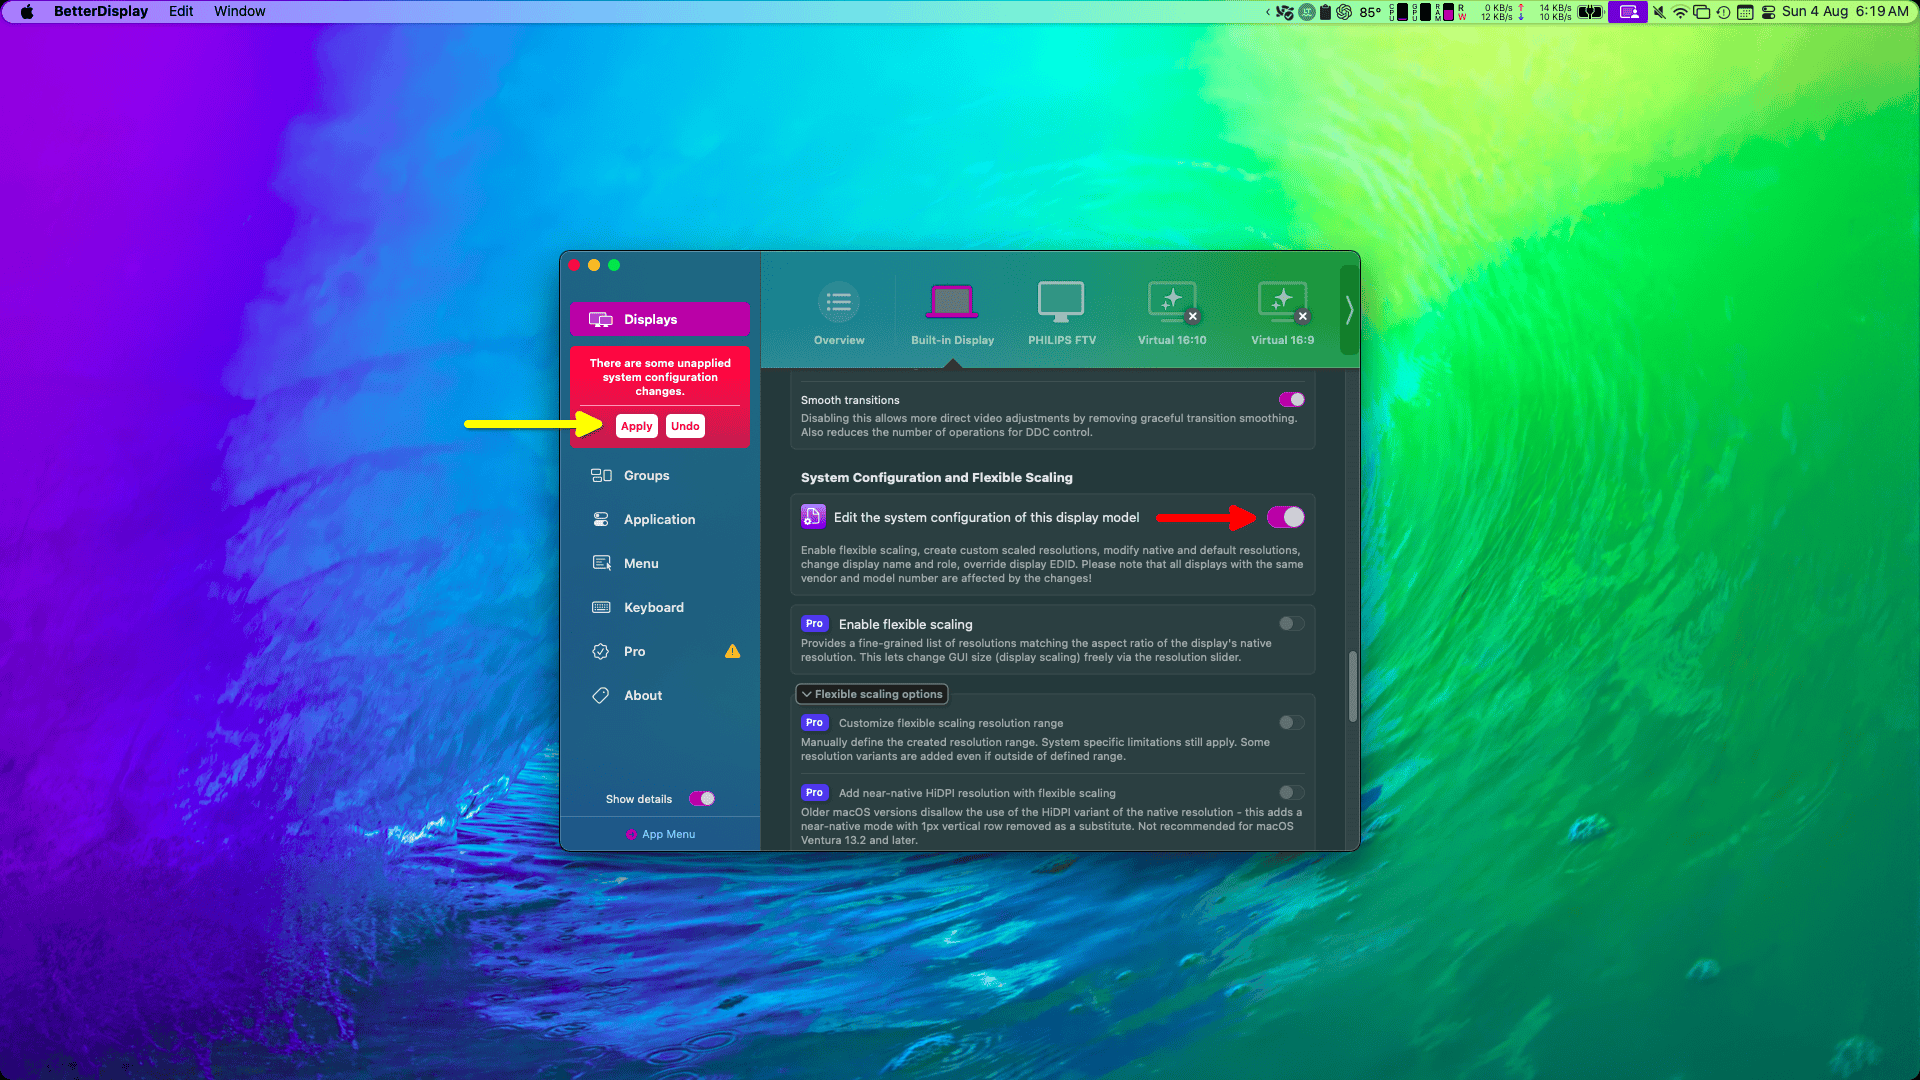
- Back to BetterDisplay, on the same screen, enable the Edit the system configuration of this display model toggle. Select “Apply” on the side menu. You may need to restart your Mac.
- After rebooting, look for the option to override the display EDID, and import the modified .bin file. Apply the settings, and the 55Hz option should be available when clicking BetterDisplay’s menu bar icon.

If you have gone through all of the above yet nothing worked, I have some bad news: you’re likely dealing with a hardware issue. Chances are that your MacBook Air’s screen flickering is caused by a damaged cable or a faulty panel. In this case, the only option left is to call Apple Support.