
My husband loves playing shooter video games and I like watching shooter movies. When he started playing Valorant, I was like, “Hey, I’d like to try that!” He’s using Windows, and guess what? I’m using Mac–and Valorant isn’t supported on Apple computers [insert sad face here]. At least not officially. So, how do you play Valorant on Mac?
Valorant is a first-person shooter (FPS) game from Riot Games. Despite being popular, it’s only available for Windows, Xbox, and PS5. However, there’s a workaround for Mac (with Intel processors) users to play this FPS game.
Step-by-Step Guide to Playing Valorant on Mac
Since Valorant is only designed for Windows, you need to download a separate Windows operating system to play this game on your Mac. It’s possible for some MacBook and iMac users, especially when your device specs can handle another OS installed.
 NOTE
NOTE
1. Install Windows Via Boot Camp Assistant
Time needed: 50 minutes
Boot Camp Assistant is a utility that allows macOS to install Microsoft Windows operating systems on Macs with Intel processors. You need at least 64GB of storage space on your Mac startup disk to install Windows. Unfortunately, M1 or M2 Macs don’t support Boot Camp Assistant. Follow these steps:
- Check the Secure Boot Setting. The Secure Boot of your Mac is always set to Full Security, which won’t affect your Windows installation. However, if it’s on No Security or Medium Security, you have to change it back to Full Security before installing Windows.
- Download 64-bit version of Windows you want to install. You can directly download Windows 10 or 11 ISO file from Microsoft website.
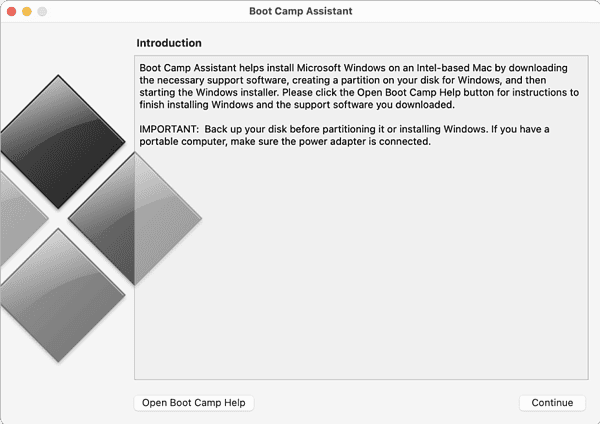
- Use Boot Camp Assistant to create a Windows partition. Open Utilities and go to your Applications folder.

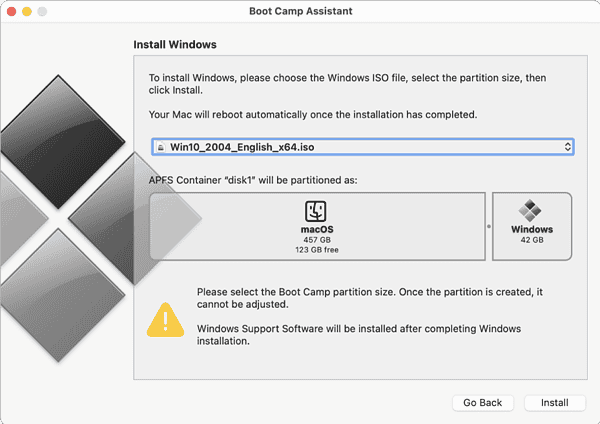
- Look for Boot Camp Assistant and open it. The instructions will appear as you open it. It may ask you to insert a USB flash drive to create a bootable drive for installation. Or it may ask you to choose the ISO file you have downloaded.
- Your Mac will restart after Boot Camp Assistant creates the partition. A prompt will ask you where you want to install Windows. Select BOOTCAMP partition and then click Format.
- Install Windows. There should be no external devices plugged in when you’re installing Windows. Click Next on the prompt. Then follow the instructions to proceed with the installation.
- Restart and switch from macOS to Windows. Once your Mac finishes with installation, it will automatically start up in Windows. A window showing Welcome to Bootcamp installer will also open. Just follow the instructions to install Boot Camp and Windows support software.
- It will ask you to restart once it’s done. To open Windows upon startup, press and hold Option (or Alt) ⌥ key. It will allow you to switch between macOS and Windows.
2. Install Valorant
Now that you have Windows on your Mac, you can install Valorant.
- Go to playvalorant.com and click “Play For Free” to download the Installer package.

- Open the installer file and choose your preferred download location. You should have at least 8GB of free storage space to install the game.
- Apart from the game itself, Riot also comes with Riot Vanguard, which is a game security software. This allows Riot Games to maintain its competitive integrity. It’s basically an anti-cheat software. Riot Vanguard should be active while you’re playing Valorant (or some other Riot Games video games for that matter).
- Riot Vanguard doesn’t usually need a separate installation. Once you install Valorant, it automatically installs Riot Vanguard as well.
- Sign in to your existing Riot ID or create one on Riot Games. Just go to Sign In and then create an account.
- Launch Valorant and you can start playing.

3. Review graphics settings
Although some graphics settings are automatically set up, you should consider reviewing them to optimize the right one for your gaming experience. This is also recommended especially if your game is running on a virtualized environment. Unlike the usual PC setups, Macs don’t have GPUs with VRAM (unless you purchase an external one).
- Run maintenance on Mac. You can do the usual maintenance processes you regularly do with your Mac. You should consider freeing up your RAM, repairing disk permissions, etc. Or you can do it through clean-up software available for Mac.
- Review Windows graphics settings. Go to Windows Graphics Settings. Look for Valorant by browsing. Once you have Valorant on the list, you have the option to set its graphics performance. Choose High Performance.
- Reduce in-game setting even though Valorant is set to High Performance in graphics settings. It allows Valorant to run smoother as it doesn’t overextend the capacity of your graphics processor. Here’s an ideal example of a graphics quality setting for Valorant.
There are still other FPS games available for macOS such as Counter-Strike 2, Call of Duty, Left 4 Dead 2, and more. But Valorant gives a fresh take on FPS games with its refined graphics quality compared to other similar video games. Also, the Valorant community is getting wider internationally, especially when it entered the Esports scene shortly after its release.