
Screenshots are crucial to getting the most out of ChatGPT, but they are a chore to take, and having too many will clutter your Desktop. Luckily, the official app from OpenAI makes the process extremely easy. In this tutorial, you’ll learn how to quickly take screenshots with ChatGPT on a Mac.
Why You Should Upload Screenshots to ChatGPT
If you use the ChatGPT desktop app for Mac, you don’t have to capture and hand over screenshots separately. Instead, you can instruct ChatGPT itself to take and attach screenshots.
ChatGPT has extremely accurate vision capabilities. Instead of copy-pasting text or writing detailed prompts, screenshots provide context and allow ChatGPT to learn more information. Let’s say you need to proofread an email. Just upload a screenshot of the draft and ChatGPT will analyze the text. The same could apply to troubleshooting. With a snapshot of the entire screen, you won’t have to go into detail about the issue.
How to Take Screenshots with ChatGPT for Mac
Time needed: 1 minute
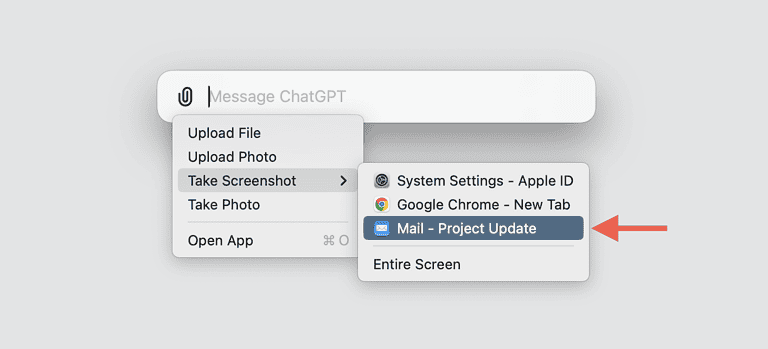
The most convenient way to take screenshots with the ChatGPT desktop app for the Mac is through the Chat Bar. Here’s how:
- Press Option + Space and select the Paperclip icon on the left corner of the Chat Bar.
- Point to the option labeled Take Screenshot.
- You’ll see a list of apps currently open on your Mac—select an app to automatically grab a screenshot of its window. Or, choose Entire Screen to capture the entire screen of your Mac.

- You should see the screenshot automatically appended to the Chat Bar. You can continue taking additional screenshots if you want.
- Type in your query and press Return. The ChatGPT window will launch, and you can talk back and forth with ChatGPT.
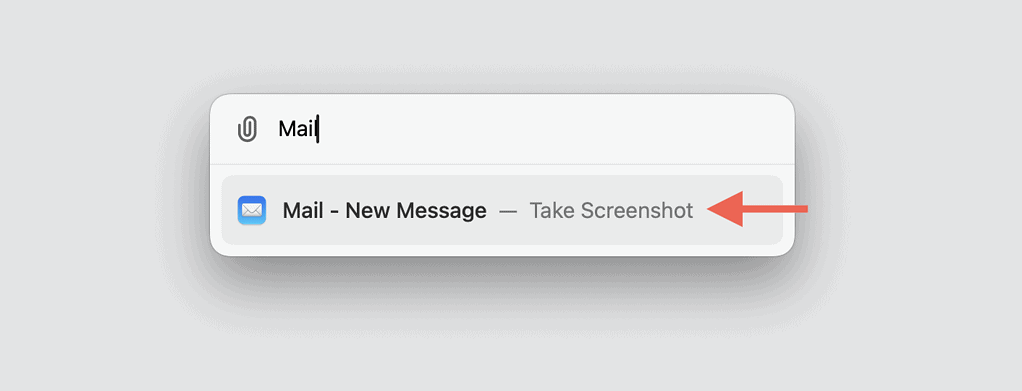
When taking a screenshot of an app, a faster way is to start typing the app’s name immediately after pressing Option + Space. The Chat Bar should indicate if you’d like to take a screenshot—just press the Down arrow key and press Return.
 NOTE
NOTE
The process is similar if you want to add screenshots to an existing conversation or a new chat within the ChatGPT app. Select the Paperclip icon next to the input area, choose Take Screenshot, and grab a screenshot of an app or the entire screen.