
Looking to install and set up kubectl on macOS? You’ve come to the right place. It’s a popular command line tool that is useful for communicating with the control plane of a Kernetes cluster through the Kernetes API. For those who just love rocking code and command lines, I’ll show you how to open up your Terminal to a new world. Let’s take a look.
What to Know Before Starting
 NOTE
NOTE
Before installing kuberctl, there are a couple of things you should know. For starters, though this is the easy guide, the installation is going to require some high experience with Terminal and its extensions, among other options. Considering kubectl involves a lot of coding in the first place, this shouldn’t come as a surprise. If you’re unfamiliar with Terminal, Curl, Homebrew, or Macports, however, you may want to back up and do some reading before continuing.
Additionally, the version of kubectl that you are using must have a minor version difference of one for your cluster. This means that if you were running, v1.29, for example, you would need the client to communicate with the control planes of either v1.28, v1.29, or v1.30. The best way to avoid issues is to use the latest version of kubectl.
1. Install kubectl Binary Using Curl
For this installation, you will be using Curl through your Terminal app. Note that this method involves knowing whether you’re using an Intel-based Mac or Apple silicon.
1. Download the Latest Version of kubectl
Time needed: 10 minutes
First, you need to download the latest version before beginning.
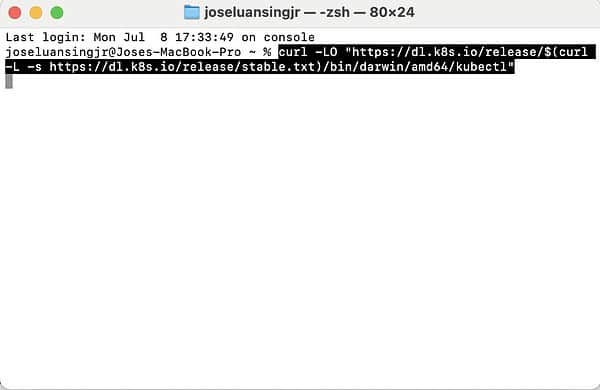
- First, open your Terminal, to download the kubectl binary. On an Intel-based Mac, enter this command:
curl -LO "https://dl.k8s.io/release/$(curl -L -s https://dl.k8s.io/release/stable.txt)/bin/darwin/amd64/kubectl"
On Apple silicon, enter this command:curl -LO "https://dl.k8s.io/release/$(curl -L -s https://dl.k8s.io/release/stable.txt)/bin/darwin/arm64/kubectl"
- If you need to download a specific version, you can replace the
$(curl -L -s https://dl.k8s.io/release/stable.txt)with the version you want to download.For example, if you want to download v1.30 on an Intel-Mac, you would use this command:
curl -LO "https://dl.k8s.io/release/v1.30.0/bin/darwin/amd64/kubectl"
On Apple silicon, you would use this command:
curl -LO "https://dl.k8s.io/release/v1.30.0/bin/darwin/arm64/kubectl"
2. (Optional) Validate the Binary
Once it is downloaded, you can then validate the binary. Make sure the binary and the checksum match. You can skip to step three if you want to.
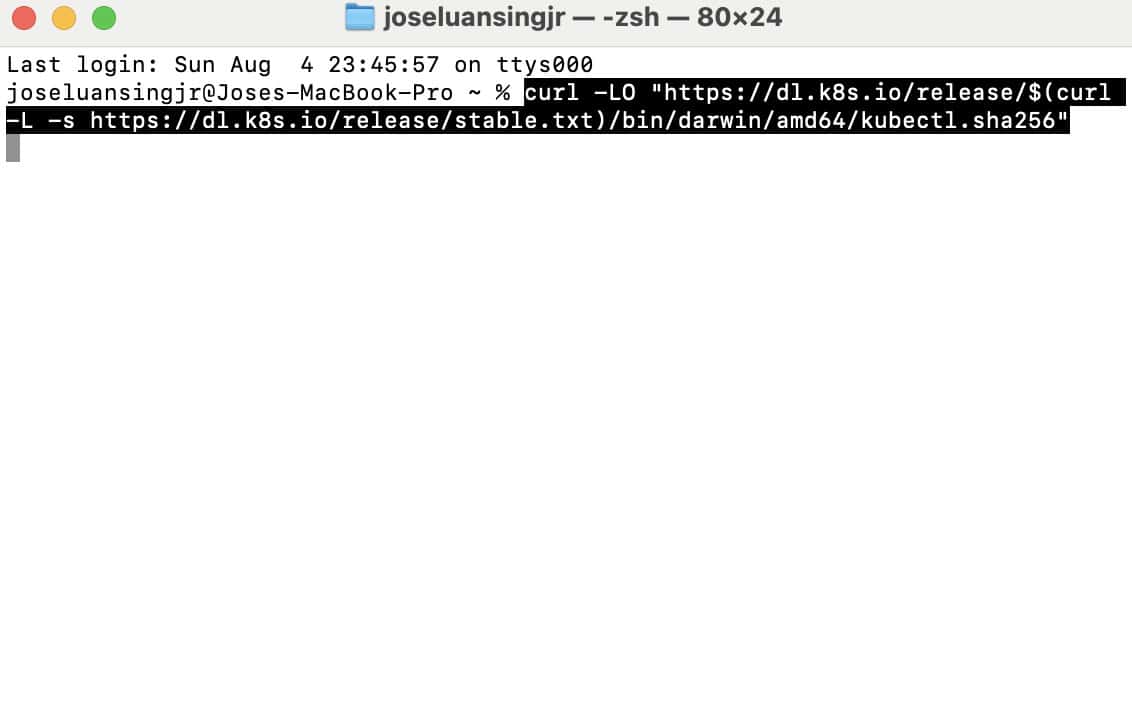
- First, download the checksum file for kubectl.
On Intel, enter this command into Terminal:curl -LO "https://dl.k8s.io/release/$(curl -L -s https://dl.k8s.io/release/stable.txt)/bin/darwin/amd64/kubectl.sha256"
On Apple silicon, enter this command:curl -LO "https://dl.k8s.io/release/$(curl -L -s https://dl.k8s.io/release/stable.txt)/bin/darwin/arm64/kubectl.sha256"
- You then need to validate the binary vs the checksum file.
Enter this command:echo "$(cat kubectl.sha256) kubectl" | shasum -a 256 --check - If it is valid, you will receive this output:
kubectl: OK - Should the check fail, shasum will exit with a status of nonzero and will print an output that looks something like this:
kubectl: FAILED shasum: WARNING: 1 computed checksum did NOT match
3. Final Steps
After performing the check, you have a couple more things to do with the binary before testing.
- First, the kubectl binary needs to be executable, enter the following command:
chmod +x ./kubectl - You will then need to move the kubectl binary to a location on your system
PATH. Enter these two commands one at a time:sudo mv ./kubectl /usr/local/bin/kubectlsudo chown root: /usr/local/bin/kubectl
Remember to make/usr/local/binthe PATH environment variable. - You can now check to see if the version you installed is up to date. Enter this command:
kubectl version --client - You can also check by receiving a detailed view:
kubectl version --client --output=yaml - Once the installation and validation is complete, you may delete the checksum file:
rm kubectl.sha256
Easy enough, yeah? Make sure to skip to step four once you are done.
2. Using Homebrew to Install kubectl
Those that would prefer to use the Homebrew package manager can perform the following steps:
- First, run the installation command:
brew install kubectl
orbrew install kubernetes-cli - Then, all you need to do is run a test to ensure you are running the must upto-date version:
kubectl version --client
That’s all there is to it. If you’re using Homebrew, it’s pretty east to get kubectl running. However, make sure you follow the verification process that’s outlined below.
3. Install using Macports
For those using the Macports package manager, the steps to install the kubectl binary are also straightforward:
- Enter the following commands into Macports:
sudo port selfupdatesudo port install kubectl - Make sure kubectl is up-to-date by entering this command:
kubectl version --client
Once you are done, you will need to follow the steps below.
4. Verify the kubcetl Configuration
Now that kubectl is installed, you will need to ensure it can access and find the Kubernetes cluster. This requires a kubeconfig file. Fortunately, these should be created automatically whenever you deploy a Minikube cluster or whenever you create a cluster via kube-up.sh.
Know that the default location is ~/.kube/config.
For this step, all you need to do is enter the following command into your terminal: kubectl cluster-info
You should receive a response that includes a URL, which indicates that kubectl has the correct configuration for access to the cluster.
If you receive a message that says something like The connection to the server <server-name:port> was refused – did you specify the right host or port? then the configuration did not go to plan. Kubernetes recommends that if you’re attempting to run a Kubernetes cluster locally (such as a laptop), you should install Minikube or something similar and then rerun the commands.
Should running the cluster-info command return a response with a URL but you’re still not able to access your cluster, you can run the kubectl cluster-info dump to check if things are configured properly.
5. Installing Optional Plugins and Configurations
For those that need it, kubectl also provides some interesting and useful configurations and plugins. You can view them on the kubernetes website (who I must also thank for helping me with this guide). Plugins available on the website include autocompletion support for Powershell, Fish, Zsh and Bash and more. You can also check out how to install kuberctl should you need the option.
You may also want to the best Terminal alternatives for Mac.