
Users have been requesting window tiling on Mac for several years. While there are quite a few third-party apps offering that functionality, a native option wasn’t available. The company introduced split view for full-screen applications in OS X El Capitan, but even that was quite limited.
With macOS 15 Sequoia, the company is finally changing that. Now, you’ll be able to snap app windows to different parts of the screen. Here’s how to use window tiling in macOS Sequoia, plus a few tips on wholly maximizing this feature.
How To Use Window Tiling in macOS Sequoia

First of all, make sure to enable the feature on your Mac. Open the System Settings app and navigate to Desktop & Dock > Windows. This section is divided into two menus, the bottom one has the tiling options. If “Tile by dragging windows to screen edges” isn’t enabled, toggle it on.
Next, click and drag an app window from the top bar. When you reach a screen corner or edge, the tiling outline will appear. Window snapping in macOS Sequoia has the following positions:
- Top left (quarter of screen)
- Top right (quarter of screen)
- Bottom left (quarter of screen)
- Bottom right (quarter of screen)
- Left (half screen)
- Right (half screen)
- Top (half screen)
- Bottom (half screen)
- Maximize (full-screen, but keeping the menu bar and dock visible)
- Center (half screen)
To maximize a window, drag it to the top of the screen, near the center, but without going past the menu bar. If you reach the screen edge, macOS opens Mission Control. To open it in the center while taking half the display’s width, drag it to the bottom edge of the screen.
Quarter-screen tiles can be created by dragging to each corner of your display. The same applies to the left and right halves with their respective edges. However, note that you can’t snap an app window to the top and bottom halves by dragging them.
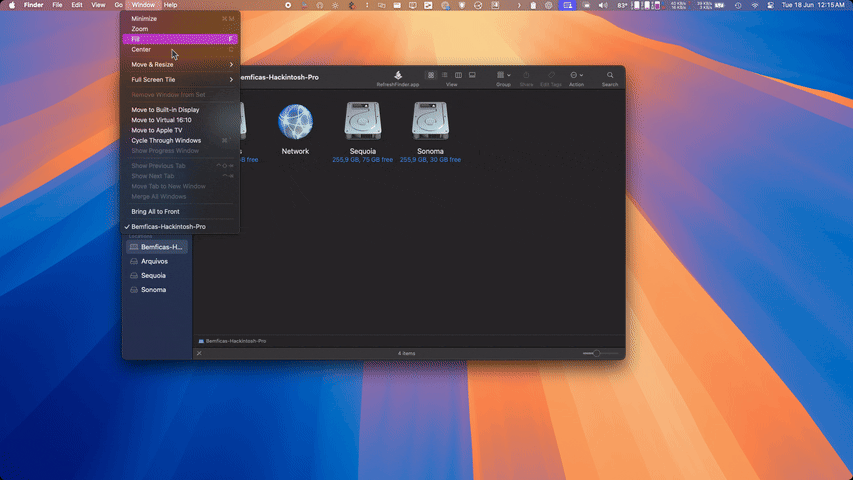
macOS Sequoia Window Tiling Menus
That’s what the tiling menus are for. They’re accessible in two ways: the green button, in the top left of a window, and by selecting Window > Move & Resize on the menu bar.
To use the green button, just hover your cursor over it. Clicking it will put your app in full-screen mode as usual.
Tips To Use Window Tiling
The native macOS Sequoia window tiling functionality has some extra features that are not enabled by default. With a few tweaks, it can be a powerful productivity tool.
Tweaking the Tiles’ Margins
By default, the tiling feature in macOS Sequoia leaves a significant margin of empty space around the windows. It may feel visually lighter, but also wastes screen real estate.
In the same System Settings menu you can enable or disable tiling, and you can configure the tiled window’s margins. But, in typical Apple fashion, you can’t make them thinner or thicker, only On or Off.
The Option Key Enables Additional Quick Actions
Many people don’t know that the Option key opens up additional actions. If you press and hold it while selecting specific system settings, you’ll see an additional set of functions. This also applies to native macOS window tiling.
While dragging a window, holding Option enables quick tiling. Basically, you can snap the window to the left or right half without needing to touch the screen’s edge. It doesn’t work for other tiling positions, however. This is useful when working with multiple monitors—while trying to touch the screen’s edge, you might end up moving the cursor to another display.
And when opening the tiling settings, holding Option shows additional arrangements. This applies to both the menu bar and the green window button.
Window Tiling Keyboard Shortcuts
All of the above rely on mouse input, which may not be everyone’s cup of tea. If you’d rather control window tiling using keyboard shortcuts, I have good news: macOS 15 Sequoia offers (limited) support.
To check the complete list of native window tiling keyboard shortcuts in macOS Sequoia, open Window > Move & Resize. In short, they are based on the Globe (Fn) and Control keys.
Keep in mind that these may not work for everyone. I use a Logitech keyboard that, despite having a Mac layout, is unable to trigger the window tiling shortcuts.
Not all the Move & Resize menu options have keyboard shortcuts, unfortunately. However, you can create custom ones in System Settings > Keyboard > Keyboard Shortcuts > App Shortcuts. This path supposedly allows you to create shortcuts for any option in the macOS menu bar, including the tiling settings. As with the above, your mileage may vary: I wasn’t able to set up window tiling this way either.
Window Tiling on macOS: You Don’t Have To Wait for Sequoia

It’s great that Apple finally added native window tiling to macOS. However, the feature has been lacking for so long that people have developed dozens of alternative tiling window managers. Here are a few of them:
- AeroSpace
- Amethyst
- AppGrid
- Assembl
- BetterSnapTool
- Grid
- Loop
- Magnet
- Moom
- Mosaic
- Phoenix
- Rectangle
- Swish
- Tiles
- WhichSpace
- Yabai
I haven’t tested most of the above apps, so take these recommendations with a grain of salt. Personally, Rectangle has everything I need. Some of the options listed are more customizable or have more advanced features, but Rectangle doesn’t overcomplicate things.
Window tiling is just one of many macOS Sequoia’s exciting new features, although it’s possibly the most anticipated one. Thankfully, it’s available right from the first Developer Beta.