
I’ve had several problems with Music over the past few months after upgrading to macOS Sonoma, including a glitch that stopped the app from working when connected to Wi-Fi. I’ll give you eight of my top recommendations to solve this problem, with complete instructions so that you can swiftly fix the issue.
Why Isn’t Music Working After Updating to macOS Sonoma?
You may encounter challenges with the Music app because updating Sonoma led to important in-device functions not being repaired. Sometimes, the issue arises from glitches that are easily solved by logging out and back into your iCloud account. Another potential reason is that your library is no longer linked to the original files.
How to Fix Music Not Working in macOS Sonoma 14/14.6.1
1. Log Out of iCloud and Back In
The fastest way to solve this problem is by signing out of iCloud and then logging back into your account. Follow these steps to do that.
Time needed: 2 minutes
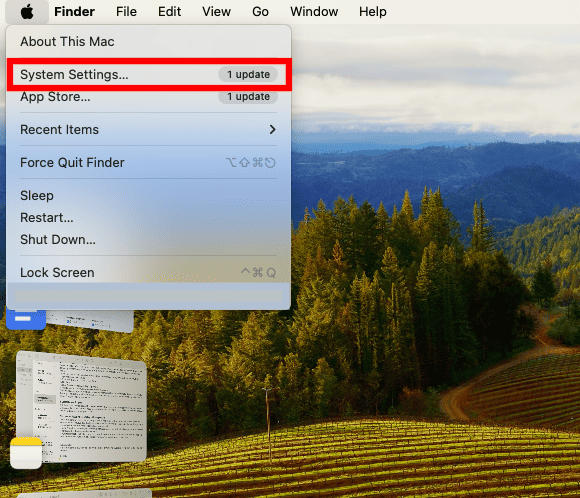
- Navigate to the Apple menu and select System Settings.

- When System Settings opens, go to your Apple ID.

- Scroll to the bottom and select Sign Out. Then, once you have logged out, sign back in.

You may also find success if you sign out and back into your Apple Music account. Open the Music app, go to Account, and select Sign Out.

2. Generate a New Music File
If logging out and into your accounts didn’t work, try generating a new music file. This should link your track and allow you to play everything like normal again. Here’s how to do that:
- Open the Music app and go to one of your songs.
- Select the three-dot red icon.
- Expand the Services dropdown menu.
- Tap Show in Finder. If you’re not directed to the file, try searching for it.
Take a look here if you’re having problems using Apple Music on your iPhone.
3. Add the Music App to Full Disk Access
Your Mac will often not fully repair files and frameworks when you update your software. For example, I have to rebuild my NTFS each time I download the latest macOS version. While this is quite annoying, it’s thankfully not too difficult to fix.
If you’re still having problems with Music, it might have something to do with your disk permissions. Here’s how you can grant Music full disk access:
- Open System Settings and go to Privacy & Security > Full Disk Access.

- Look for Music in the list of apps. If it doesn’t appear here, scroll to the bottom and select the + icon.

- Enter your password or use Touch ID when you’re prompted to.
- Search for Music, click on it, and select the blue Open button.

- If you have the Music app open, quit and reopen it when the pop-up asks you to.

- Look in Full Disk Access; you should now see Music with a blue toggle.


4. Play Your Track Via Finder
I’ve found that one way to fix tracks not playing in Music before is to play them via Finder, and this is also something that worked in older versions of iTunes. You have two options for this, and I’ll walk through both of them.
The first is to go into Finder and search for your song:
- Open the Finder app.
- Use the search bar to find one of your missing songs.

- Double-click on the song. Ideally, the Music app will open and start playing the track.
- If Music didn’t open, try pressing control + trackpad while hovering over the song and selecting Open With > Music.


5. Update to the Latest Version of Sonoma
Depending on when you read this guide, Apple may have released a newer version of Sonoma. Many problems are usually fixed with these updates, so it’s worth checking to see if you have something new to download.
- Go to System Settings > General > Software Update.
- Wait for your Mac to find an update. If it does, agree to download it.
- When your software has been updated, try using the Music app like you normally would.
6. Re-Import Your Songs Manually
I can already hear your frustrated groans if you have thousands of songs downloaded, but it might be a handy way to get the Music app working as it should. It’s also easier than you think, though admittedly, it can be time-consuming depending on how big your library is.
Follow these steps to manually import your songs back:
- In the Music app, go to File > Import.

- Choose the songs you want to add to your Music library. Then, wait for the process to be completed. If your songs are in place, you can simply drag your cursor while holding the trackpad to highlight them all.

7. Launch Your Mac in Safe Mode and Hold Option + Command
Safe Mode can help you fix multiple issues with native Mac apps, including Music. I don’t really like Safe Mode because it’s quite tedious to troubleshoot, but at the same time, it is helpful. Some users have more specifically found that Music starts working again when they hold Option + Command while booting their device in this mode.
Follow these instructions:
- Turn your Mac off in the same way that you normally would. Make sure you shut it down fully, though, rather than restarting.
- Wait for your Mac to switch off.
- Once your computer has turned off, press and hold the standby button. At the same time, hold Option and Command on your keyboard.
- Use your Mac in Safe Mode and test to see if the Music app is now functioning normally again.
- If everything is fixed, turn off your computer and restart it in normal mode.
8. Delete com.apple.Music.eq.plist and com.apple.Music.plist
As a last resort, you can try deleting a couple of files in the Finder app. Here’s how to find and remove them:
- Open the Finder app.
- In the app, select Go in the top toolbar. Then, when the dropdown menu appears, click on Go to Folder.

- Type ~/Library/Preferences in the text box and follow it with com.apple.Music.eq.plist. Hit the Enter key after typing all of this.

- Move com.apple.Music.eq.plist to the Trash.

- Repeat the above process with com.apple.Music.plist following ~/Library/Preferences this time.
- Close and reopen the Music app.


