If you pay for additional iCloud storage space, there is an added benefit that you need to know about. The new iCloud+ service allows you to use custom domains with your iCloud email, but there’s also a way to hide your email. This is very useful if you’re filling out a form that asks for your email address, and don’t want to risk getting inundated by spam. Let’s take a look at how to use “Hide My Email” from your iCloud+ service.
Why You Might Want a Burner Email Address
Most of us get more emails than we care for. Some are definitely useful, but most are not. In fact, Statista recently reported that spam messages accounted for 45.1% of all email traffic generated in March 2021. In 2020, around 306.4 billion emails circulated each day, including billions of marketing emails.
These add up, and we end up spending way too much of our time dealing with unwanted emails. At the same time, we want to be able to use the Internet, buy products and services, and just enjoy what’s out there on the World Wide Web.
This is the biggest reason to use “Hide My Email”. The feature creates a “burner” email address that you can use on those online forms. It forwards to your regular email address, but if it gets to be too spammy, you can just delete the spammed email address altogether.
Using Hide My Email From the Sign In with Apple Menu
Quite a few apps and web pages offer you the ability to sign in using your Apple ID. When you first sign up with one of these, you will see the option to share your email or hide it. If you choose the option Hide My Email, Apple provides a burner email address.
Any email that app or website tries to send you gets forwarded to you, but your real email address remains private. This feature is available to anyone with an Apple ID, even if you don’t have iCloud+.
How You Can Create a Burner Email Address Anywhere with iCloud+
If you have an iCloud+ account, you can hide your email address from just about any app or site. This service does not depend on using Apple’s Single Sign-On, which not everyone supports. Instead, as you fill out the registration form, pay attention when you get to the part asking for your email address.

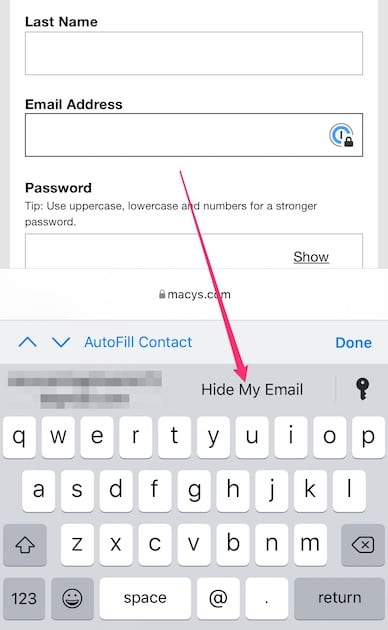
When you tap the email address field of the form, you should see an option labeled Hide My Email just above the keyboard. Tap that option.
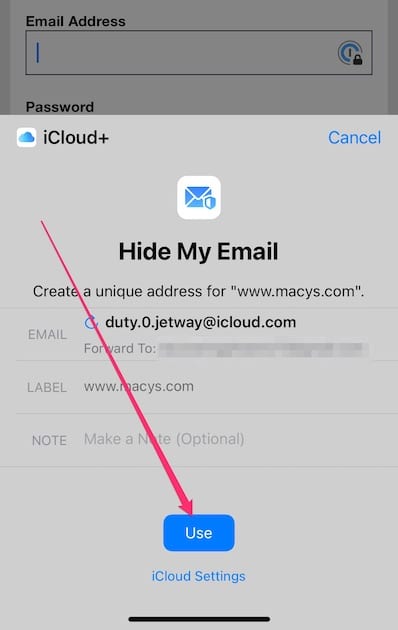
Next, the iCloud+ Hide My Email menu appears. It will show a unique email address, with the option to change to a different one. This will also show where emails will forward, along with a link to go into iCloud settings and change the options.

Tap on the blue Use button, and Safari fills your burner email address in the form. You should also receive an email notification that you used Hide My Email.
Managing Your Hidden Email Accounts
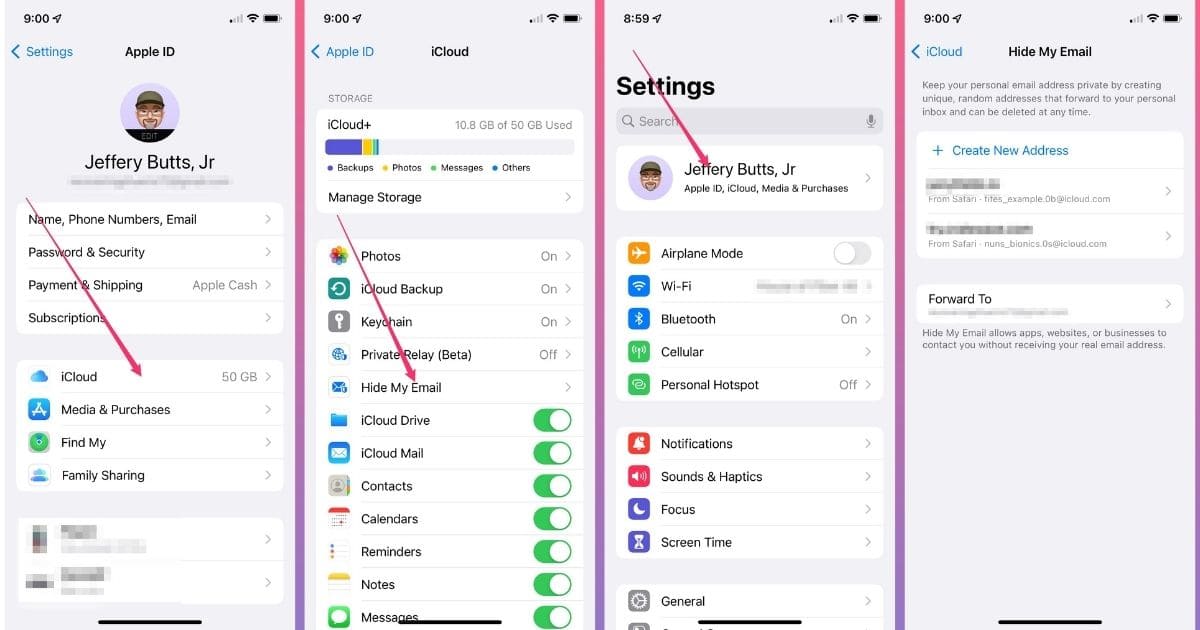
Any email sent to one of your custom addresses forwards to the email address associated with your Apple ID. You can manage all of your Hide My Email settings right from your iPhone. All you have to do is open the Settings app, then tap your Apple ID. Next, tap iCloud. Finally, tap Hide My Email. You will see all of the random addresses you’ve created, and can change the label or note for each one. You can also deactivate an email address to stop receiving any messages sent to it.

Using Hide My Email is a great way to maintain your email sanity. If you sign up for an account and later find out that site or app has sold your email address to sketchy marketers, it’s a snap to ditch that email address and rid yourself of the spam. Since you’re already paying for that additional iCloud storage space, it makes perfect sense to take advantage of all the bonus features that come with it.
