If you’re running one of the macOS High Sierra betas and have tried to resize your APFS container without success, I’ve got the answer for you. You can’t currently do this from Disk Utility, so it requires some Terminal geekery. Of course, if you haven’t already migrated over to APFS, you might want to look into that first, with the help of John Martellaro.
Finding Where Your APFS Partition Lives
I’m confident that by the time High Sierra ships in the fall, this will be possible within the graphical Disk Utility. It’s a pretty common requirement, so Cupertino is bound to incorporate it more easily into the final version of macOS 10.13 High Sierra. For now, though, the Terminal is our friend.
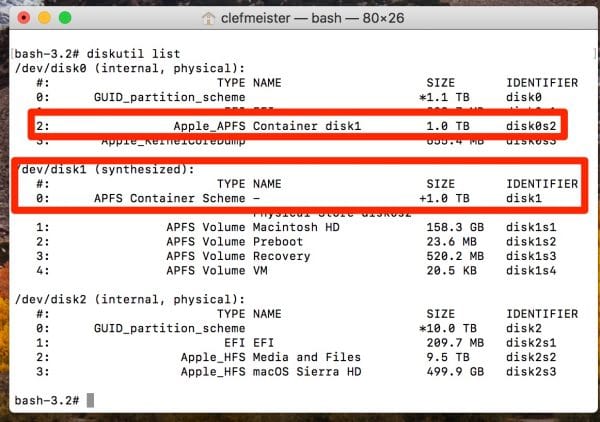
To do this, you’ll need to open Terminal from Applications -> Utilities. Once there, issue this command to find out where your APFS container lives:
diskutil list
My output looks like the image below. Note that my APFS container is named /dev/disk1, and resides at /dev/disk0s2.

Resizd Your APFS Container (the Hard Way)
Let’s talk about shrinking the APFS partition, or container, first. You use the same command for both processes, but you might be likely to want to reduce the size of your APFS partition first, perhaps to install another operating system on your Mac. To shrink my 1TB APFS container to 750GB, I’d issue the following command in Terminal:
sudo diskutil apfs resizeContainer disk0s2 750g jhfs+ Extra 250g
That command would resize the APFS container from 1TB to 750GB, also creating a 250GB journaled HFS+ partition with the freed space. We need to use sudo here, to take administrative privileges over the Terminal session.
I could have also issued the command like this, and diskutil would automatically determine the size for my new partition:
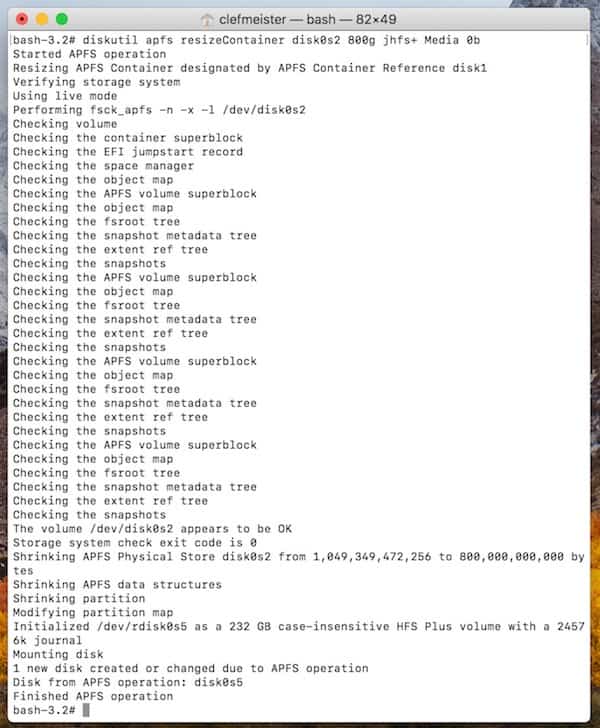
sudo diskutil apfs resizeContainer disk0s2 750g jhfs+ Media 0b
The output of the command will look something like this:

I could also create multiple partitions, using a command like this:
sudo diskutil apfs resizeContainer disk0s2 750g jhfs+ Media 200g FAT32 Windows 50g
Note that in my case, I could replace disk0s2 with disk1 for either command, since my APFS container is located at disk1. The diskutil command automatically locates the physical store for my APFS container, and resizes things accordingly.
Shrinking Your APFS Partition to Reclaim Space
If you decide you want to reclaim that space into your APFS container, you can do that using diskutil as well. First, though, you have to delete the JHFS+ or other partition and set it as free space on your hard drive. This command will do the trick, assuming your volume is named disk0s3.
sudo diskutil eraseVolume "Free Space" %noformat% /dev/disk0s3
Next, resize your APFS container:
diskutil apfs resizeContainer disk0s2 0
In this case, diskutil automatically claims all available free space on the physical storage device, but you can also replace 0 with a size value.
Yes, You Can Resize Your APFS Container on a Live Filesystem
Before you ask, yes, I’ve verified this process works even when you’re booted into High Sierra on that APFS volume. You will notice that your Mac becomes unresponsive for a time, as it verifies the filesystem, checks everything out, and then carries out the resize operation. For the best file integrity, though, I’d probably recommend doing this from Recovery Mode. I live on the bleeding edge, though, and did this from the live filesystem without any data corruption.

I created a comment just to come here and thank you!
I was almost formatting my whole HD in a complicated process to split my partition, until I found this. Lots of forums don’t have the right answer, which is exactly what I found here (and in the comments, because I had time machine enabled).
THANK YOU! 😄
We are glad we could help! 🙂
I understand this is an old thread, but I figured I would chance it anyways. It would be great to see the same example but with an existing BootCamp partition in place within the APFS container to use unallocated space outside of the APFS container to expand.
Attempts to use these command lines with a High Sierra partition and its associated BootCamp volume to increase the APFS container to use unallocated space were unsuccessful. BootCamp partition, in this instance, was after the High Sierra volume, after which, was the unallocated space of a larger drive this MacOS High Sierra with BootCamp was cloned onto.
Goal was simply to swap out a 1TB Samsung 850 Pro to a 2TB Samsung 850 Pro. Backups were made and experimentation began using this article’s tips.
Using a physical drive cloner (non-software), the larger 2TB hard drive was cloned from the original 1TB driive successfully. Emplacement of the newly cloned 2TB hard drive boots up and works flawlessly both for High Sierra and its associated BootCamp volume. Attempts to expand the APFS container to utilize the remaining unallocated space were met with failure.
(“Error: -69771: The target disk is too small for this operation”)
This, of course, is false, as when in BootCamp, using MiniTool Partition Wizard 12 (free version), an exFAT partition was easily created making sure to use an allocation size 1024kb or less (in this case, 64kb to match default apple exFAT allocation sizing). Additional space is recognized in BootCamp, but not in High Sierra (it does NOT even show there is a partition/drive/container/volume at all–even with repair commands, etc.). exFAT was chosen simply for its ability to support both High Sierra and BootCamp’s ability to both read AND write to a volume that could be used to pass information back between Mac/Windows on same physical drive (NTFS does not support Mac writes, only reads).
Every article I have come across to date, forum or otherwise, addresses shrinking/decreasing, but not expanding, save for a few like this one (https://derflounder.wordpress.com/2017/10/18/resizing-a-macos-vms-apfs-boot-drive-to-use-all-available-disk-space). However, none have addressed the method with an associated BootCamp volume within the APFS container (in this case, 1TB) and unallocated space outside of the APFS container (the other 1TB from the unallocated space of the larger replacement cloned 2TB hard drive). Current versions of CarbonCopyCloner and WinClone do not preserve BootCamp boot capability; and therefore, are not solutions.
Maybe MacObserver can revisit and do an updated article as Apple Support still lists High Sierra, Mojave, and Catalina as supported OSes.
Hi Jeff, could you please check what i did wrong? Thanks!
diskutil list
/dev/disk0 (internal, physical):
#: TYPE NAME SIZE IDENTIFIER
0: GUID_partition_scheme *240.1 GB disk0
1: EFI EFI 209.7 MB disk0s1
2: Apple_APFS Container disk1 119.8 GB disk0s2
/dev/disk1 (synthesized):
#: TYPE NAME SIZE IDENTIFIER
0: APFS Container Scheme – +119.8 GB disk1
Physical Store disk0s2
1: APFS Volume Mac 116.1 GB disk1s1
2: APFS Volume Preboot 19.4 MB disk1s2
3: APFS Volume Recovery 509.8 MB disk1s3
4: APFS Volume VM 2.7 GB disk1s4
PC192-168-1-201:~ Steve$ diskutil apfs resizeContainer disk0s2 0
Started APFS operation
Error: -69743: The new size must be different than the existing size
Hi Jeff,
I have been having huge problems even when trying to follow the instructions here and in other APFS related posts. What is unusual for me is that the rogue partition doesn’t appear as an external disk. After erasing it following instructions you gave it converted from APFS and resides now (in disk utility) as: “PCI-Express Internal Physical Volume • Mac OS Extended (Journaled)”. It can be mounted and unmounted but not much else. Here is what I am looking at from the terminal:
Jons-MacBook-Pro-2:~ jonsatterley$ diskutil list
/dev/disk0 (internal):
#: TYPE NAME SIZE IDENTIFIER
0: GUID_partition_scheme 500.3 GB disk0
1: EFI EFI 314.6 MB disk0s1
2: Apple_APFS Container disk1 379.0 GB disk0s2
3: Apple_HFS Untitled 120.8 GB disk0s3
/dev/disk1 (synthesized):
#: TYPE NAME SIZE IDENTIFIER
0: APFS Container Scheme – +379.0 GB disk1
Physical Store disk0s2
1: APFS Volume Macintosh HD 242.1 GB disk1s1
2: APFS Volume Preboot 21.5 MB disk1s2
3: APFS Volume Recovery 506.6 MB disk1s3
4: APFS Volume VM 2.1 GB disk1s4
I want to kill the 120GB disk0s3 partition (which was originally reserved for a failed boot camp) but every time I try to use the terminal or disk utility I don’t get the result as you explained. I also tried to do a full erase/restore using Time Machine, but the outcome still ended in the 120GB partition surviving. I’d readily start again completely and erase everything, but I don’t know how to get my Mac back to factory conditions as this 120GB partition just won’t go away!
Was getting quite frustrated before I found this article. Thank you for posting! Worked like a charm.
Hi Jeff,
I have encountered a peculiar problem. I tried enable writing on my NTFS formatted external drive using Terminal. This is the code I used –
sudo nano /etc/fstab
LABEL=NAME none ntfs rw,auto,nobrowse
Then Ctrl+O, enter and Ctrl+X
I didn’t succeed in that, contrary my Mac would hang every time I’d click on Finder after a reboot.
So I decided to follow the article and delete the entry I made in fstab and saving and exiting it.
After that, I see my disk utility is not listing any disks at all. I can boot the Mac and use all the apps but cannot access any of my files. I checked disk utility on terminal and found this –
/dev/disk0 (internal, physical):
#: TYPE NAME SIZE IDENTIFIER
0: GUID_partition_scheme *251.0 GB disk0
1: EFI EFI 209.7 MB disk0s1
2: Apple_APFS Container disk1 170.7 GB disk0s2
3: Microsoft Basic Data 80.1 GB disk0s3
/dev/disk1 (synthesized):
#: TYPE NAME SIZE IDENTIFIER
0: APFS Container Scheme – +170.7 GB disk1
Physical Store disk0s2
1: APFS Volume 110.5 GB disk1s1
2: APFS Volume 32.3 MB disk1s2
3: APFS Volume 519.9 MB disk1s3
4: APFS Volume 2.1 GB disk1s4
5: APFS Volume 20.5 KB disk1s5
So you see, the container disk (170 GB) which was earlier Macintosh HD is now just container scheme. Any idea how I can mount it back? I’m hoping all my data will be safely tucked in it somewhere considering both my users and all settings etc are intact.
I’m using a MacBook Pro Late 2013 running on High Sierra (obv). Please help!
Hi Jeff.
Thank you for the explanation, it is really helpful
Can I remove disk0s2 and merge it with disk0s4 ?
disk0s2 was my old OS, now I installs OSX on disk0s4 I want to merge disk0s2 into disk0s4 ? is that possible or it should be in order ?
Thanks
Hi Jeff,
When I try to resize the APFS container and create a new volume, using your first example, I get the error:
APFS Container Resize error code is 49153
Error: -69606: A problem occurred while resizing APFS Container structures
Have you come across this before?
Thanks,
Brad
Exactly the same problem here, trying to install bootcamp.
*when trying to install bootcamp
Hello WonderBrad, sorry for the delayed reply, but from what we’ve found you might not be able to resize the APFS container if Time Machine is producing snapshots and is enabled. Thus:
1) Access the Time Machine settings page and disable Automatic backups.
2) Use Terminal to delete all local snapshots once you list them with the following command: tmutil listlocalsnapshots /
3) Then remove them using: tmutil deletelocalsnapshots
To anyone running into the “the target disk is too small” issue, here’s what I believe is happening. APFS is only able to resize itself to space on the disk that exists beyond the last sector of the existing APFS container. If you have deleted a partition that was placed before the beginning of the APFS container, it won’t be accessible to resizing your existing APFS container.
In such an instance, my recommendation is to make a clone of your APFS drive, using either Carbon Copy Cloner or Super Duper, and then repartitioning the entire drive the way you want it. Start fresh, basically. Then you can copy your clone back onto your drive.
It’s a pain, but it’s a pain that exists with HFS+ volumes, too. You aren’t supposed to be able to delete the first partition on a drive, and you can’t grow a volume “backwards.” I.e., you can expand from the end of your existing partition towards the last sector on your drive, but you can’t expand from the beginning towards the first sector.
Hi Jeff,
Thank you so much for your analysis. And I believe it’s correct. I had this knowledge for HD but the fact that it also applies to SSD didn’t hit me until I read your comment.
My problem in short: disk0 (non-APFS logical partition) and disk1 (APFS system drive). disk1 ran out of space. No matter how I re-format/erase disk0, I cannot extend disk1 to use that space. Because disk1 is the last partition, and a partition can only extend “forward”.
Here’s what I did to solve the issue:
0. Backup data on your logical partition. (In my case it’s non-APFS disk0).
1. Re-format disk0 to APFS container (using “erase” in Disk Utility app).
2. Use Carbon Copy Cloner to copy ALL files from disk1 to disk0.
3. Go to “System Preferences” -> “Startup Disk”. You should be able to see both disk0 and disk1 are selectable startup drives. Previously it’s only disk1. (basically what happened here is we “cloned” the entire OS from disk1 to disk0.
4. Select disk0 (the cloned OS) as startup drive and restart. Now the entire system runs on disk0.
5. In Disk Utility app -> Partition, use “-” symbol to delete disk1, and disk0 will automatically expand to eat up the space freed from disk1.
Thanks again for your advice!
Note: The above steps are a bit more than simply “extend disk1” since it combined two disks as a result. What we want to achieve is “shift” the last non-expandable APFS partition ahead so that we can get more space “afterwards”. Plus, you can always create new partitions later.
I am getting the error “Error: -69771: The target disk is too small for this operation” when running the last command. I am positive that I have the command correct and I have the APFS container selected.
Sebastian,
As I explained in the above article, you can’t yet resize or delete APFS containers from Disk Utility. You have to use diskutil from the Terminal. Check this article and see if it helps. If not, shoot me a message and I’ll see if we can’t sort it out.
Hi,
I have a q.
How to delete partition with APFS.? When i try delete from DiskUtility from Sierra Recovery Partition system tell me “cant umnount a disk” (this is the same disk – I have only one 128gb ssd with 3 partitions – Sierra, APFS High sierra and recovery sierra”. Can’t do this!
And can’t resize partition APFS. I have only 25gb and can’t resize to 35GB!.
It’s SAFE ?
Regards
Sebastian
please
Travis,
Sorry it’s taken me a while to get back to you. This is crucial: in the next to final step, did you try this command:
sudo diskutil eraseVolume “Free Space” %noformat% /dev/disk0s3
with curley quotes? If so, try it again, making sure you copy it from this comment, not from above. I just noticed that curly quotes snuck into my code snippet above.
Hi Jeff,
I’m having the same issue as Travis, using your latest edit wit the non-curly quotes.
Any idea what might be the issue?
Thanks!
Paul
polr, I’m not sure what might be causing that, and the fact that the file system is so new means not many folks are posting yet about their exploits with APFS. Shoot me an email at jeffb (at) macobserver (dot) com, and include the output of diskutil list for me. I’ll see what I can make of it.
When I do the final step to claim free space, I get an error saying the target disk is too small for this operation
please help