For those that like to create their own videos, they should know that there is a way to add subtitles or captions in iMovie. If you don’t know, there is a way to go about adding subtitles to a project, and it can be done so manually. However, I am also going to take a look at a way to generate subtitles automatically. If you are cutting your teeth through this free Apple program, iMovie can be a great start to the world of video-editing.
With that in mind, I’m going to explain what subtitles are, how they might be helpful, and then go through the process of adding them to iMovie via Mac, iPad and iPhone. While creating subtitles in longer projects may be rather labor-intensive, following these steps ensures that you have the right tools and options.
What Are Subtitles?
Subtitles are a series of texts that transcribes the dialogue or commentary occurring within the movie or video. People may also know them as captions. Typically, captions and subtitles appear at the bottom of the screen, but using these methods, you can place them wherever you would like on the screen.
Captions and subtitles can be useful for those that are a hard of hearing, and it can also be a good idea to add subtitles to videos that will appear on social media, such as Tik-Toks or FaceBook stories. Using this guide, I’m going to show a couple of different options for adding subtitles to iMovie, including doing so automatically.
How to Add Subtitles Manually in iMovie
First, we’re going to take a look at adding subtitles directly within iMovie. While this is a manual process, it can still be rather easy. However, depending on the length of the project, or depending on how much dialogue there is, it may be a time-consuming process. Let’s begin.
Time needed: 2 minutes
How to add subtitles or captions to iMovie.
- First, open your project in iMovie.
- Choose the clip that you would like to add subtitles to. Your clips will be at the bottom of iMovie within your TimeLine.
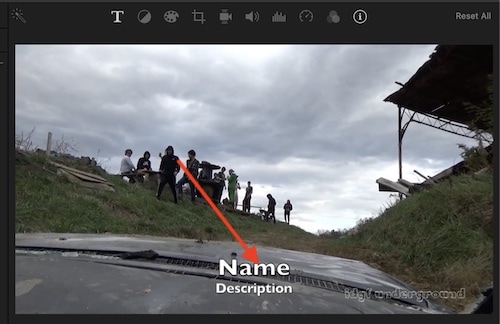
- At the top of the viewer, you will see the Titles sign. Select this.
- Upon selection, you will be given various different options for different text you can add to your project. If you want your subtitles to appear at the bottom, select the Lower Third option.
- Drag the Lower Third Title to where you want it to appear in the TimeLine.
Note that if you did select your clip, you can also simply double-click the Lower Third Title to automatically add it.
- You can now add text at the top of the viewer. Double-click within the video of your project to add text.
If you’re only looking to add subtitles, you can delete the text that says name.
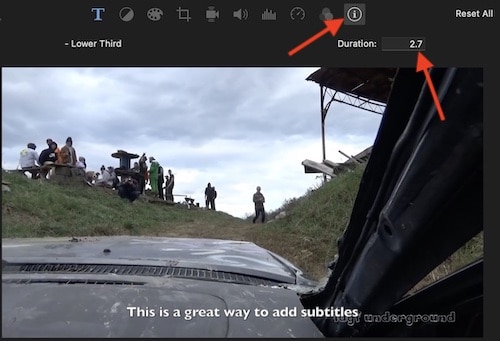
- If you want to adjust the time or duration of the subtitle, you can click the edges of the title to drag them and adjust the length.
You can also click the Info button at the top-right corner and adjust the duration time by typing it manually.
When looking at the Title itself, you can click it to drag it along the TimeLine. This can be great for fine-tuning. Be sure to avoid ‘stacking’ these Titles. - Next to the information button is also different ways you can style your captions. For example, you can change the font and font color by clicking the T-icon.
Things to Note
Remember that in this instance, the undo button is really going to be your friend. If you are new to this experience, getting the text boxes to align with your dialogue and speech may take some practice. Remember that not only are you able to adjust the length of time of the text boxes, but you can also drag them along the TimeLine to ensure they are exactly where they need to be. Don’t get discouraged if you need to try more than once to get it just right.
Can iMovie Automatically Add Subtitles?
No, iMovie cannot add subtitles automatically. However, there is a way to add subtitles automatically to an iMovie project, though, this can not be done inside iMovie directly. A good transcription service that does offer some free options is HappyScribe. However, keep in mind that the free service will only add subtitles via artificial intelligence, meaning that the accuracy will not be perfect (around 80 percent). While this will not create perfect subtitles, some may find it to be a much faster process.
To add automatic subtitles, remember that you are going to need to export your iMovie in .mp4 format. You will also need a Happy Scribe account. Fortunately, signing up is relatively straightforward (and free). Note that there is an option to have a professional transcriber add captions to your project, but it will cost money.
If you are using Happy Scribe for the first time, the website will walk you through the process step-by-step. Simply follow the instructions as they are presented. Additionally, you can also try Amberscript as a way to automatically add subtitles.
Export Your iMovie Project
If you want to export your iMovie project, simply follow these steps.
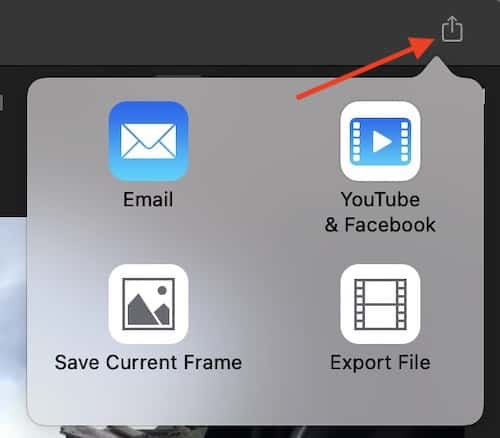
- From iMovie, click the Share button in the top-right corner of the screen.
- You can select either the Export option, or you can also select FaceBook & YouTube if you plan on using your video on Social Media.
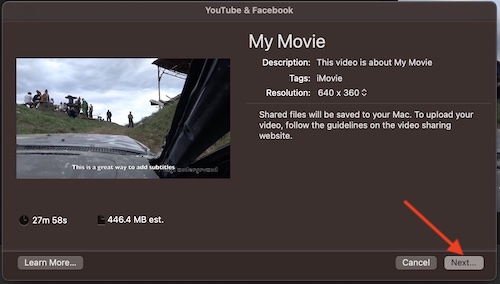
- Once you made your selection, the next screen will have you fill out some information. This includes the title of your project, as well as a description, tags and further information, depending on your selection. You will also have resolution options. Fill in the information and hit Next.
- Type in a file name in the Save As section, and then choose a destination for your file. Then hit Save. It may take a moment for iMovie to render your project, but when it is finished, you will have a file you can upload to Happy Scribe.
Can I Add Subtitles in iMovie App?
If you are using iMovie on an iPad or iPhone, you can also add subtitles manually within the program.
- Open your iMovie project on your iPhone or iPad. That, or start a new project. If you are starting a new project, add the media you wish to caption or add subtitles to.
- Then, select a portion of your clip where you would like to add captions or subtitles. You will be able to personalize your captions here as well.
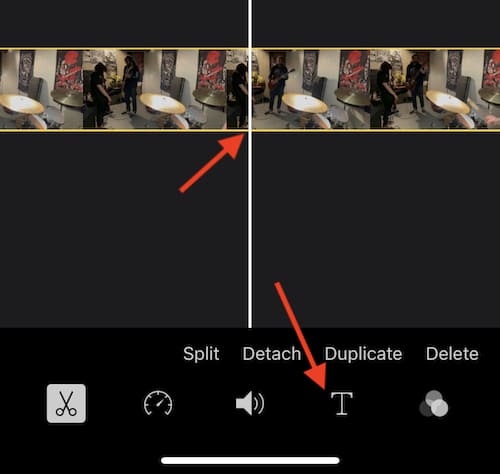
- Once a clip is selected, you can choose the Title icon. This will bring up the Titles selection menu, and you can choose which you would like to add.
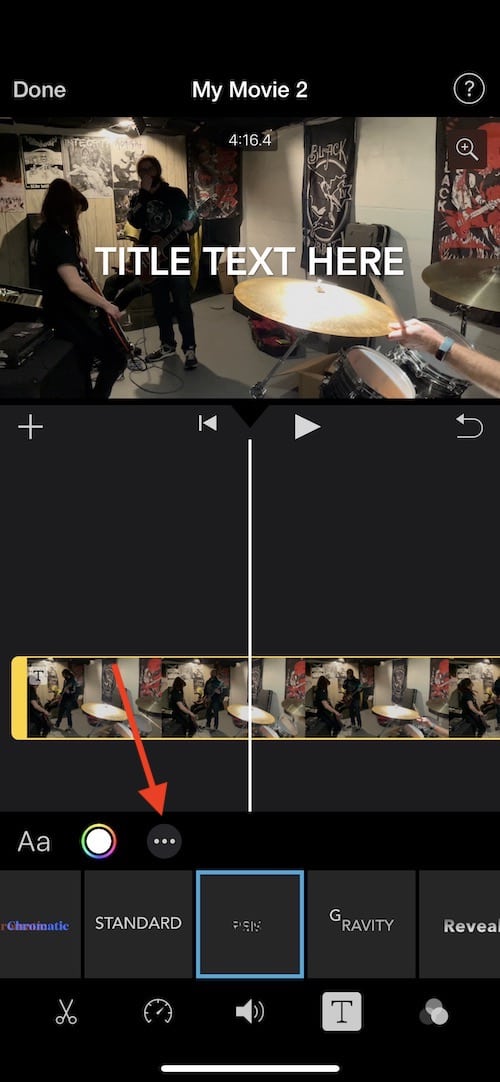
- Then, you will see the words “title text here” directly on your project. You can double-click this and select Edit to edit the caption or subtitle.
- If you are using iMovie on your iPad, you can adjust the length of the titles by dragging the Timer button that appears below the Title selection process. If you are using your iPhone, you may need to split the clips individually to add subtitles. Do this by selecting the area you want to add subtitles within your Timeline, then click the scissors icon and select Split. Note that this may be an involved process.
- Additionally, you can also make changes to the style of your clip through a few different options. When you first make a Title, there will be some options above the Title you have selected. This includes the font and the font color. You can also click the three dots to give yourself more options, including Text Shadow and Style.
Get the Message
While it may be a time-consuming process to add subtitles and captions your iMovie project, users should know that they have options available to them. Again, the Undo button is likely to be your friend in this situation. Personally, I would recommend using a Mac to create subtitles, as the process is slightly easier while also providing a few more options. You can also use online services as well, but they may not be as accurate as you would like.
When you are finished, you will have a project that has proper subtitles and captions. This is a great option for those looking to add subtitles to a project that is meant for Tik-Tok or FaceBook, as these videos typically are not very long to begin with. While it may take some practice to get your subtitles just right, this can be a good way to build more experience with using iMovie. Of course, if you are planning to use iMovie for social media, you may want to know how to tailor your video specifically for social media.


