The Apple Pencil is an essential tool for iPad users who rely on it for tasks like note-taking, illustrating, and graphic design. I personally love the haptic feedback and the squeeze gesture on my Apple Pencil Pro when doodling in Procreate. Unfortunately, after installing the recent iPadOS 18 update, my Apple Pencil suddenly stopped working. If you’re experiencing the same issue, you’ve come to the right place.
10 Ways to Fix Apple Pencil Not Working on iPadOS 18/18.1
From temporary software glitches to insufficient battery, there are several reasons why your Apple Pencil may stop working with your iPad. Regardless of what caused the issue, you can quickly get your Apple Pencil working again as long as you have a compatible model that works with your iPad.
1. Force Restart Your iPad
Software glitches related to iPadOS 18/18.1 or hardware glitches related to the Bluetooth chipset can often prevent the Apple Pencil from functioning. You may force restart the iPad to clear such glitches.
- iPad Models Without a Home Button: Quickly press and release the volume button that’s closest to the power button followed by the volume button that’s furthest from the the power/top button. Now, press and keep holding the power/top button until your iPad’s screen turns off and you see the Apple logo.
- iPad Models With a Home Button: Simply press and keep holding the power/top button and the Home button at the same time for a few seconds until your iPad’s screen turns off and you see the Apple logo.
2. Check the Battery Level
Apple Pencil may refuse to work with your iPad if it’s running low on battery. To check if your Apple Pencil has sufficient battery, go to Settings > Apple Pencil and locate the battery indicator on the right. Apart from that, you can also keep track of the battery level from the Home Screen via the Batteries widget.
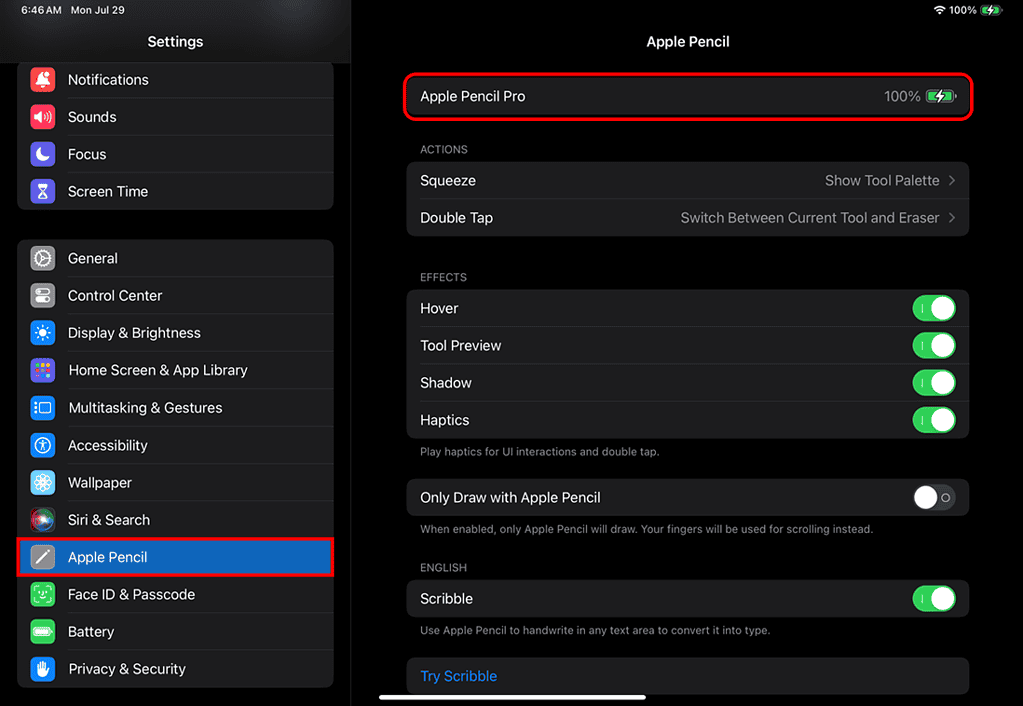
In case your Apple Pencil has less than 20 percent of battery remaining, you will need to charge it before you can start using it. To charge an Apple Pencil Pro or Apple Pencil 2, you simply need to attach it to the magnetic connector on the side of your iPad. On the other hand, you’ll need to connect your Apple Pencil to an iPad via the lightning port or a USB-C cable, in order to charge the 1st generation or the USB-C model.
3. Ensure Apple Pencil is Paired
If this is the first time you’re trying to use an Apple Pencil, you must know that it won’t start working right out of the box. You’ll first need to pair the Apple Pencil to your iPad using Bluetooth before you can start drawing or writing with it. Here’s how you can pair the Apple Pencil to your iPad, depending on its model:
- Apple Pencil Pro and Apple Pencil 2: Attach the Apple Pencil to the magnetic connector on the side of your iPad. Your Apple Pencil will be paired automatically and begin charging once its image appears on the screen. Now, tap Continue and detach the Apple Pencil from your iPad whenever you want to use it.
- Apple Pencil (USB-C): Pull or slide over the cap at the top to access the USB-C port. Then, attach a USB-C cable to the port and plug the other end of the cable into the iPad. When an Apple Pencil dialog pops up, hit Continue and unplug the cable from the Apple Pencil to start using it to take notes and draw stuff.
- Apple Pencil 1: Remove the cap at the top and plug the Apple Pencil into the Lightning connector on the iPad. Then, tap Pair when a dialog pops up. But, if you have a new iPad that doesn’t use a Lightning port, you must plug the Apple Pencil into the USB-C to Apple Pencil Adapter and connect the other end of the adapter to your iPad using a USB-C cable. You may unplug the Apple Pencil once it has been connected.
Once paired, your Apple Pencil should be ready to use immediately. However, if you are unable to pair your Apple Pencil, it could be due to low battery or you’ve forgotten to enable Bluetooth on your iPad.
4. Tighten the Apple Pencil’s Tip
If your Apple Pencil still isn’t working, tightening its tip can be a simple yet effective solution. The Apple Pencil’s tip is removable, and it might loosen over time, affecting its functionality. To ensure this isn’t the case with you, twist the rubber tip clockwise so that it’s securely attached to your Apple Pencil. However, make sure you aren’t over-tightening the rubber tip as it could damage the metallic nib located under it.
5. Reconnect the Apple Pencil
In some cases, connectivity issues between the Apple Pencil and your iPad, can cause random drops in Bluetooth connection and prevent things from working as expected. Generally, you’ll be able to resolve this problem by reconnecting your Apple Pencil to your iPad to establish a fresh Bluetooth connection.
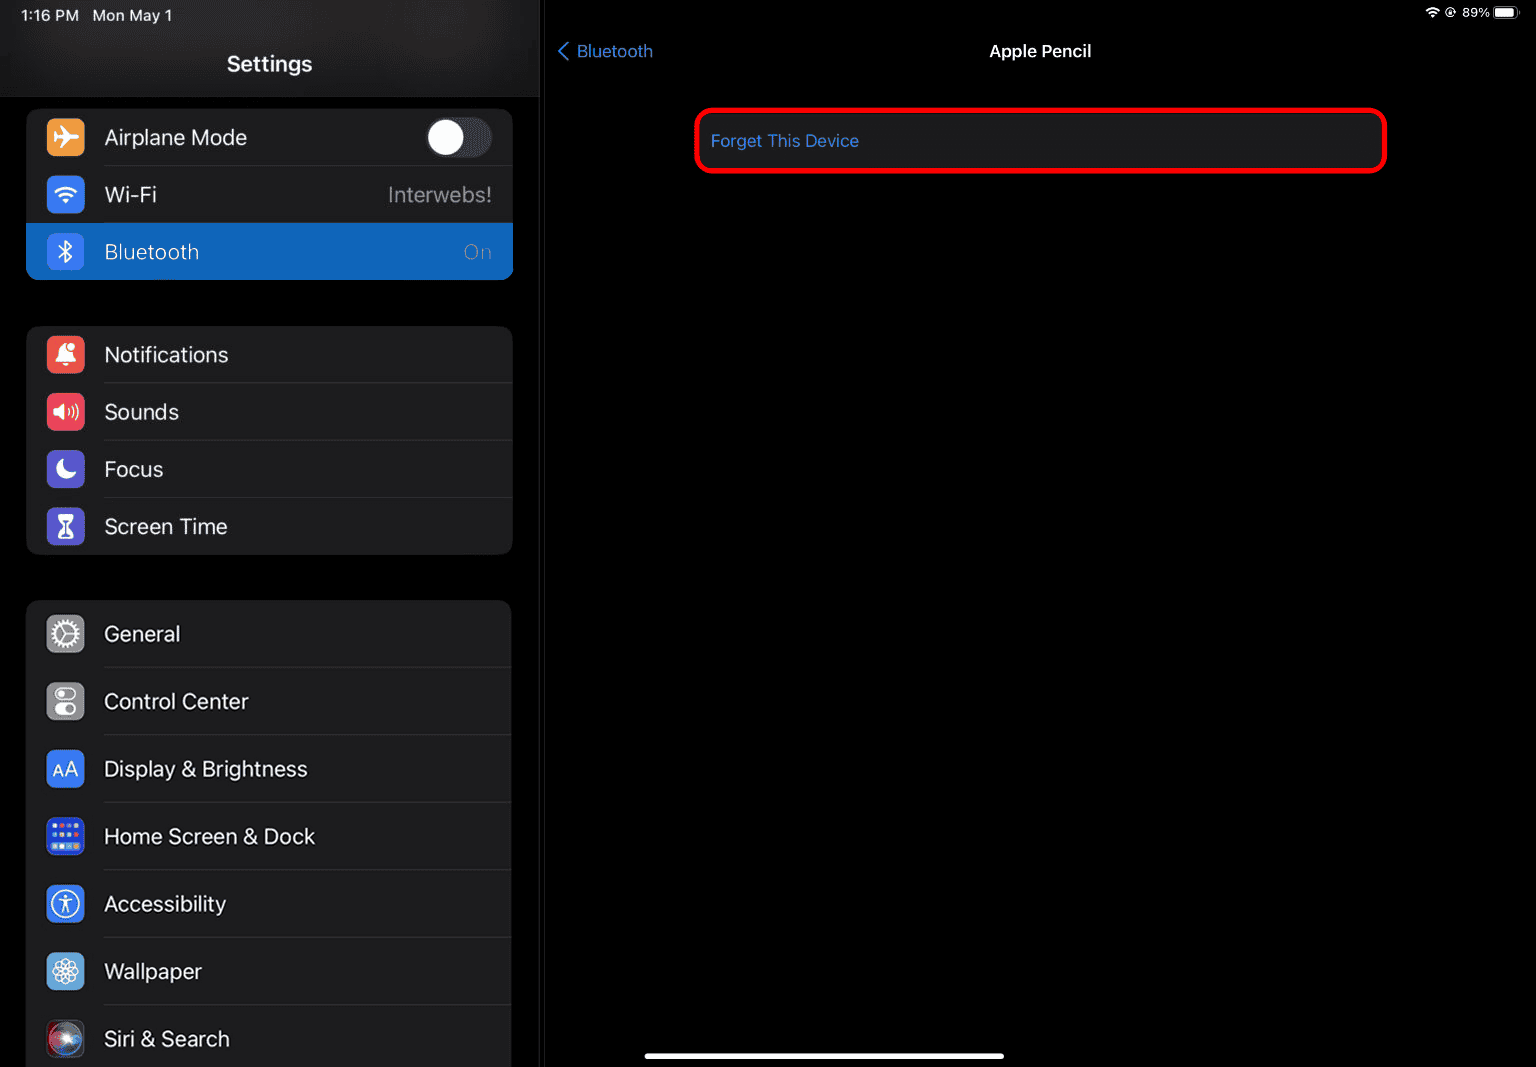
- Open the Settings app on your iPad and go to Bluetooth.
- Tap the blue information button next to your Apple Pencil.
- Tap Forget This Device to disconnect the Apple Pencil.
- Finally, tap Forget Device to confirm your action.
Once you’ve disconnected the Apple Pencil from your iPad, follow the steps given in the third solution to reconnect it. This will most certainly fix the issue. But, if it doesn’t, you might want to try the next solution.
6. Clean the Apple Pencil’s Tip
A dirty rubber tip or nib can often prevent your Apple Pencil from making proper contact with your iPad’s screen, rendering it unusable for taking notes or drawing. If you think this is what’s causing the issue, you must clean your Apple Pencil’s tip. To do this, twist the rubber tip counter-clockwise to detach it. Then, use a damp microfiber cloth to wipe the detachable rubber tip and the metallic nib affixed to the Apple Pencil.
7. Replace the Apple Pencil’s Tip
If your Apple Pencil fails to work even after cleaning the rubber tip, it might be worn down after repeated use over years, preventing your iPad from registering touch strokes. You must inspect the Apple Pencil’s tip for possible signs of damage and replace it with a new one if it appears to be worn down in any way.
8. Check for Firmware Updates
If you’re sure that you’re facing issues only after installing iPadOS 18.1, there may be a bug in the update that’s causing the issue. If you want to fix this, your only option is to update your iPad to the most recent iPadOS version released after iPadOS 18.1 or wait if there’s no software update available at the moment.
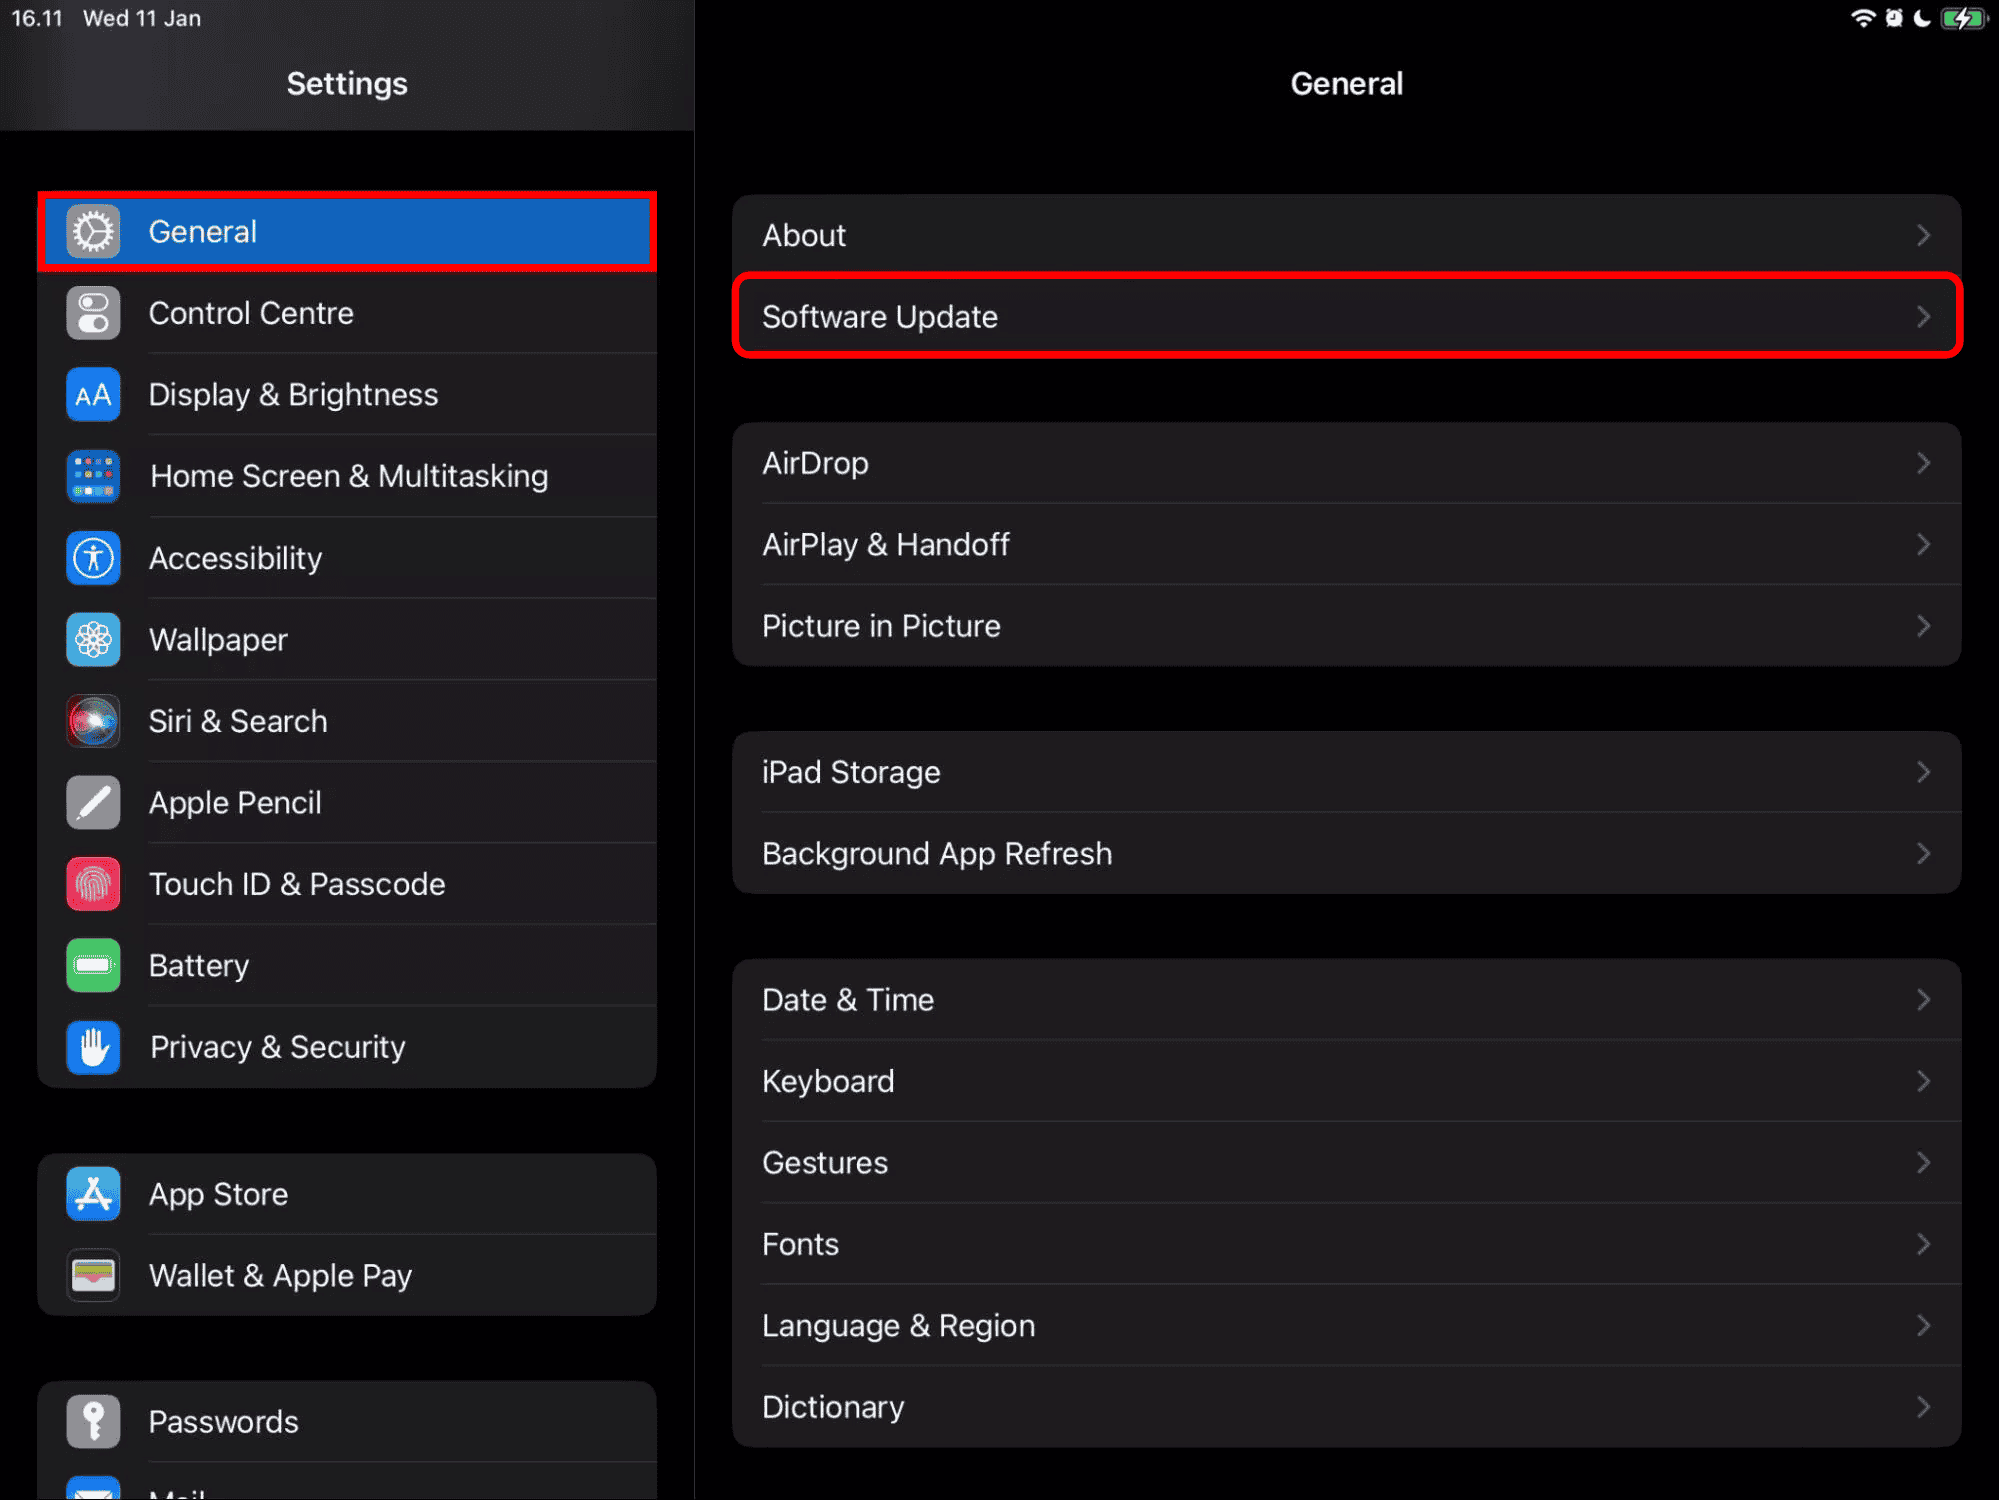
- Open the Settings app on your iPad.
- Go to General and then, tap Software Update.
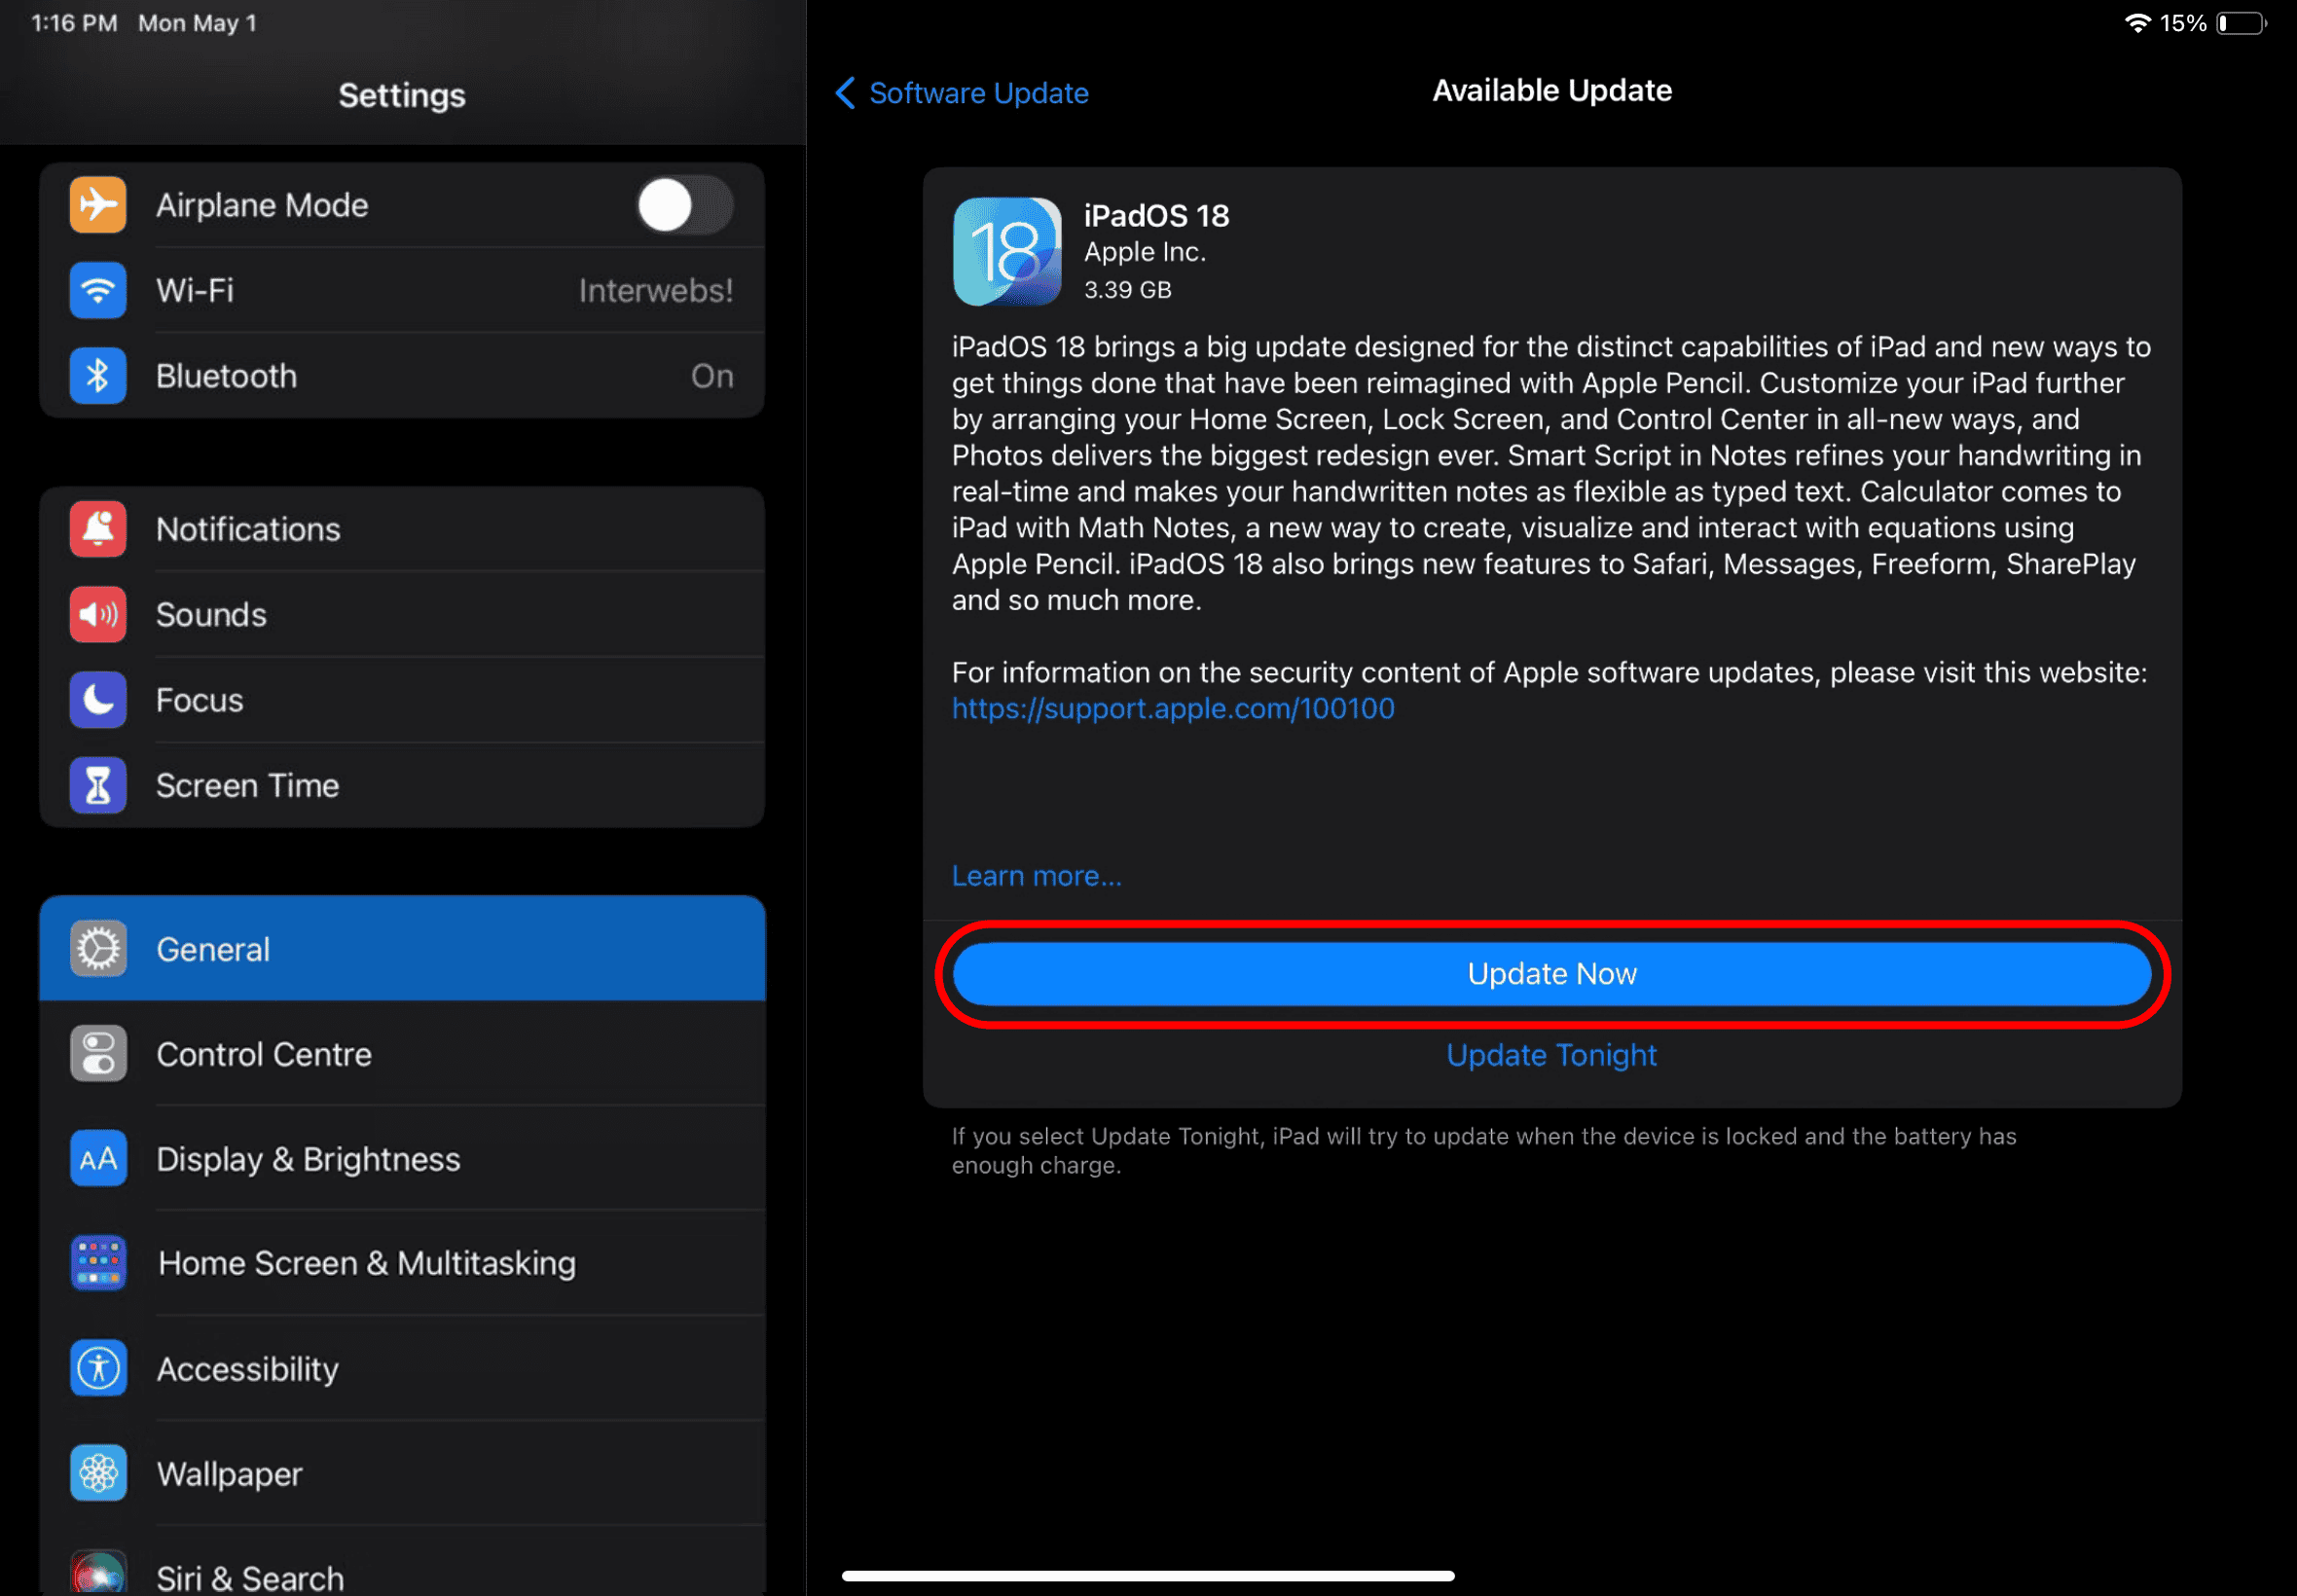
- Tap Update Now if a new iPadOS update is available.
- Enter your passcode and Accept the terms to install the update.
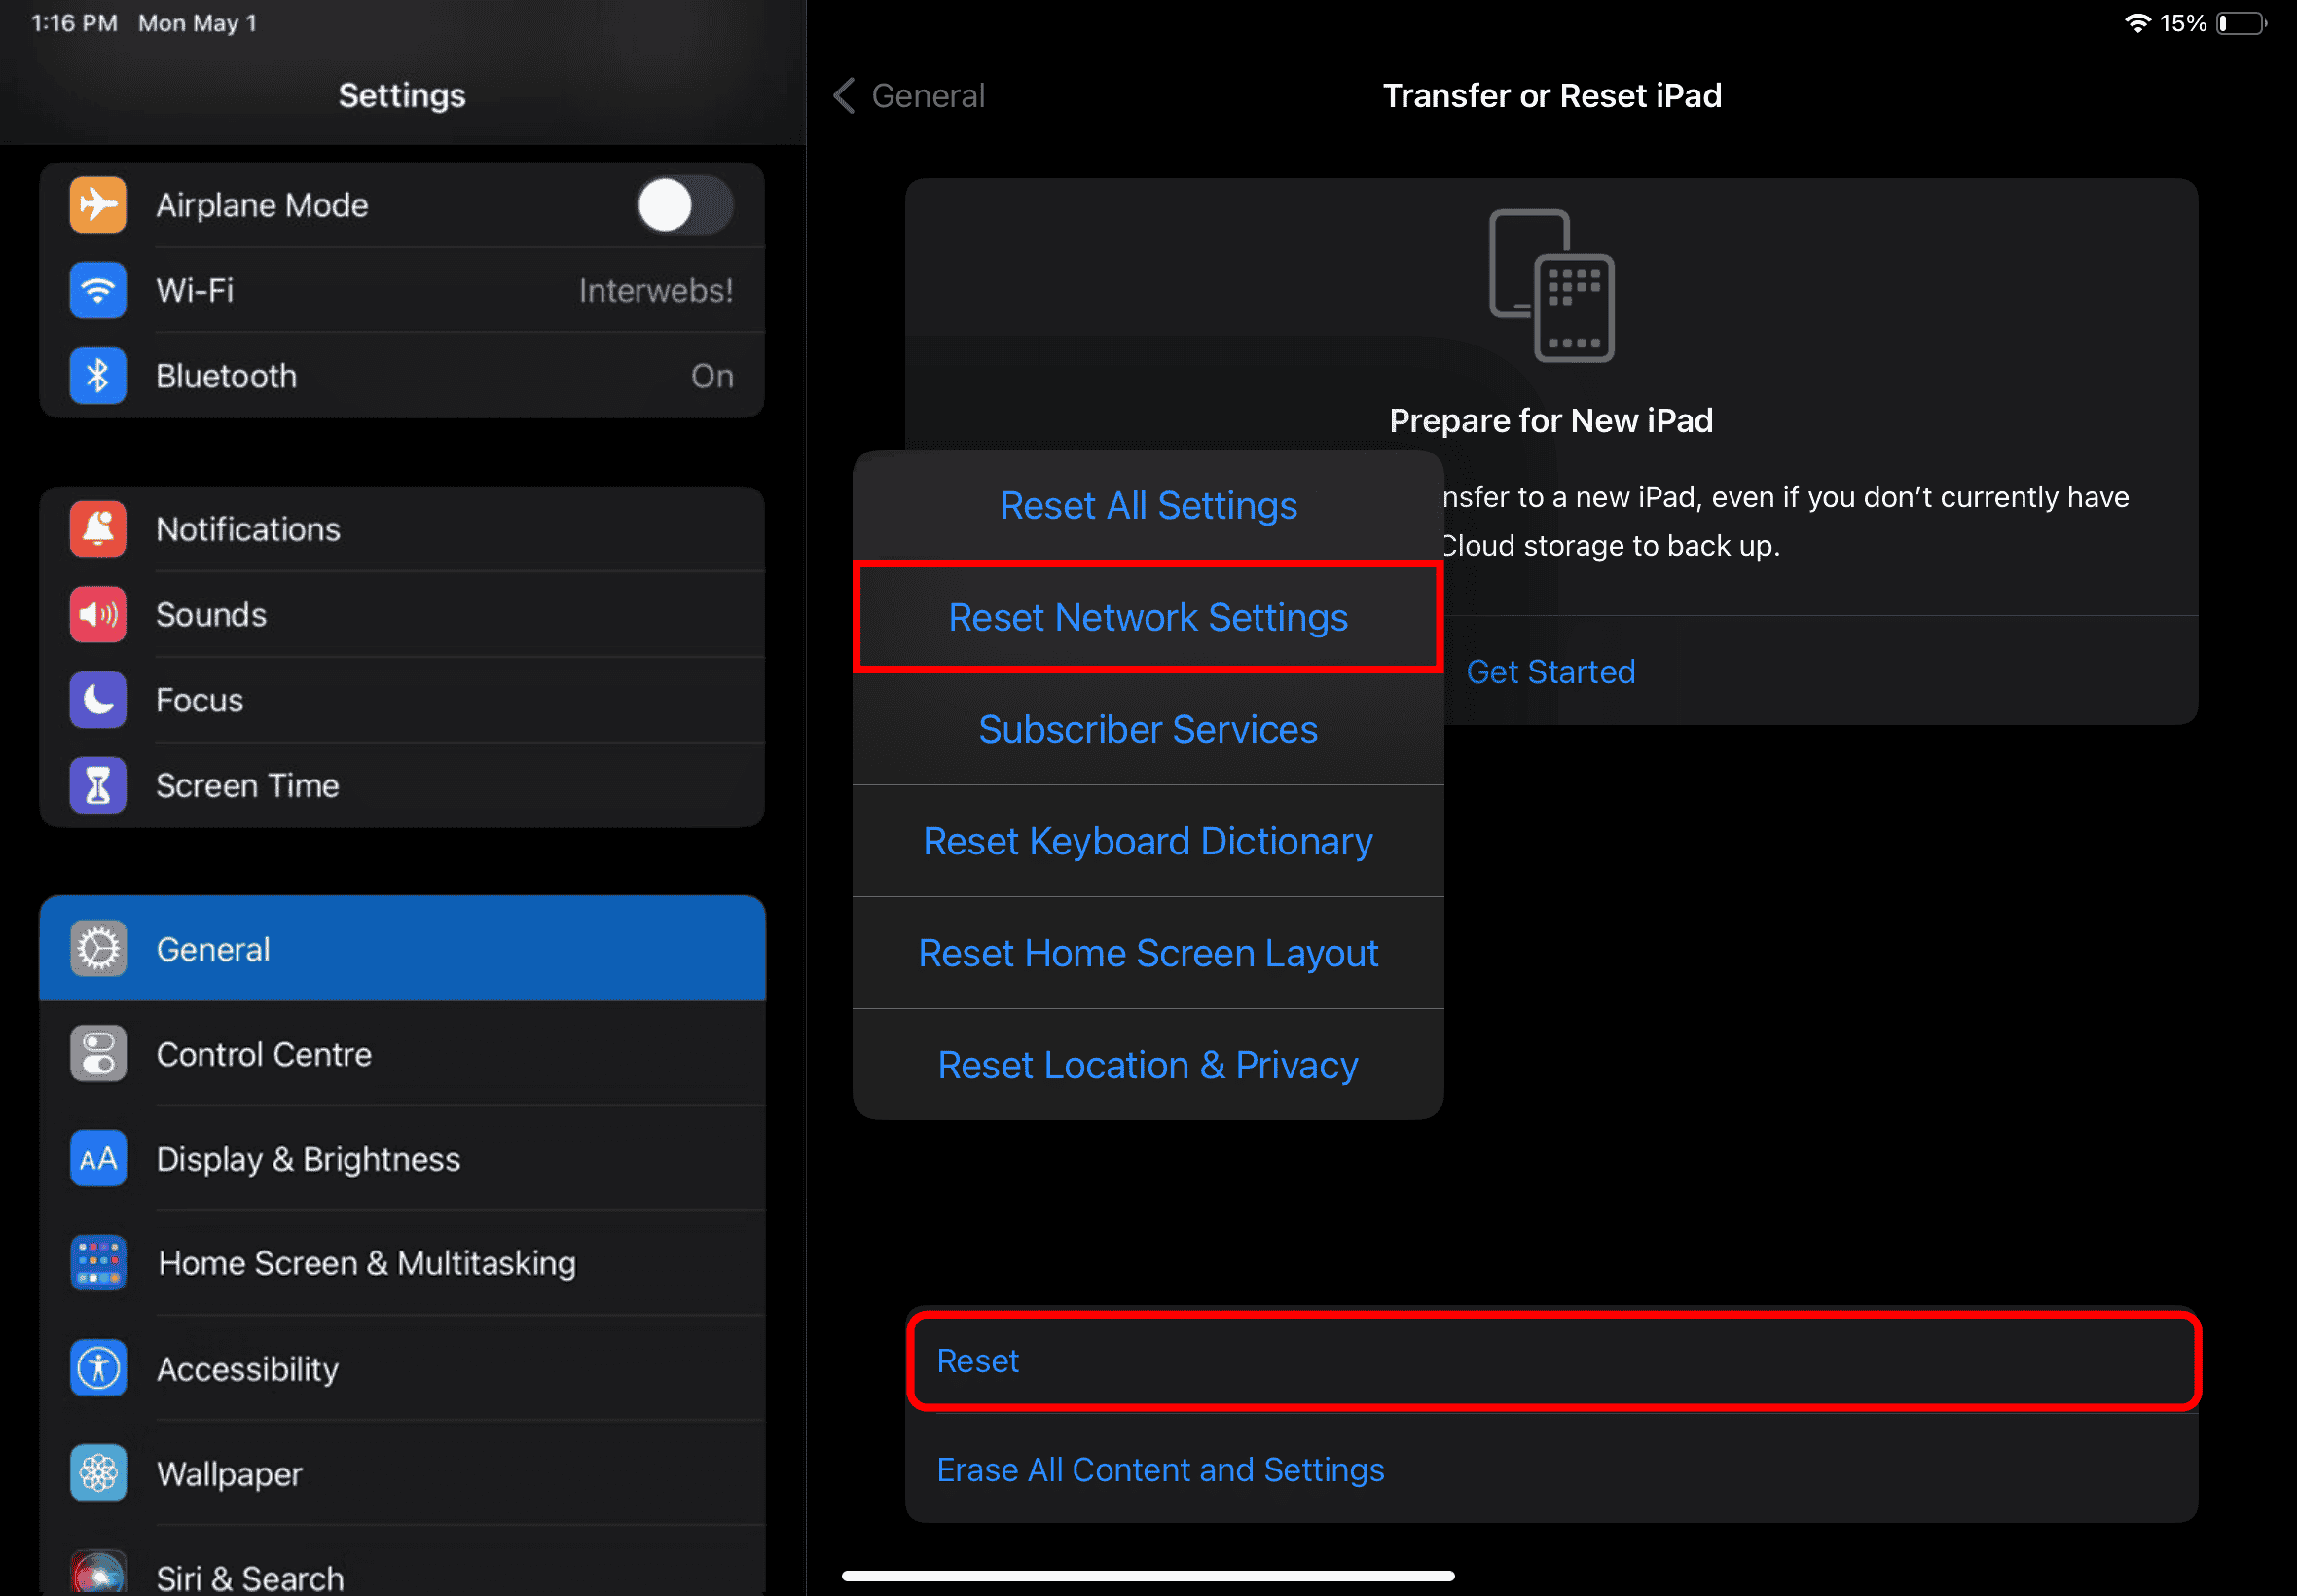
9. Reset Your Network Settings
Resetting network settings on your iPad can be a helpful troubleshooting step if your Apple Pencil isn’t working as expected. This process will essentially reset all your Wi-Fi and Bluetooth connections without affecting your data or apps, which can sometimes resolve connectivity issues related to the Apple Pencil.
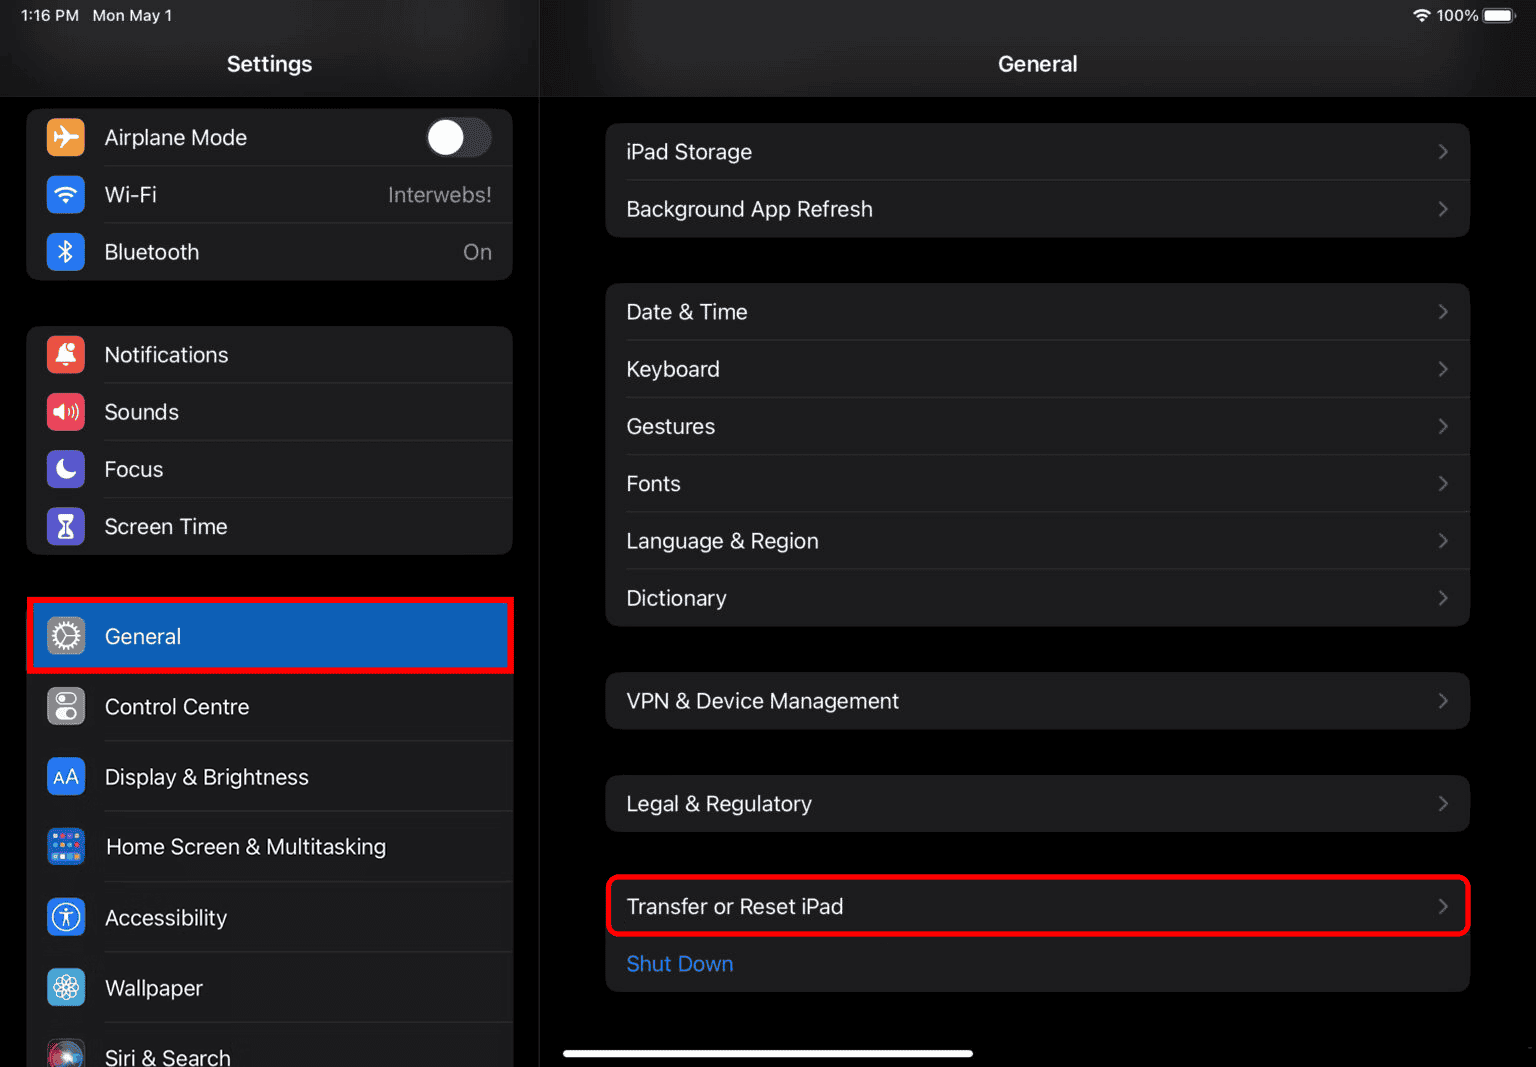
- Locate and open the Settings app on the iPad.
- Go to General and tap Transfer or Reset iPad.
- Hit Reset and select Reset Network Settings.
In case resetting the network settings doesn’t help you fix the issue, you can try resetting all settings on your iPad. This will help you revert any misconfigurations that may cause the Apple Pencil to malfunction.
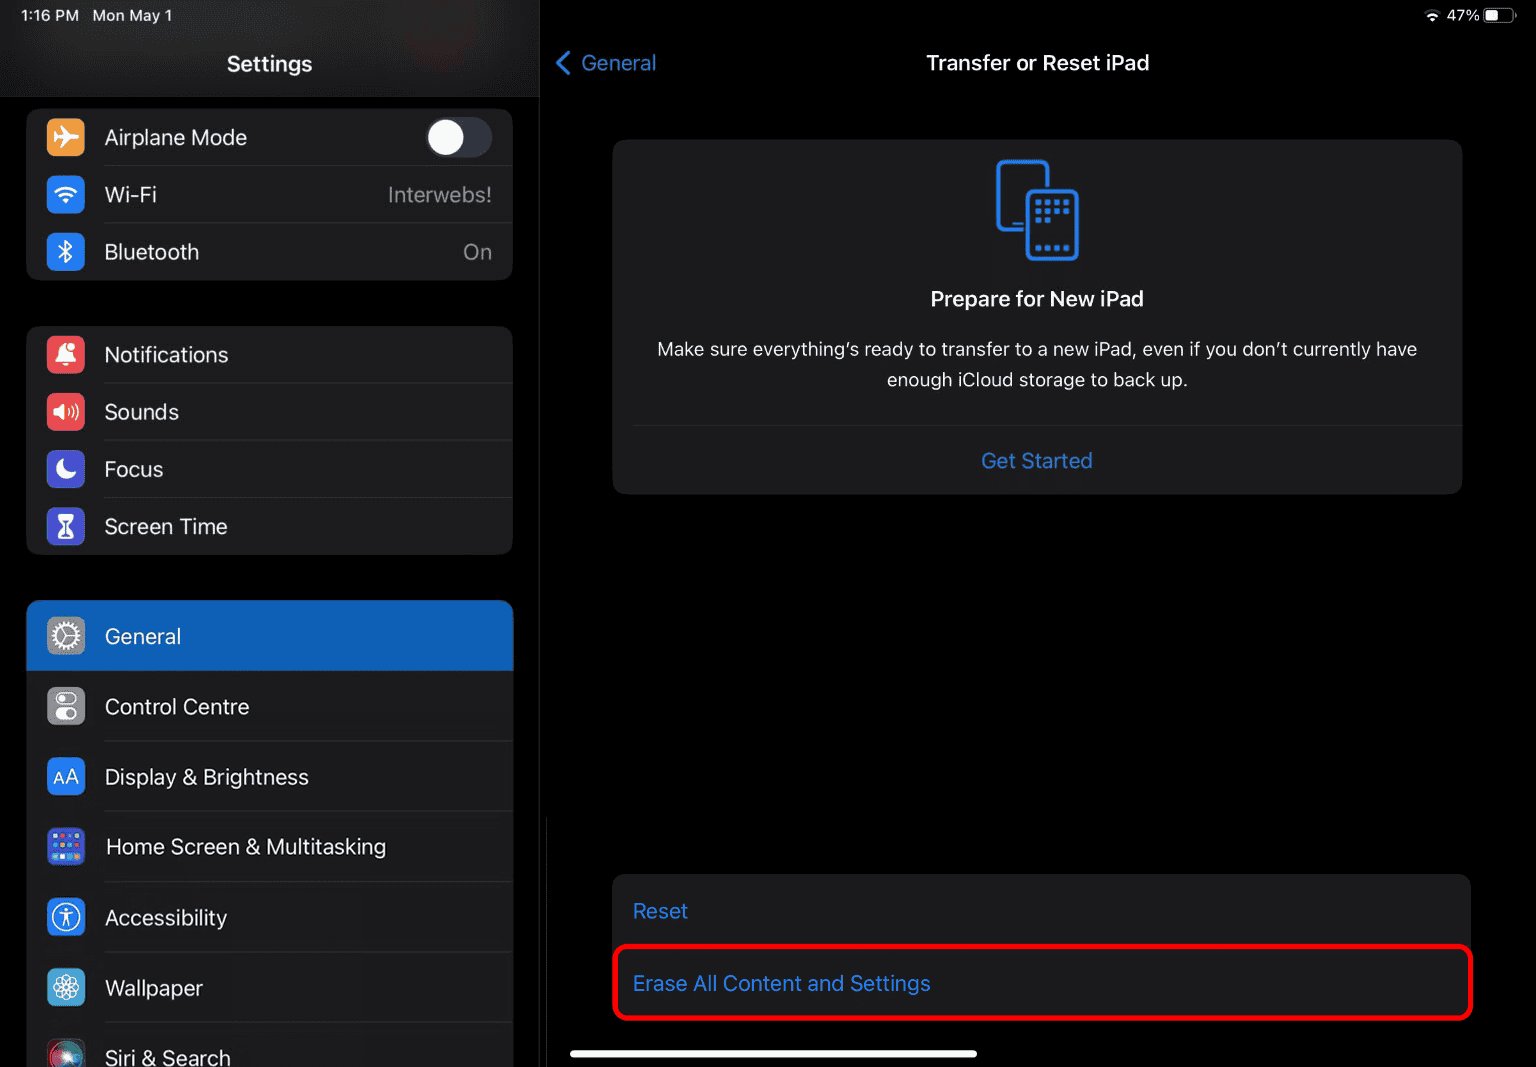
10. Erase All Content and Settings
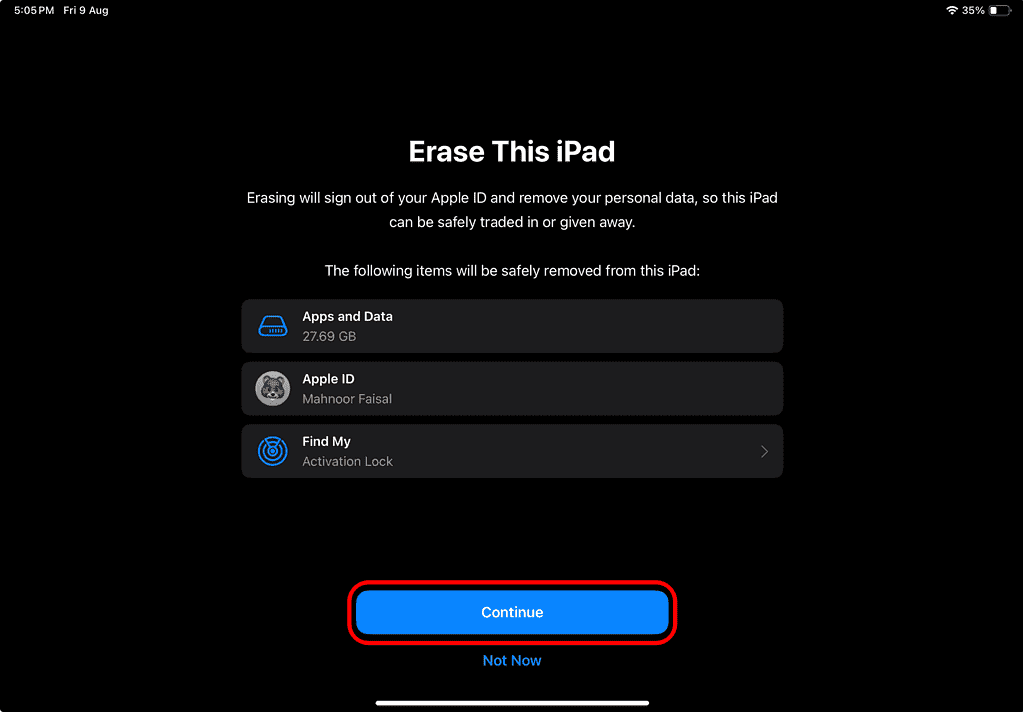
Still struggling to get your Apple Pencil functioning again? Then your best bet will be to factory reset your iPad. This process will erase everything on your iPad, requiring you to set it up from scratch. Even though it may seem a little extreme, factory resetting can often help you phase out software glitches in iPadOS.
- Locate and open the Settings app on the iPad.
- Navigate to General and tap Transfer or Reset iPad.
- Tap Erase all Content and Settings and enter the Passcode.
- Finally, tap Continue and follow the on-screen instructions.
If you tried all the solutions listed in this troubleshooting guide but nothing seems to do the trick, your Apple Pencil might be damaged. You may contact Apple Support to ascertain whether the issue can be fixed or if you need to purchase a new Apple Pencil. If the need arises, you can even file a warranty claim.
