Earlier, users had to resort to iTunes if they wanted to Restore their iPhones. However, Apple discontinued iTunes in 2019. The sudden removal of the app left everyone confused about how to restore or reset an iPhone without iTunes. If you’re searching for a solution to restore your iPhone without third-party apps, read along to learn how you can do it using your Mac.
Also, restoring an iPhone and resetting an iPhone are entirely different processes that lead to separate outcomes. Therefore, we’ll also help you figure out when to reset your iPhone and when to restore your iPhone so that you don’t lose your data.
When Should I Reset and Restore My iPhone?
Resetting an iPhone and restoring an iPhone are two different processes. Now, the Reset iPhone Setting on iOS offers users a variety of choices. One can reset saved Network Settings, Home Screen Layout, etc., or Reset All Settings without worrying about losing any data. Additionally, you do have the choice to reset all the settings alongside the data on your iPhone.
Since you can wipe your data or not touch it at all during resetting an iPhone, this method is mostly used to fix issues caused because of wrong settings, etc. Also, it does not affect the device’s firmware or iOS version.
On the other hand, restoring an iPhone helps recover devices stuck in Recovery mode, DFU mode (Device Firmware Update), or on an error screen. Now, you can either restore your iPhone from a backup or you can restore your iPhone to factory settings. When you restore your iPhone from a backup, you get all the data and settings. However, if you choose to restore your iPhone to factory settings, you lose all your data.
Things to Know Before Resetting an iPhone
As mentioned earlier, iOS offers plenty of choices when resetting your iPhone. However, we need to be aware of what settings and data we will lose before tapping on any of these options.
We’ve listed below all the available options to Reset iPhone setting and what data or settings will be reset.
- Reset All Settings: Network Settings, Keyboard Dictionary, Location Settings, and Privacy Settings are reset to default. All your Apple Pay cards are removed, but no data or media from the device is deleted.
- Reset Network Settings: All Network Settings are removed. The device’s name is reset to iPhone. All the manually trusted certificates are changed to untrusted. Saved Wi-Fi passwords and VPN profiles are removed.
- Reset Keyboard Dictionary: All the words you’ve added to your iPhone’s keyboard dictionary are removed. Want to know more? Check out our guide on how to reset iPhone keyboard history.
- Reset Home Screen Layout: All the built-in apps return to their factory default location on the Home Screen.
- Reset Location and Privacy: Location Services and Privacy Settings are reset to default.
- Erase All Content and Settings: You will be signed out of your Apple ID, every installed app will be removed alongside all of your data, Find My Activation Lock will be deactivated and all of the above-listed settings will be reset to default factory settings.
Also, back up your iPhone to iCloud or your Mac before you proceed with any of these steps. And, keep your Apple ID and password along with your iPhone’s passcode ready before restoring or resetting your iPhone without iTunes.
How to Reset an iPhone Without iTunes
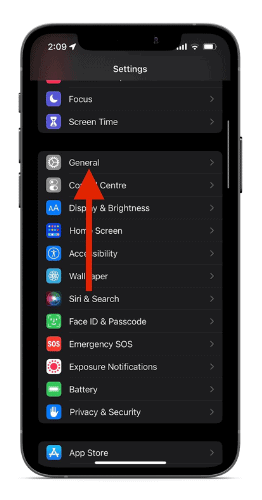
If you can navigate to settings on your iPhone without any issues, you can easily reset your iPhone without iTunes. You don’t even need a Mac. We’ll also go through the steps to back up your iPhone to iCloud so that you don’t lose any data. Follow the steps mentioned below to reset an iPhone without iTunes and without connecting your iPhone to a Mac.
Time needed: 4 minutes
Follow the steps mentioned below to reset an iPhone without iTunes and without connecting your iPhone to a Mac.
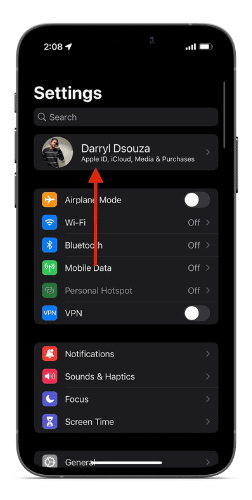
- Open the Settings app on your iPhone and tap the “Your Name” option below the search bar.
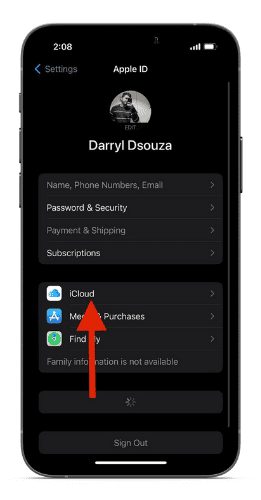
- Tap the iCloud option on the next screen.
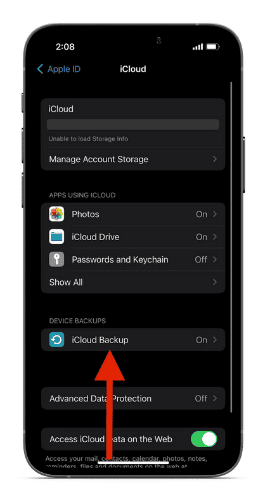
- Now, tap the iCloud Backup option under Device Backups,
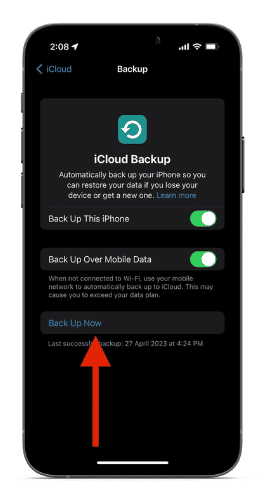
- Tap Back Up Now on the Backup screen. If you do not have a Wi-Fi connection, enable the Back Up Over Mobile Data toggle.
- Once the backup is complete, head back to Settings and navigate to General.
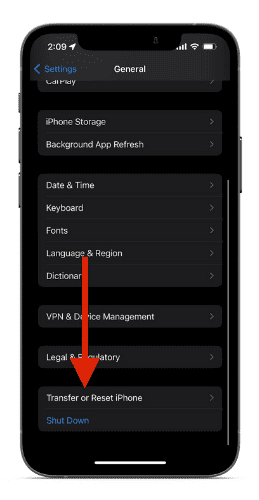
- Scroll down and select the Transfer or Reset iPhone option on the next screen.
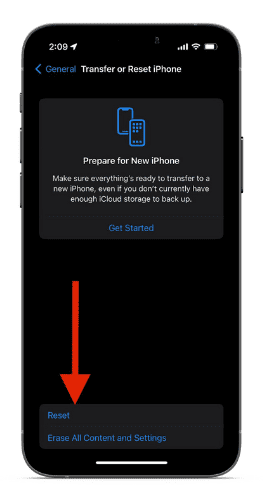
- Tap Reset and select the option that best suits your needs or tap Erase All Content and Settings and follow the onscreen instructions.
How to Restore an iPhone Without iTunes Using a Mac
Even though Apple removed iTunes, most of its functionality moved to the Finder app on Mac. Now, you can easily restore your iPhone using Finder. But, before you do that, ensure to back up all of your iPhone data to iCloud or Mac. Once you’ve done that, follow the steps mentioned below to restore your iPhone without iTunes using a Mac.
1. Connect your iPhone to your Mac using USB-C to Lightning or USB-A to Lightning cable. Just ensure to use an MFi-certified cable that supports data transfer.
2. If asked, enter your passcode on the iPhone and tap the Trust option in the popup.
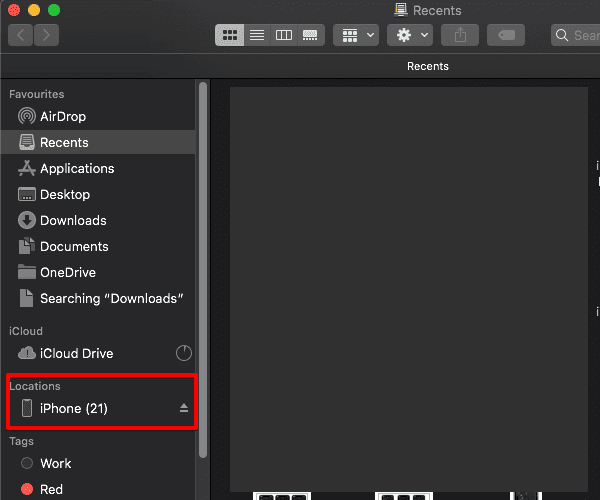
3. Open the Finder app on your Mac and select “X’s iPhone” under the Locations menu from the sidebar.
4. Now, head to the General tab.
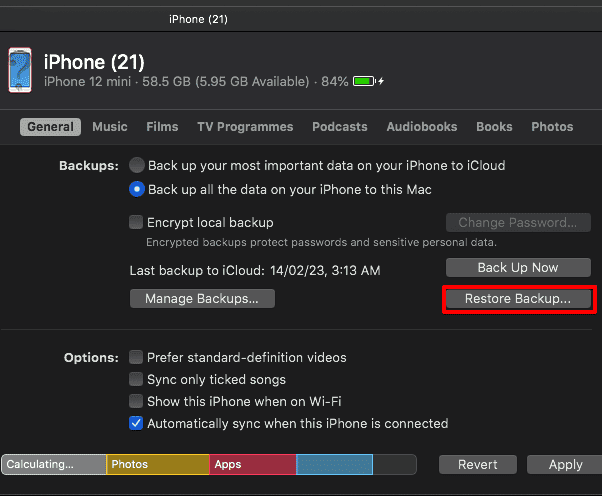
5. Here, select the Restore iPhone option in the software section if you want to remove all your data, and settings and reinstall the software.
6. If you want to restore your iPhone from a backup you had previously taken on your Mac, select the Restore Backup… option located at the bottom right in the Backups section and follow the onscreen instructions.
Restoring or Resetting an iPhone Without iTunes is Easy
And that is how you can restore or reset your iPhone. So, the next time your iPhone is stuck in Recovery or DFU mode, just remember these steps or refer to this article. Also, if you plan on selling your iPhone, ensure to reset it and select the Erase All Content and Settings option. Doing so will help remove all your data from your iPhone. If you have any other questions, do let us know in the comments below. For further reading, check out how to cancel iTunes subscriptions on your iPhone, iPad, Mac, and Windows PC.
