On Apple Silicon Mac, Apple Intelligence and ChatGPT are already integrated into the Notes app. Whether you log in or not, they work across a range of text and image editing apps. ChatGPT can correct your grammar, spelling, and vocabulary for faster, smarter writing. You could even use it to churn out an entire essay in seconds. Best of all, it’s free! Here’s how to integrate generative AI into your daily note-taking sessions.
How to Use ChatGPT With Notes on Mac
Setting up and using the ChatGPT integration in the Apple Notes app is a breeze if you meet the following requirements:
- Your Mac should run on any of the Apple Silicon chips, like M1, M2, M3, and M4.
- You must upgrade to the latest macOS Sequoia 15 release.
- You should enable Apple Intelligence and ChatGPT on Mac.
- Set your Mac’s primary language to English (US). As of writing, localized English in Australia, Canada, Ireland, New Zealand, South Africa, or the United Kingdom also works.
- You need a stable internet connection.
Do you have all the above points? Follow the below steps to get started.
Enable Apple Intelligence
Time needed: 5 minutes
Usually, all eligible MacBooks will automatically get the Apple Intelligence toggle button in System Settings > Apple Intelligence & Siri menu. If you see that toggle button, follow the steps from number 6. However, if you don’t see that feature yet, perform all the steps outlined below.
- Click on the Apple icon in the top-left corner of the menubar and select the System Settings option on the context menu.
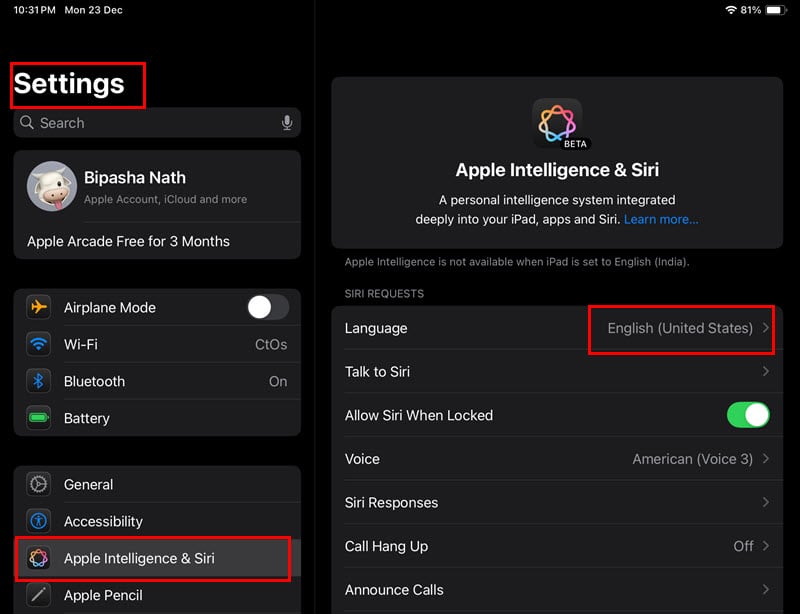
- Select the Apple Intelligence & Siri option in the left-side navigation panel.
- Click on the Language selection arrow and switch to English (United States) or any other English language that I mentioned earlier in the requirements section.
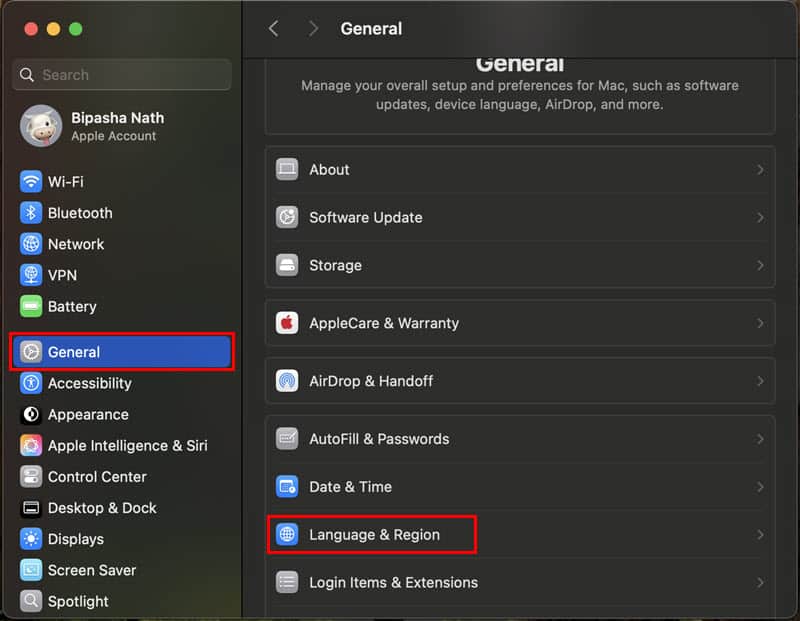
- Now, click on the General settings menu in the left-side panel and select the Language & Region menu on the right.
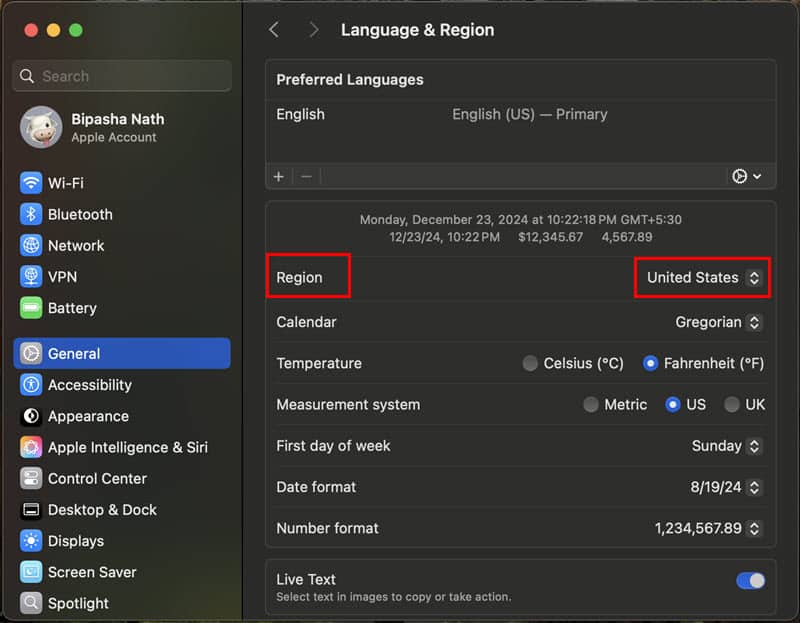
- Change the Region setting for the Mac to the United States, Australia, Canada, Ireland, New Zealand, South Africa, or the United Kingdom.
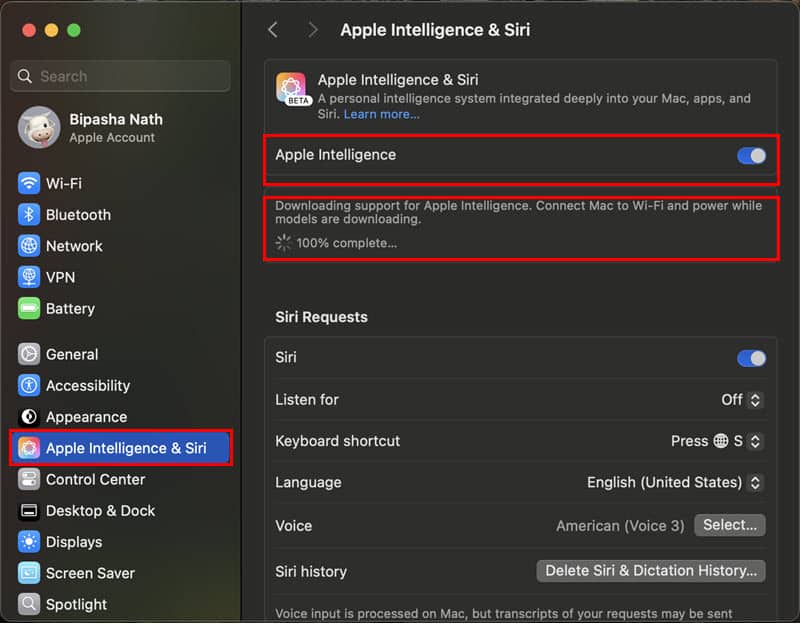
- Go back to the Apple Intelligence & Siri menu and you should now see the Apple Intelligence toggle button. Click on that to enable the feature.
- The Apple Intelligence algorithms and models will download in the background. You’ll see the progress in percentage along with a loading spinner.
Setting Up ChatGPT on Mac
Once macOS has downloaded all the necessary models for Apple Intelligence the next step is to enable the built-in ChatGPT extension. Let me show you how:
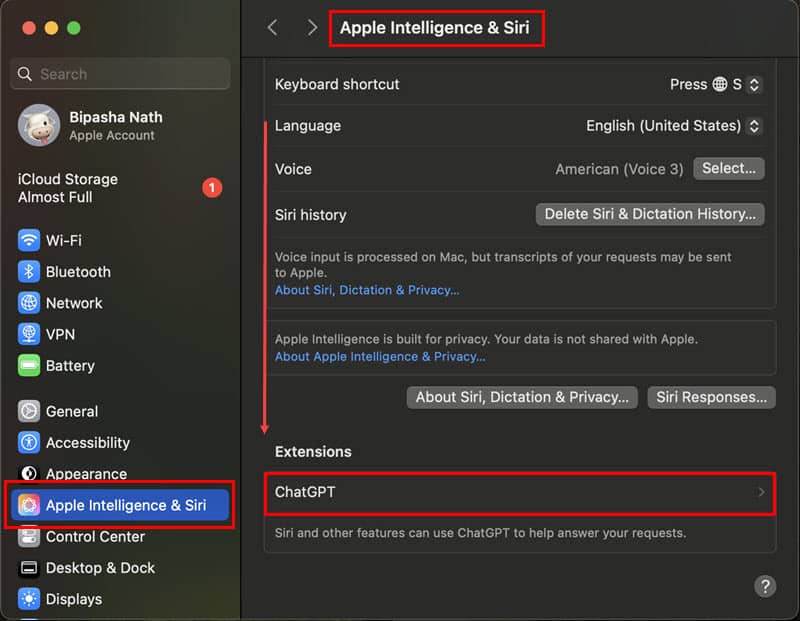
- Go to the Apple Intelligence & Siri settings menu from the Apple icon > System Settings.
- Scroll down to the bottom on the right side and click on the ChatGPT option below the Extension section.
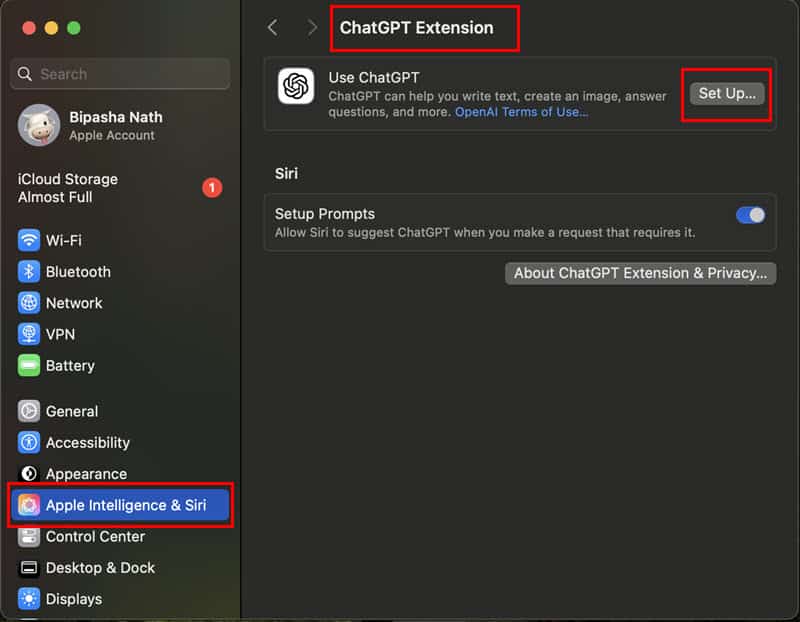
- Click on the Set Up button in the Use ChatGPT Extension menu.
- The ChatGPT pop-up will open showing additional features it offers as listed below:
- Integrates with Siri.
- Compose Text in Writing Tools.
- Works with a ChatGPT Account.
- Click Next on that pop-up to start the setup process.
- On the Privacy and ChatGPT dialog box, click on the Enable ChatGPT button.
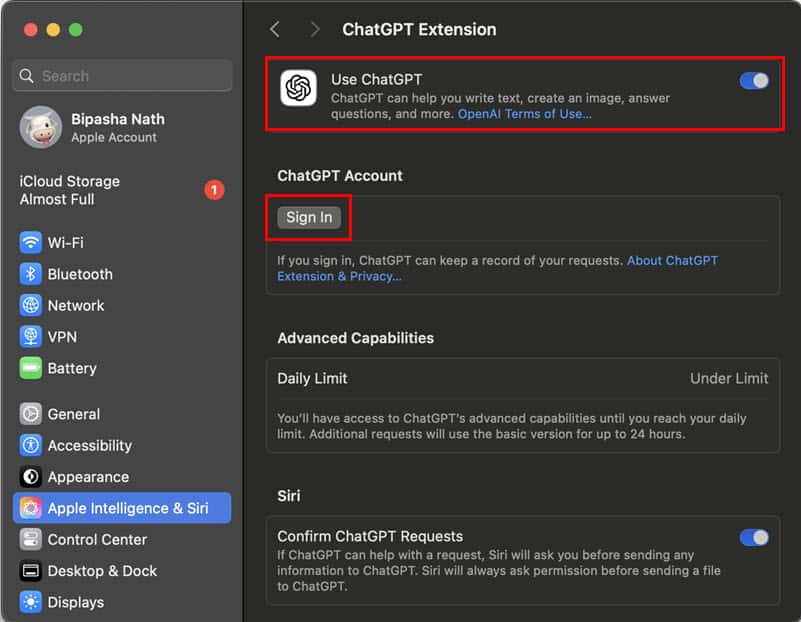
- The ChatGPT Extension menu will update to include a toggle button, so you can instantly enable and disable the feature in the future.
- The menu will also show the ChatGPT Account section with a Sign In button. Click on that to log in to your existing paid or free ChatGPT account.
- The sign-in flow will open a Chrome or Safari browsing session and ask you to log in using your Apple or Google Account. Also, you’ll get the email-based sign-in option.
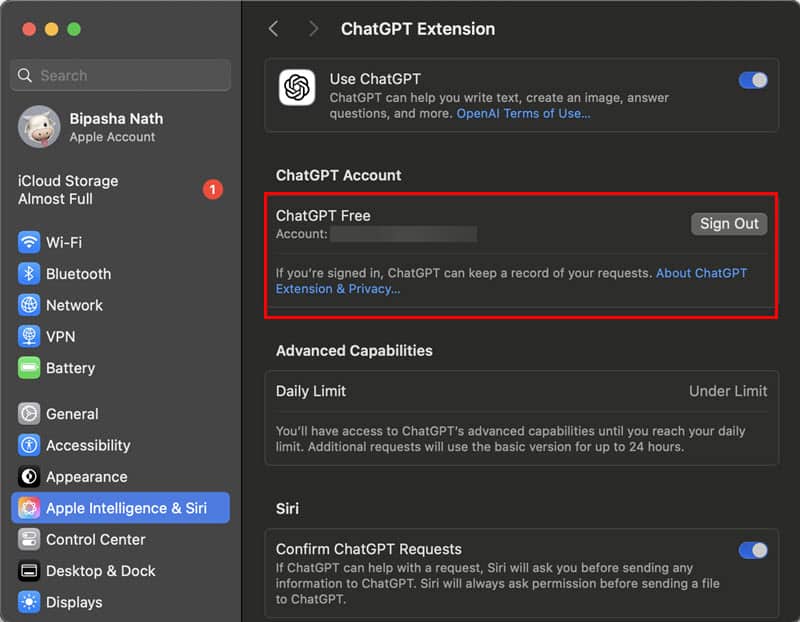
- When you go back to the ChatGPT Extension menu in Apple Intelligence & Siri settings, you’ll see the logged-in account, like the Free or Paid type along with your email.
- That’s it! You’ve successfully enabled ChatGPT for all text and image editing apps in your MacBook, including the Notes app.
Using ChatGPT on Mac Notes App
Now that you’ve activated ChatGPT globally on your MacBook it becomes really easy to use it from various text editing software, like Notes. Signing in to your ChatGPT account is always recommended so you have a backup of the prompts and outputs online in the ChatGPT account. You can try these steps to practice:
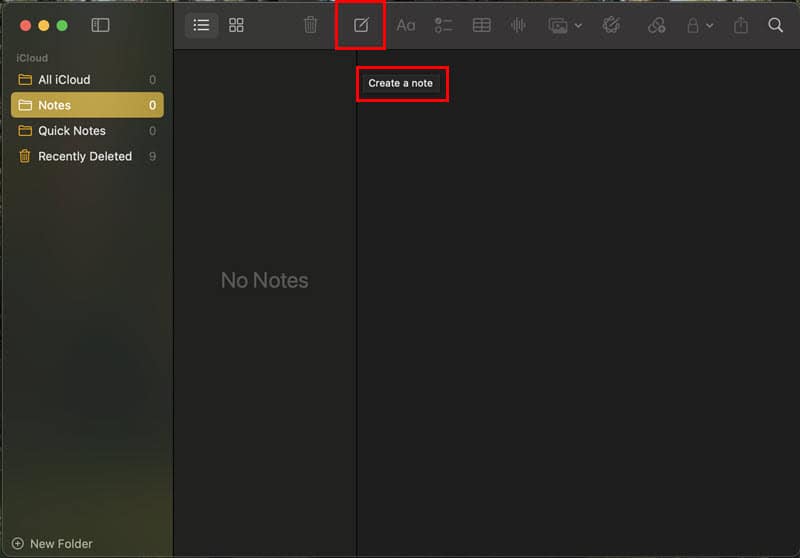
- Open the Notes app from the Dock.
- Click on the Create a note button in the top menubar of the Notes app.
- You’ll see the typing cursor blinking.
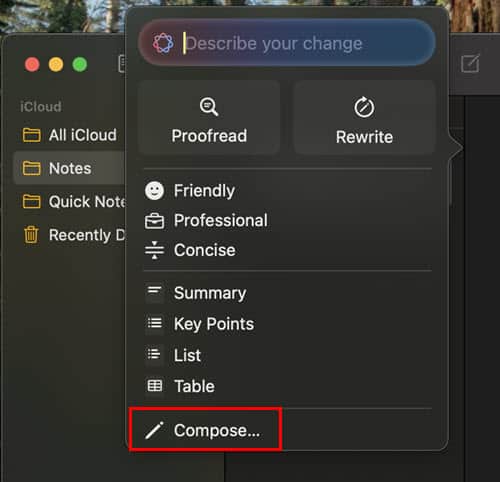
- Now, click on the Show Writing Tools button in the menubar.
- The Describe your change dialog will open.
- Click on the Compose button at the bottom.
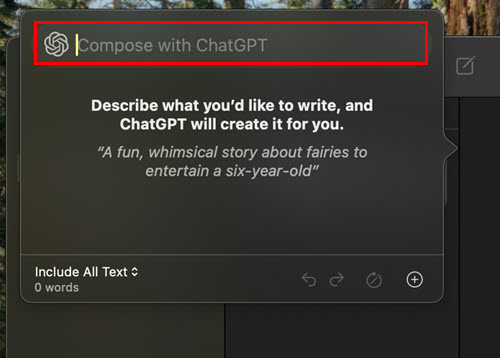
- You should now see the Compose with ChatGPT dialog box with a texting field.
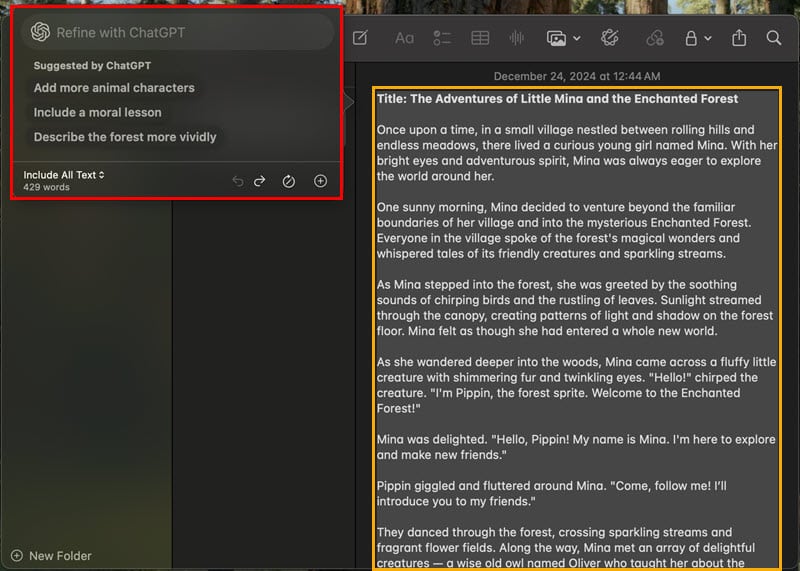
- Enter your generative AI prompt in the Compose with ChatGPT field and hit the Return button.
- ChatGPT will write directly into the Notes app.
- If you wish to perform advanced text generation using external references, like an image or a document, bring up the Compose with ChatGPT texting field again from Show Writing Tools > Compose.
- Click on the plus icon in the bottom right corner of the ChatGPT texting interface.
- The Add a Reference context menu will show up giving you the option to upload images and documents using the Photo and Document commands.
- To edit your text, click anywhere on the note and press Command+A to select the whole text. You can also select a paragraph if you wish.
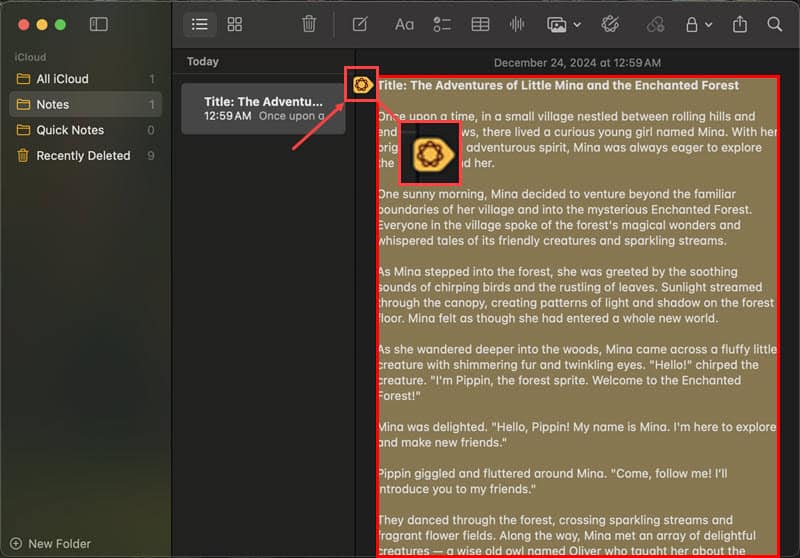
- The Show Writing Tools arrow will appear in the selected text’s top right corner.
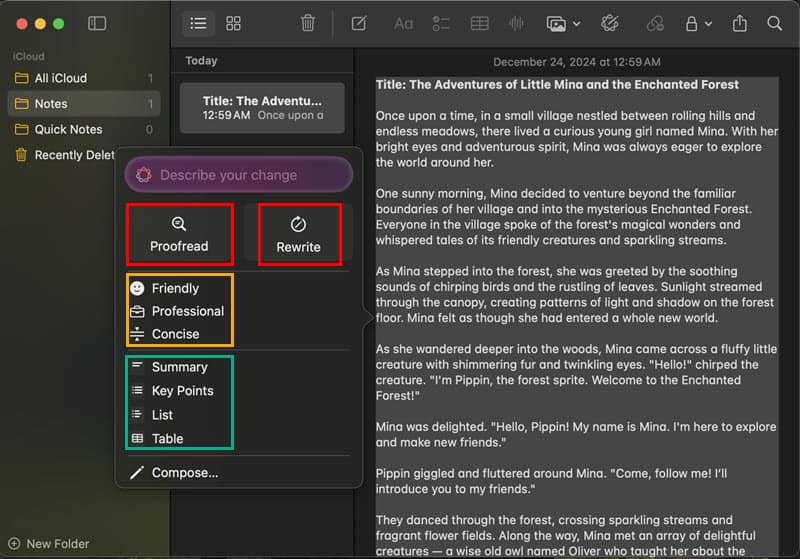
- Click on that to access the context menu that allows you to perform further actions, like Proofread, Rewrite, etc. Other tools you get are as outlined below:
- Change Tone and Pace: Friendly, Professional, and Concise.
- Extract Content From Text: Summary, Key Points, List, and Table.
Now you know how to use ChatGPT with Notes on Mac without opening any web browser. This is a great way to avoid distractions when writing anything, from personal journals to business reports.
You might also want to learn how to link notes in the Apple Notes app and why to share Apple Notes with yourself.

