I’m taking a look at how to set up and use Dictation for macOS. For those that may not know, Apple includes voice recognition software within macOS that is capable of dictating your voice directly to any document that needs text. Dictation is not only useful as an Accessibility feature, but it can be pretty helpful for those that may simply prefer speaking their ideas rather than using their hands to type. This not only saves you from buying third-party dictation products, but Apple’s form of dictation software includes some additional handy tools as well.
Getting it all together, I’m going to take a look at how to use the Apple Dictation feature with macOS, as well as look at some of the advantages of Dictation. This includes setting up the built-in dictation software and then properly using it. I’ll also provide some dictation tips, while also covering additional dictation options as well. Considering this can be incredibly useful for those that need accessibility features, I break the steps down so that the average person can get an idea of what to do. I also go over the common commands you can implement with Dictation while covering additional commands as well.
Keyboard Dictation VS Voice Control: What’s the Difference?
Before starting, folks should be aware that two different Accessibility features on macOS involve speaking to your device. While both are extraordinarily helpful, they serve different functions. While macOS Dictation allows a voice-to-text option, there’s also Voice Control. The Voice Control feature provides voice-to-text options, but you can also control your Mac using voice commands.
Concerning Voice Control and Dictation, the most important thing to remember is that the Dictation feature is not going to work if Voice Control is enabled. You can check to see if Voice Control is active from the menu bar by navigating to Apple > System Settings > Accessibility > Voice Control and ensuring it is disabled.
How to Enable Dictation on macOS
If you need to know how to enable Dictation on your Mac, simply follow these steps. Remember that if you are using an Intel-based processor, you may need an internet connection to properly engage with the Dictation feature.
Time needed: 1 minute
To turn on Dictation on your Mac, follow this guide.
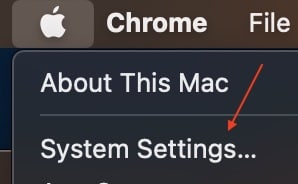
- From your Mac, go to Apple > System Settings from the menu bar.
- Scroll down to the bottom and select Keyboard from the sidebar.
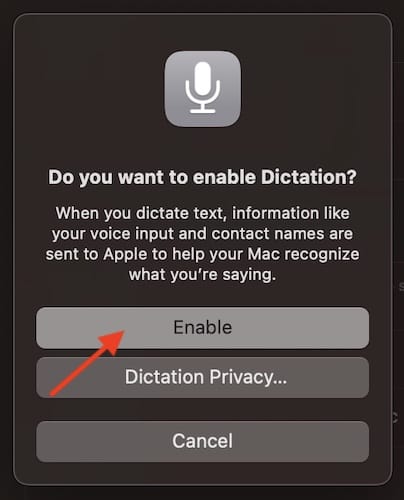
- On the right, select Dictation and ensure it is enabled. You may be asked if you want to improve Dictation and Siri by sharing your audio recordings with Apple. Make your decision. I talk about what this means in the section below.
From here, you’re all set to go! Dictation should be ready to go. Next, I will show you how to use Dictation on macOS.
How to Use Dictation on macOS
Now that Dictation is enabled, you can begin to dictate your text to your Mac, offering a great Accessibility feature for those that need it. Simply follow the steps below to begin a Dictation.
- Using any app on your Mac, place the insertion point wherever you would like to add text.
- There are then three options to begin a Dictation:
- Press and release the microphone button (which looks like a microphone) that is within your row of function keys.
- Or, go to Edit > Start Dictation from the menu bar.
- Use a keyboard shortcut. This allows you to have a dedicated Dictation key. If you need to create a keyboard shortcut, go to Apple > System Settings from the menu bar and select Keyboard from the sidebar. Then, select Dictation, and click the pop-up menu next to the shortcut. You are then able to choose one or create your Dictation shortcut from the drop-down list.
- You will know your device is ready for Dictation when you see a feedback window showcasing a microphone icon. The microphone should fluctuate to indicate loudness. You may also hear a tone to inform you that your device is ready to begin dictation.
- When you receive either of the above indicators, start dictating. Note that this feature will automatically insert certain punctuation marks, such as question marks, commas and periods. You can turn this feature off via Apple > System Settings > Keyboard > Dictation > Auto-punctuation. Those running Apple silicon can insert emojis by saying the name of the emoji.
- You can finish your Dictation by pressing the Return key. Or you can also press your keyboard shortcut, or click Done from the feedback window. Dictation also ends when your Mac doesn’t detect any speech for 30 seconds.
Dictation Privacy: What You Need to Know
One should be aware that the first time they enable Dictation, there’s a chance your machine is going to ask you to share your audio recordings with Apple. Be aware that agreeing to this allows Apple to store copies of your inputs into Dictation. This also includes Siri commands if you agree. Agreeing also means that Apple can listen to portions of your recordings.
It’s up to you whether or not you want to share this information. Remember that regardless of what you choose when you first set up Dictation, you can always change this setting by going to Apple > System Settings > Privacy & Security > Analytics & Improvement > Improve Siri & Dictation. This will prevent Apple from storing and reviewing your Dictations. However, if you use Dictation, Apple is going to be listening to help process your requests, so keep that in mind.
You should also be aware that if you want to remove your recordings from your disk drive, simply go to Apple > System Settings > Siri & Spotlight > Siri & Dictation History > Delete Siri & Dictation History. Note that on anything before macOS Ventura, the Siri & Spotlight option will just be labeled Siri. Either way, this can be a good way to free up some disk space and remove your Dictation history.
Go Offline: Enhanced Dictation
Depending on what version of macOS you are running, you may have the option for Enhanced Dictation. You will know your Mac has this as an option, as it will simply be a checkbox that you need to click to enable from the Dictation Settings page. Also, be aware that if you are using a Mac with Apple silicon, you will not need an internet connection for Dictation anyway.
This can be extremely beneficial for those that do a lot of work offline. You can always check what processor you are using (Apple or Intel) by going to Apple > About This Mac. If you see the word ‘Intel’ anywhere in the Processor section, you are running an Intel-based Mac.
Key Voice Commands for Dictation
While Apple’s Dictation feature does automatically include punctuation, knowing certain Voice Commands for each type of punctuation is still going to be rather useful, as it substitutes certain key combinations. Being aware of these advanced dictation commands can make the process faster for you. Additionally, there are several other Commands that one should familiarize themselves with as well. Take a look at the complete list below.
Punctuation
| Command | Result |
|---|---|
| Apostrophe | ‘ |
| Open bracket | [ |
| Close bracket | ] |
| Open parenthesis | ( |
| Close parenthesis | ) |
| Open brace | { |
| Close brace | } |
| Open-angle bracket | < |
| Close angle bracket | > |
| Colon | : |
| Comma | , |
| Dash | – |
| Ellipsis | … |
| Exclamation mark | ! |
| Hyphen | – |
| Period/point/dot/full stop | . |
| Question mark | ? |
| Quote | “ |
| End quote | “ |
| Begin single quote | ‘ |
| End single quote | ‘ |
| Semicolon | ; |
Special Characters
| Command | Result |
|---|---|
| Ampersand | & |
| Asterisk | * |
| At sign | @ |
| Backslash | \ |
| Forward slash | / |
| Caret | ^ |
| Center dot | ・ |
| Large center dot | ● |
| Degree sign | ° |
| Hashtag/pound sign | # |
| Percent sign | % |
| Underscore | _ |
| Vertical bar | | |
Codes for Formatting
| Command | Result |
|---|---|
| New line | Begins a new line. |
| Numeral | Formats the next phrase as a number. |
| Roman numeral | Makes the next phrase a Roman numeral. |
| New paragraph | Starts a new paragraph. |
| No space on | Formats the next phrase without spaces. |
| No space off | Resumes default spacing. |
| Tab key | Places the cursor at the next tab stop. |
Capitalization
| Command | Result |
|---|---|
| Caps on | Formats the next phrase in Title Case. |
| Caps off | Returns you to the default case lettering. |
| All caps | Makes the next word in ALL CAPS. |
| All caps on | Will make your next phrase in ALL CAPS. |
| All caps off | Turns off caps-lock. |
Mathematical
| Command | Result |
|---|---|
| Equal sign | = |
| Greater than sign | > |
| Less than sign | < |
| Minus sign | – |
| Multiplication sign | x |
| Plus sign | + |
Intellectual Property
| Command | Result |
|---|---|
| Copyright sign | © |
| Registered sign | ® |
| Trademark sign | ™ |
Currency
| Command | Result |
|---|---|
| Dollar sign | $ |
| Cent sign | ¢ |
| Pound sterling sign | £ |
| Euro sign | € |
| Yen sign | ¥ |
Emoticons
| Command | Result |
|---|---|
| Smiling face | 🙂 |
| Frowning face | 🙁 |
| Winking face | 😉 |
| Cross-eyed laughing face | XD |
Tips for Effective Dictation on macOS
When using Dictation on Mac, you may need to familiarize yourself with the speech recognition software feature before diving into it fully. Extended use of this program can truly be a help, as it allows your Mac to get a better sense of your voice. The degree of accuracy within the program is only going to increase the more you engage with it.
Additionally, consider your voice and compatible speech when using Dictation. Accuracy rates will only continue to climb if you speak in a clear tone with a consistent pace. Remember to consider the punctuation rules at well. While it may take a bit of use to get the Dictation feature to 100% accuracy, taking extra time working with the program is only going to make things easier.
If you do find that you’re using Dictation for an extended period, or you’re not happy with the results, considering a more advanced microphone may be the way to go. You may also want to consider removing any background sounds or distractions.
Use Dictation with Different Languages
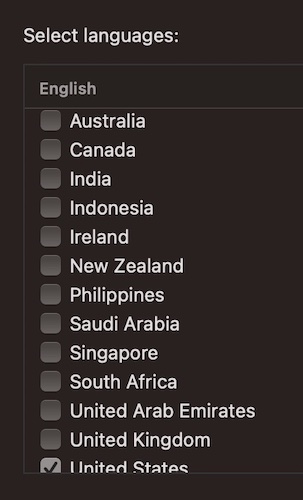
One nice thing about Apple Dictation is that it is available in a multitude of languages, though this is going to vary from Mac to Mac. For example, any Mac running Apple silicon is likely to have more language options than an Intel-based Mac. If you want to use Dictation with another language, you can select a different language from Apple > System Settings > Keyboard > Dictation and select the Language pop-up menu. Choose a language from the list, or select Customize or Add Language to add additional languages. English will more than likely be the default option. Though the default setting may also depend on what language you originally chose when setting up your Mac.

You can also remove languages by going to the Language pop-up menu, selecting Customize and deselecting any languages you do not want to use. It’s also important to note that you can switch languages while you are dictating. So long as you set the feature up for multiple languages, you can select a language from the feedback window and select the language you wish to use.
Dictation and App Compatibility
Concerning Apple Dictation for macOS, any program native to the company is going to work without issues. However, this might not be the case for third-party applications. While countless applications are likely to work, some are likely not, possibly common applications. If you find that Dictation simply isn’t working with a third-party app, remember that the program simply may not support this feature. It can also be a good idea to check an App’s page on the App Store to see if it offers any information in terms of this feature. While you may want to use your application of choice for a specific situation, remember that apps native to macOS may work better with the feature over third-party apps.
Dictation in Siri
In addition to Dictation implementing Apple’s voice recognition software, don’t forget that Siri can also be your handy virtual assistant. Arriving on the scene in Oct. 2011, Siri is Apple’s virtual assistant, and it can be quite powerful on its own. You can think of Siri as a nice combination of Voice Control and Dictation: while Siri is not able to do all of the things that these features can, it can still perform many of them, and perform them well. For example, you can send messages with Siri by asking it “Hey Siri, send a message to. . .” It can also help set reminders and more.
Differences in Enabling Dictation on Different macOS Versions
While different versions of macOS may have different ways they word enabling Dictation, the instructions should be relatively the same. Simply go to Apple > System Settings from the menu bar and navigate to Keyboard. Look for Dictation, and ensure it is enabled. Different versions of macOS may prompt you differently, but the steps are the same. Whether you’re using macOS High Sierra or Sonoma, just remember where the Dictation setting is located, and ensure that it is enabled.
Note that older versions of macOS may refer to System Settings as System Preferences. Essentially, be mindful of the language.
Troubleshooting Dictation: Problems and Solutions
One thing a user needs to remember is that Voice Control and Dictation will not operate at the same time. You can either have one, or the other. If you are enabling Dictation and it is not working for you, ensure that Voice Control is disabled by going to Apple > System Settings > Accessibility > Voice Control and ensuring that it is disabled. Be mindful of your Accessibility settings.
Another issue you may have is your machine picking up their speech. I discuss this elsewhere in this article, but it’s important to reiterate that you may need to spend some time with Dictation to get it exactly where you want it: it may take some practice before it is perfect. Also, be aware that Dictation will highlight ambiguous text with a blue line. If the program finds a statement unclear, you can click the text highlighted in blue and make the corrections suggested by Dictation. You can also dictate or type your corrections. If you have been using Dictation for a while and it is still making several mistakes, you may want to consider a different microphone.
You may also want to remember that you may not hear audio coming from other apps while you are using Dictation. However, this is an easy one to fix. If you are not hearing audio from any of your apps, simply wait 30 seconds without saying anything to get Dictation to close on its own, or have it stop listening for audio by pressing the Return key.
Conclusion
Apple’s built-in speech tool isn’t just powerful, it can be outright necessary for certain individuals. Of course, an important thing to remember is that macOS Dictation is going to work best as a digital assistant for official Apple apps. You may also want to remember the importance of clarity while recording your voice. I recommend giving Dictation a try and seeing if it works well for you, though be mindful of my recommendations as well. Experimentation is almost always a good thing. Of course, feel free to let us know in the comments what your experience was, or if there is anything that you would recommend.


One warning about Mac speech dictation: it mutes the sound for other apps. You can get fooled by that if you accidentally leave speech dictation (the little mic icon) on. Then, if you attempt to watch or listen to something somewhere else, you will not have sound. It took me a few minutes to figure out why I had no sound in a different app – I had previously left speech dictation on in a previously used app and it was on another one of my Mac’s 3 displays.
I’m trying to convert a lecture from an MP3 file into text using Pages. Is this possible? Have tried without any luck. Thank you very much for your help.
To do it manually, you would be able to use dictation on the Mac if you spoke what the lecturer was saying. For audio transcription you would need specialized software. One example I found is called Descript.