When you’ve accidentally emptied the trash on Mac, you may think all is lost. But the good news is the files are not immediately erased from the disk. Instead, the operating system marks the space previously occupied by those files as available for use, and it remains so until overwritten. As long as you act quickly, you still have a chance to recover files from the emptied trash on Mac.
If you need to recover emptied trash on Mac, this guide will walk you through all the best methods and tools, so you never have to worry about data loss again.
How to choose the proper way to recover emptied trash on your Mac?
It’s often possible to recover deleted items from emptied trash on Mac. However, the best way to recover emptied trash on Mac depends on whether:
- You have good technical know-how and are skilled at using Mac.
- You have Time Machine enabled and regularly back up your system.
- You’d prefer a simple software-based solution.
- You have the budget for a premium tool or service that can do all the hard work for you.
Whatever method of emptied trash recovery for Mac you choose, it’s not as complicated as it first seems. Here’s everything you need to know.
The ultimate way to recover emptied trash on Mac
4DDiG Mac Data Recovery by Tenorshare is our top pick to recover items from emptied trash on Mac thanks to its intuitive interface and comprehensive set of features.
Get your deleted trash back by using these simple 4DDiG Recovery tips:
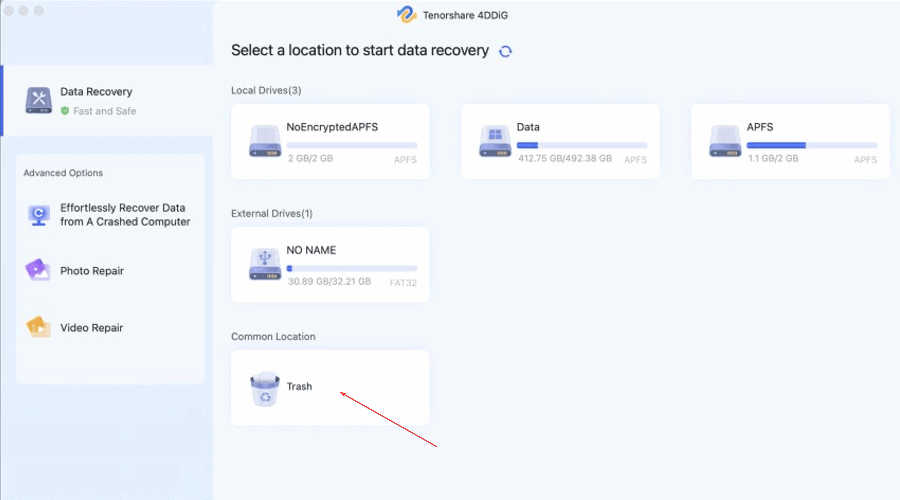
- Launch the software and choose Trash as your recovery location. Click the Scan button and it will take several minutes to assess your recoverable files.
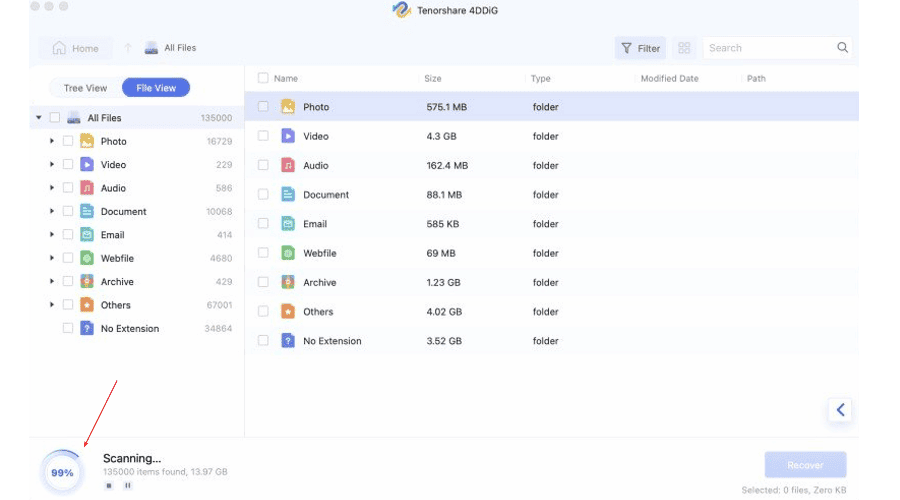
- A progress update is shown on screen, along with all the different types of recovered files. Browse the file or tree view to see what has been recovered. You can use check boxes to choose specific items or recover everything found.
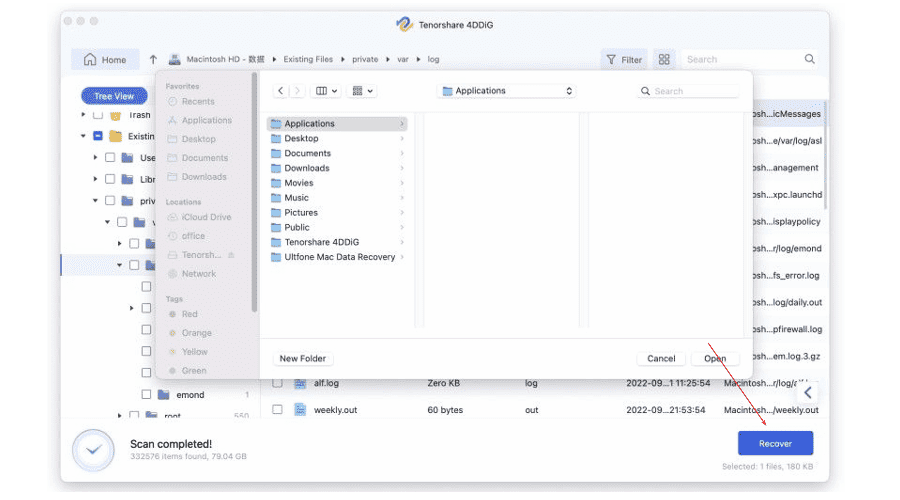
- When ready, click the Recover button in the bottom right. Choose a location to save the recovered files. At this stage it’s best to save to a location that isn’t the same as where the files were originally lost. This can be an external drive or another folder on the system. You can return them to a different location later.
Whatever type of file you need to recover, 4DDiG has your back. These include everything from videos and images to any type of document. It can even recover data lost after an unexpected crash, hard drive failure, or virus attacks.
You can follow the same process to recover files from over 2000 storage devices, including external drives, USB storage, SD cards, NAS drives, and more. With the help of 4DDiG, emptied trash recovery on Mac has never been as simple as it is now.
Alternative ways to recover emptied trash on Mac
Follow these steps that show how to recover permanently deleted files on Mac using other useful methods.
1. Time Machine
Time Machine is Mac’s built-in backup utility, which serves as a valuable option to recover emptied trash on Mac. Here’s how to run it:
- Make sure your Time Machine backup drive is connected to your Mac.
- Click on the Apple menu in the top-left, select System Preferences, and click on Time Machine.
- If not already enabled, click the checkbox next to Show Time Machine in menu bar. This will add a Time Machine icon to your menu bar.
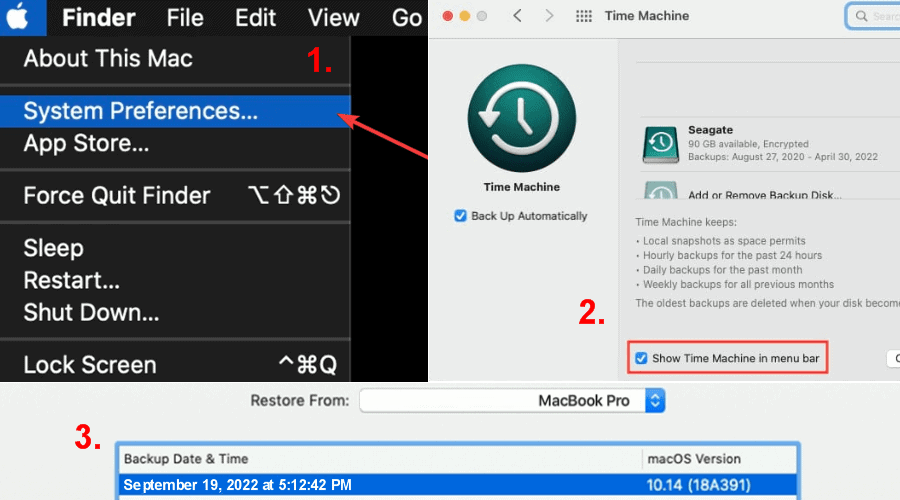
- Click on the Time Machine icon in the menu bar and select Enter Time Machine.
- You’ll see a dropdown list. It represents your backups over time. Find the backup point from before you emptied the trash and select everything you wish to restore.
- Click Restore to recover deleted items from emptied trash on Mac.
2. Cloud storage services like iCloud or Google Drive
If you backup your data to iCloud or Google Drive, you can easily recover emptied trash on Mac.
For iCloud Recovery:
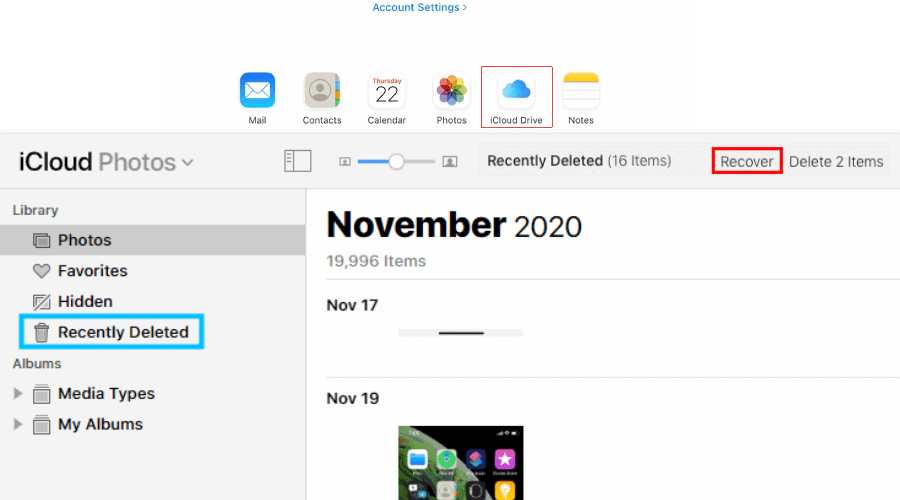
- Open a web browser and go to iCloud.com to find your backups.
- Click on iCloud Drive, choose a category such as photos, then on Recently Deleted.
- Select the files you want to restore and click on Recover.
For Google Drive Recovery:
- Sign in with your Google account. For this to work the files must be synced between your Mac and Google Drive.
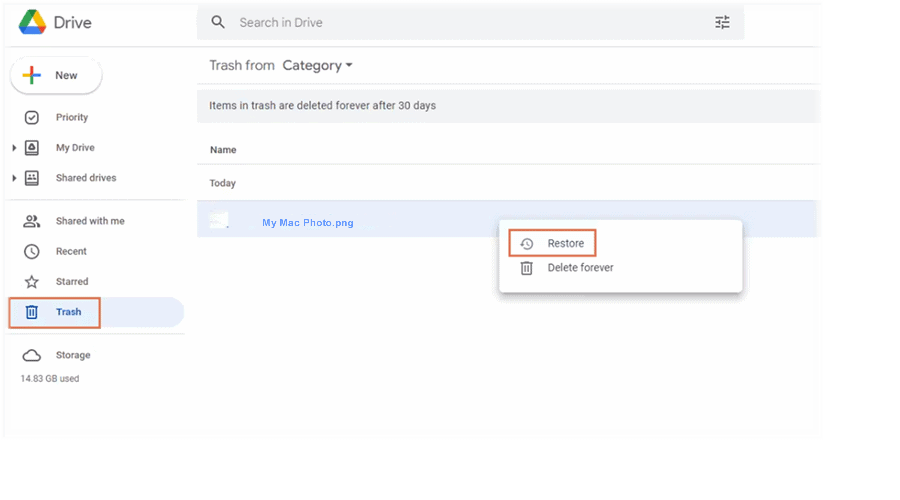
- Click on Trash on the left side, then right-click on the files you want to recover and select Restore.
3. App-Specific File Recovery
In some cases, you can use app-specific file recovery for certain apps that have built-in recovery options. This commonly includes the Photos, Mail, and Office based apps, as well as many third parties like Adobe Photoshop. Each app will function slightly differently, but the general process is the same.
- Go to the app settings and locate the file handling or recovery setting.
- Review how the files are currently backed up, either to the cloud or specific folder.
- Use the built-in recovery feature or browse to the recovery directory to find your files.
Many apps will use Time Machine for recovery as mentioned above.
4. Terminal Recovery
Advanced users can recover deleted files from the emptied Trash on Mac by accessing the Terminal app. However, you must know the exact file names for this to work.
- Go to Utilities > Applications and open the Terminal app.
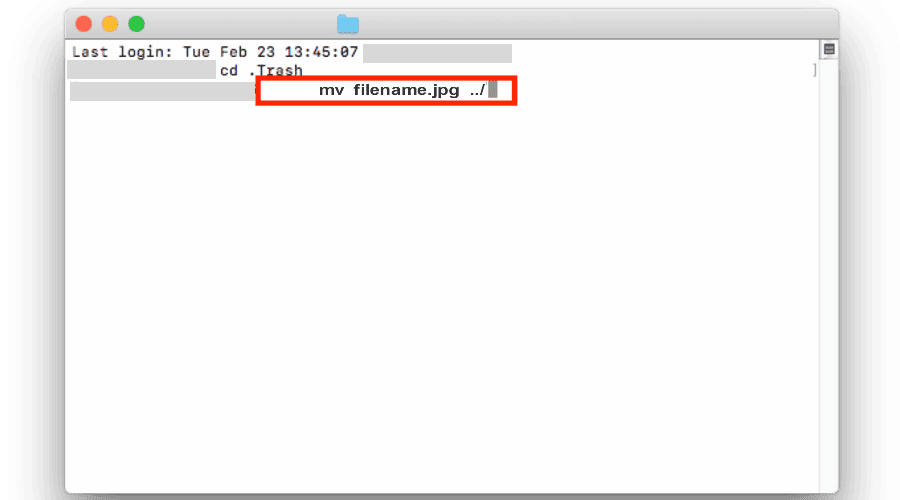
- Type the following command and press Enter: cd ~/.Trash
- For each file you want to recover, type the following command and press Enter: mv filename ../
- Press Command (⌘) + N to open the Finder window.
- Enter each file name into the search bar at the top right to find where the restored files are located.
5. Data Recovery Services
If you want to know how to recover emptied trash on Mac without software yourself, a professional data recovery service can do the job for you. Make sure to find a reputable expert with good reviews before handing over your computer. Of course, this will cost a fee and should only be used as a last resort.
Common causes of Mac data loss and prevention tips
Now, you no longer need to worry about how to recover emptied trash on Mac. Nevertheless, in our daily lives, various reasons can lead to the loss of important data on Mac.
Common Causes
Some of the most common include:
- Malware, viruses, and ransomware attacks, although less common on Mac than Windows.
- Unexpected system crashes, whether due to hardware failure or software issues.
- Hard drive or storage device failure due to aging hardware or physical damage.
- Corruption of the file system from sudden power outages or improper shutdowns.
Practical Tips
You can prevent most of these problems by:
- Setting up a regular backup schedule with Time Machine, cloud storage, or manual backups to external drives.
- Ensuring all your important apps have recovery settings configured.
- Installing recovery software like 4DDiG in advance, so you are prepared.
- Regularly scanning for viruses and other malware and using security software to prevent phishing and ransoms.
- Keeping your system up to date and upgrading to a modern Mac when your older device is experiencing performance issues.
How to recover emptied trash Mac FAQs
Your questions answered about how to recover deleted trash on Mac.
Q1: Is it possible to recover emptied trash on Mac?
Yes, even when the trash is emptied and not just sitting in the trash to be put back, the data is still technically hidden on the drive until it is overwritten with new data. A good software tool can restore this data.
Q2: How to Improve the Success Rate of Emptied Trash Recovery on Mac?
To improve your chances of emptied trash recovery, stop using the Mac right away so no new data overwrites the data that was ‘deleted’. Check your backups immediately or allow recovery tools to work their magic.
Q3: How to recover emptied trash on Mac without software?
To recover emptied trash without software, advanced users can attempt to use the Terminal commands. Alternatively, there are a number of backup and restore methods that don’t require software, but you must have these configured before the files are deleted to recover them.
Conclusion
When you need to recover emptied trash on Mac, it doesn’t have to be a headache. By maintaining a backup schedule, using the Time Machine, and turning to software like 4DDiG Mac Data Recovery, those important files you thought were gone forever can easily be restored.
