One of the notable features of macOS High Sierra is the introduction of the APFS file system. APFS is a modern file system that replaces the extraordinarily aged HFS+, introduced in 1998. For reference, here’s a quick overview of the APFS features.

When the public beta of macOS High Sierra is released, you’ll likely have the option to stay with the old HFS+ or elect to upgrade your boot drive to APFS. Because Apple has had stunning success with APFS in iOS so far, you’ll probably want to upgrade your Mac to APFS, especially if your boot drive is Flash-based.
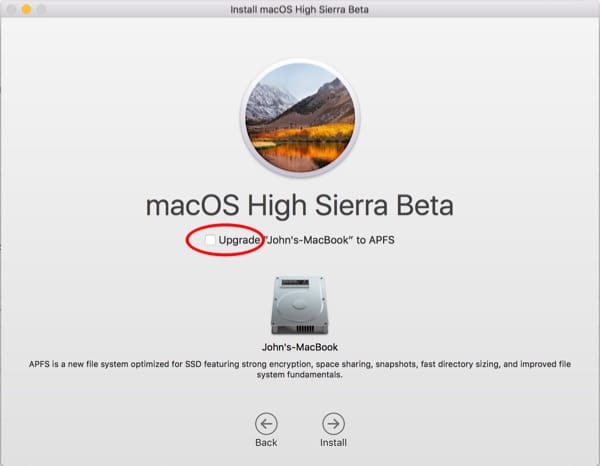
Here’s a screenshot of the installer. Note the checkbox circled in red.

What’s mildly tricky here is that the description of APFS, at the bottom in the smaller print, is isolated from the checkbox above the disk icon. I’ve seen several instances in Apple’s forum where people forgot to check the box before a hurried click on the Install button.
If that happened to you, there’s a fix to upgrade to APFS after your installation is done. The upgrade is non-destructive—you won’t lose any files.
The macOS High Sierra Post-Install Upgrade to APFS
1. Of course, compete the installation in the normal fashion. If the upgrade to High Sierra seemed normal, continue to step #2.
2. Restart the Mac into Recovery Mode. To do that, select Restart from the Apple menu and hold down the Command and “R” keys (often abbreviated as CMD+R) until you see the Apple Logo or a spinning globe. You’ll be dropped into the macOS Utilities.
3. Launch Disk utility. Click-select your named boot volume. (Not the physical drive above it.) In this example, it’s called “John’s-MacBook.”
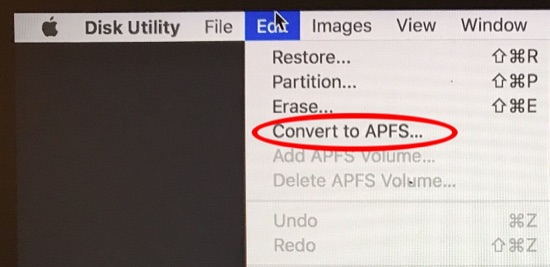
4. In the Disk Utility Edit menu, select “Convert to APFS.” (It will be dimmed if you didn’t properly select the boot volume.)

5. You’ll get a confirmation dialog box. “Would you like to convert Your-drive-name to APFS? The box notes: “APFS volumes cannot be used with older versions of macOS. Converting to APFS cannot be undone.” Click on the “Convert” button.
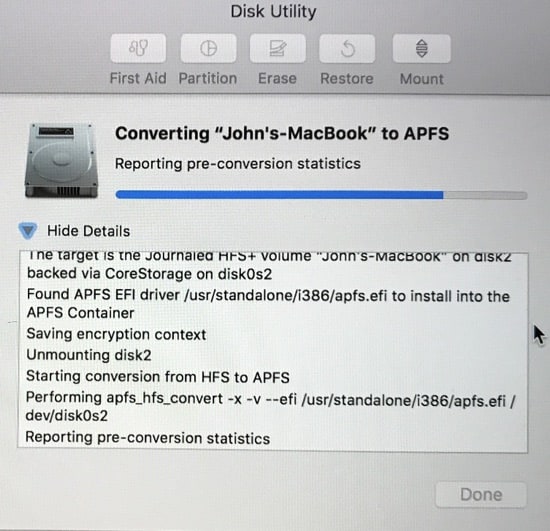
6. When the conversion starts, you’ll see a progress indicator with all the geeky details if you elect to show them. Click Done when that button becomes undimmed.

The results of the conversion will be reported to Apple for QC analysis. This is okay to allow.
The size of the SSD in my MacBook is 256 GB. It took approximately two minutes in my case. That’s fast, and it’s just another indication of the brilliance of Apple’s APFS team.
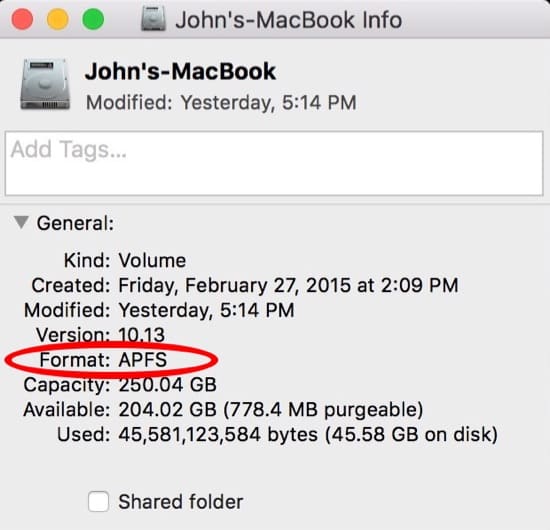
If you’d like the warm fuzzy of seeing that the drive was converted, on the Mac’s desktop, click-select the boot drive icon. (If you don’t see it, you may have to reveal it with Finder > Preferences > General) Then hold down the Command key and type “I” (CMD+I) for “Get Info.” You’ll see something ike this:

If you’d like to read more about the features of APFS, I also recommend these other publications. “APFS: What You Need To Know About Apple’s New File System.” and “10 Things You Should Know About APFS; Apple’s New File System.” Some of the discussion in these articles refers to iOS, but it’s all the same file system in iOS and macOS.

Just did this on a client’s computer, and everything worked as described above, except now we’re getting the dreaded flashing-folder-with-a-question-mark. Are we totally screwed now? Yikes…
Hello JC and sorry for the delayed reply. You can try the following: Hold the power button for 10 seconds. If you’re using a notebook computer, press and hold Touch ID. Use Disk Utility (https://support.apple.com/en-us/HT210898) to fix your startup disk, or reinstall macOS. For more information, check out what to do if your Mac starts up to a question mark (https://support.apple.com/en-us/HT204323).
“Convert to APFS” is dimmed for my Internal Drive “Memory Alpha” (CoreStorage Logical Volume) on my MacBook Air running 10.14.3. How do I “properly select” it? I apparently have the option to Mount the drive, and it is encrypted. I am also showing an OSX Base System drive.
Hello Adam, and sorry for the delayed reply.
You need to unmount the drive first.
If a disk cannot be mounted, macOS may not be able to identify it due to a damaged file system. In this situation, you must reformat the disk to APFS or erase it, which will delete all of the data already on it. First, you may want to backup your data, if you have anything important (https://www.macobserver.com/tips/5-best-mac-backup-software-other-than-apples-time-machine/) then go to Disk Utility and select “Show All Devices” from the “View” option in the top left corner. Locate and choose the drive that you wish to format with APFS. At the top of the window, click “Erase.” Choose “GUID Partition Map” under Scheme, then enter the name and your preferred format (APFS). Wait until the converting procedure is complete before clicking “Erase.”
Does this method wipe the SSD drive data? thanks.
Hello Richard, and sorry for the delayed reply. Your SSD data will be safe.
Thanks, worked for me! In fact the last few iOS updates to my MBP could not be done because they required APFS. Thought I was left behind in the dust because I went NVMe instead of SSD. All good now!
This is really a concerned topic of MAC when I “unmount” the drive first; then the option to “Convert to APFS” was available so keep take attention at this. There is also sometimes Firefox Not Responding error on our Pc or lappy you can contact us.
I unmounted the mac SSD drive and clicked on “Convert to APFS”. It started fine, then said it was “Opening and closing disk3s2 to terminate old content driver” and the infamous beachball started spinning. It has been that way for 20 minutes now.
You helped me
Hello Roger and sorry for the delayed reply. In this case, you’ll have to reformat the disk to APFS or erase it, which will delete all of the data already on it. First, you may want to backup your data, if you have anything important (https://www.macobserver.com/tips/5-best-mac-backup-software-other-than-apples-time-machine/) then go to Disk Utility and select “Show All Devices” from the “View” option in the top left corner. Locate and choose the drive that you wish to format with APFS. At the top of the window, click “Erase.” Choose “GUID Partition Map” under Scheme, then enter the name and your preferred format (APFS). Wait until the converting procedure is complete before clicking “Erase.”
On step #4 above … in the Disk Utility Edit menu, my “Convert to APFS” is dimmed and it doesn’t matter that I properly selected the boot volume. Any ideas why?
When I initially was installing High Sierra beta 1, I tried three times and each time it crashed until on the 3rd attempt, I chose not to convert to APFS and that is when the installation actually was successful.
P.S. Yes, I did have FileVault encryption turned on during the High Sierra install attempts. Does that make a difference?
Well, I think I was successful in doing a APFS conversion. I had to “unmount” the drive first; then the option to “Convert to APFS” was available. After the conversion, the internal drive was automatically mounted again. Hope this helps others.
FYI, this helped.
@sterlingma1 — I had exactly the same issue (on an external hard drive.) I think I saw somewhere else that APFS isn’t supported yet in some configurations. I’m having trouble finding details of when it is supported though.
Awesome. The non-destructive upgrade is great!
I had created a separate partition on my Mac called BETA. Then installed original Sierra on BETA partition. Then installed new Public Beta of High Sierra on BETA. I never saw the option to use APFS. So I then followed your instructions to Convert to APFS. Following this process, I could not boot to the BETA partition. I had to get some Terminal commands from another site to delete the volume. I have since recreated BETA, installed High Sierra. Still never saw the check box for installing as APFS. Any ideas?