For power users, or aspiring power users, the command line is an essential tool. It allows you to interact directly with the operating system on your computer, unhindered by the constraints of a GUI. On your Mac, you access the command line via Terminal. For those of you unfamiliar with this powerful tool, allow me to give you a primer. Those already somewhat familiar can get a good refresher, too.
What Is Terminal on macOS?
Beneath the gorgeous graphical interface of macOS, you’ll find a variant of Unix. Specifically, it’s based on BSD. Prior to color graphics, icons and pointing devices, the command line was all we had. To this day, you’ll find some of the most powerful utilities for your Mac at the command line, in Terminal.
As you begin your journey to learn Terminal, a word of caution. I won’t say “Here be dragons,” but the powerful commands here do need to be treated with respect and carefully executed. You could inadvertently delete important files, force essential services to quit or unexpectedly shut down your Mac.
How to Get to and Use Terminal on Your Mac
With that said, going to the Terminal is easy. There are several ways to find it. Perhaps the fastest is to launch Spotlight by pressing Command-Space, typing Terminal and pressing Return. Alternatively, you can click Applications > Utilities > Terminal.
In Terminal, you can issue a large number of commands to navigate your file system, run programs and more. There’s even a command that allows you to download files from the web using Terminal.
By default, Terminal will open a window with black text on a white background. If that’s too jarring on your eyes, though it’s easy to fix. Just click Shell in the menu bar, New Window and then the profile you prefer.
When you want to run a command in Terminal, you just type it and press Return. Almost every command will comprise three basic elements:
- The command itself.
- An argument that tells the command what or where it should operate.
- A modifier option that affects the command’s output.
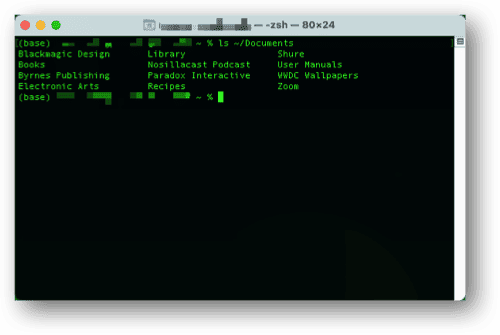
The argument and modifier are often optional, but let’s look at an example. Let’s say you want to list the files in your Documents folder. You’ll use the ls command to do this, like so:
ls ~/Documents
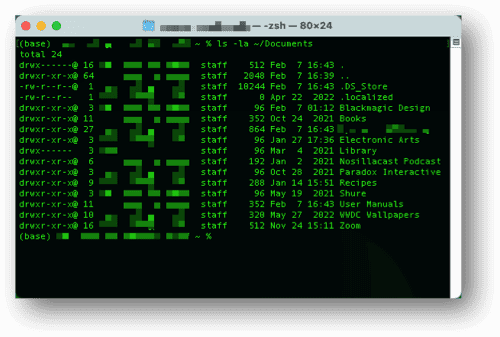
And there you have it, a simple list of the files in your Documents folder. Now, what if you want more information on that list, such as file sizes? That’s where the modifier options come in.
ls -la ~/Documents
In this case, the -la modifier says to list all files (a) in long form (l), which gives more details on each file.
Commonly Used Terminal Commands
In the Terminal, there are a few commands that will be your bread and butter. These are:
- cd: used to change from one directory to another.
- cp: used to copy files.
- rm: used to delete files.
- mv: used to move files.
- find: think of this like Spotlight for the command line, but much more popular. It supports using regular expressions (regex) in your searches.
- du: disk usage, a command to tell you how much of your Mac’s disk is being used.
- sudo: the so-called “god” command, used to give the following command administrator rights.
The best way to learn Terminal is by doing, but you should familiarize yourself with those basic commands, first. Each has its own manual, which you can find by typing man <command>. So, man find will tell you everything you need to know about the find command.
The Tricks of the Trade for the Command Line
Bear in mind, your mouse may not seem like it would do you much good in Terminal. That doesn’t mean you can’t drag, drop, copy or paste into or from Terminal. You certainly can. In fact, let’s say you want to change to a directory buried deep in your file system.
To drag and drop file or directory names into Terminal, just follow this walkthrough.
- Using Finder, point and click your way to the directory or file you want to work with.
- Click into Terminal, and start typing the command you want to use on that file or folder. For example, let’s say I want to change to the Documents directory on my iCloud Drive. I’ll start by typing cd (including the space).
- Next, click the folder in Finder and begin to drag it.
- Drag the folder into Terminal and release your mouse button.
- The full path to that folder drops into Terminal, at the end of my cd command.
- Press Return, and you’ll go to that directory.
You can also copy and paste from other apps straight into Terminal, if you need to. Want to run another app from within Terminal? You can do that, too. Let’s say you want to run the macOS TextEdit app.
- Type open -a TextEdit.app.
- Press Return.
This can be very useful if you want to develop automations or scripts within Terminal.
Learning More About How to Use Terminal on Your Mac
There’s much more you can do in Terminal than I could possibly cover here (without risking putting you to sleep). You should explore the various man pages for Terminal commands.
You will also benefit from Apple’s section in the macOS User Manual on Terminal. Be sure to bookmark it, as it’s chock full of useful information. Also check back here as we continue to expand on our tutorials of how to use Terminal on macOS.
