There’s no denying that reading is a good habit. But, reading from a screen might not be ideal as it increases your daily screen time and also causes vision-related issues. A simple solution to this problem is to use the Text-to-Speech feature. It will read aloud the text on the screen and you can customize everything from the language, speed, accent, and more. Read along to learn how to use Text-to-Speech on iPhone and iPad.
Enable Speak Selection To Use Text-to-Speech on iPhone and iPad
The Speak Selection is an Accessibility feature in iOS and iPadOS. Using this feature, your device can read aloud text that you select and you get total control over it. The Speak Selection feature is useful for people who can manually highlight the text that they want to convert to speech. However, if you have problems related to vision, we suggest using the Speak Screen feature which we’ve covered later in the article.
Time needed: 3 minutes
Steps to enable Spoken Content and use it to read aloud highlight text on iPhone and iPad.
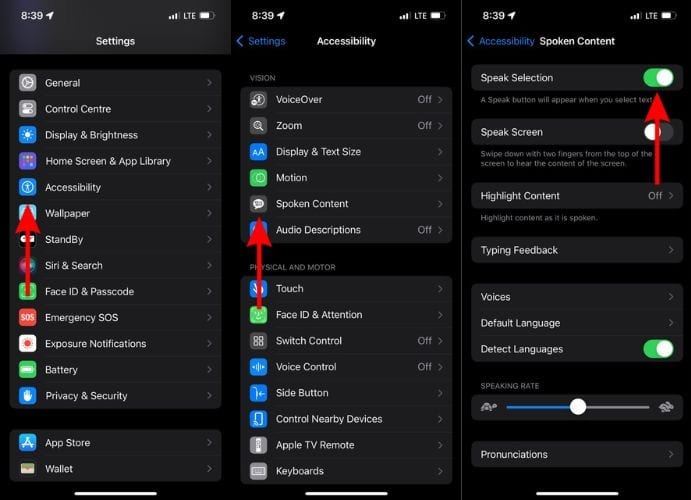
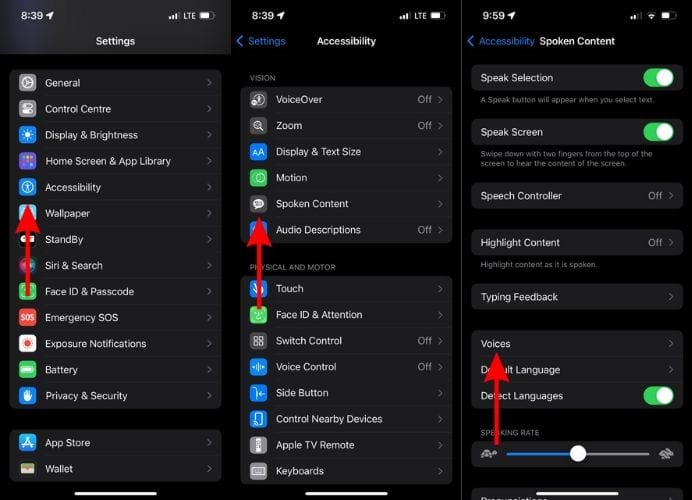
- Open the Settings app on your iPhone.
- Head to the Accessibility option.
- Tap the Spoken Content option located under the Vision menu.
- Enable the Speak Selection toggle on the next page.
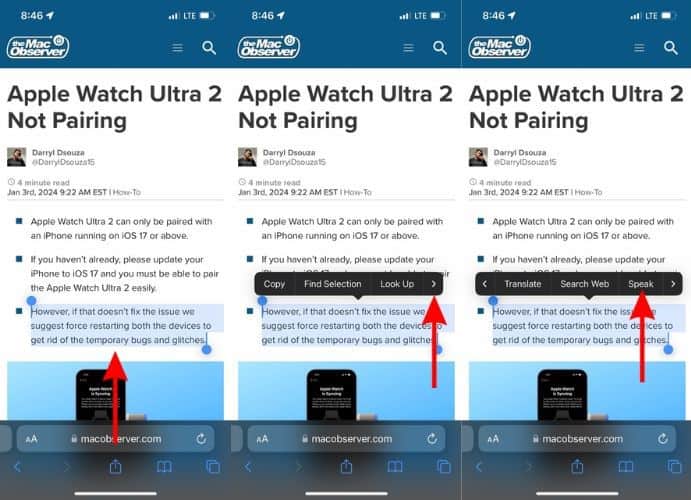
- Now, head to any app of your choice (Notes, Mail, Safari, etc.) and tap and hold on text to select it.
- Tap the “>” arrow icon in the pop-up and then tap the Speak option.
You can also tap and hold on text messages in Messages, WhatsApp, etc., and then select the Speak option to use the Text-to-Speech feature. If you don’t see the Speak option right away, it might be hidden behind the More option. Navigating to the Speak feature after holding on text will be a similar process in most applications.
Use Text-to-Speech in Safari Browser
Don’t want to strain your eyes while reading a super interesting blog online? You can use the in-built Text-to-Speech feature in Safari on iPhone and iPad. It will read aloud the entire blog from the beginning to the end without any interruptions.
- Open the Safari Browser on your iPhone or iPad and head to the website or webpage you want to be read out aloud to you.
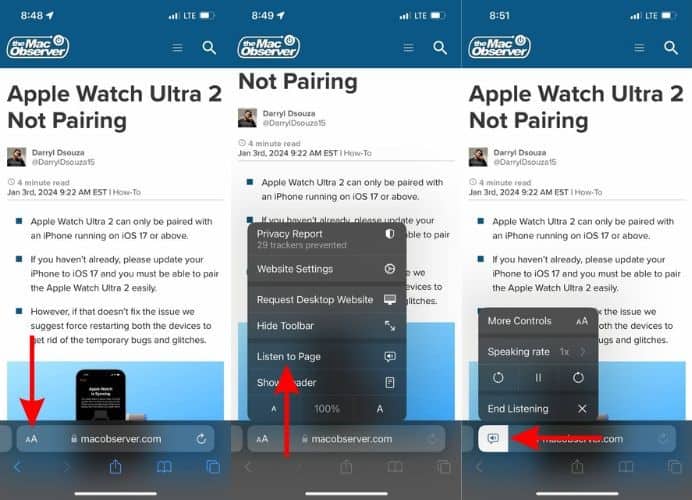
- Tap the AA icon located in the bottom left corner of the address bar.
- Tap the Listen to Page option in the pop-up menu and your device will start reading out aloud the contents of the website/webpage.
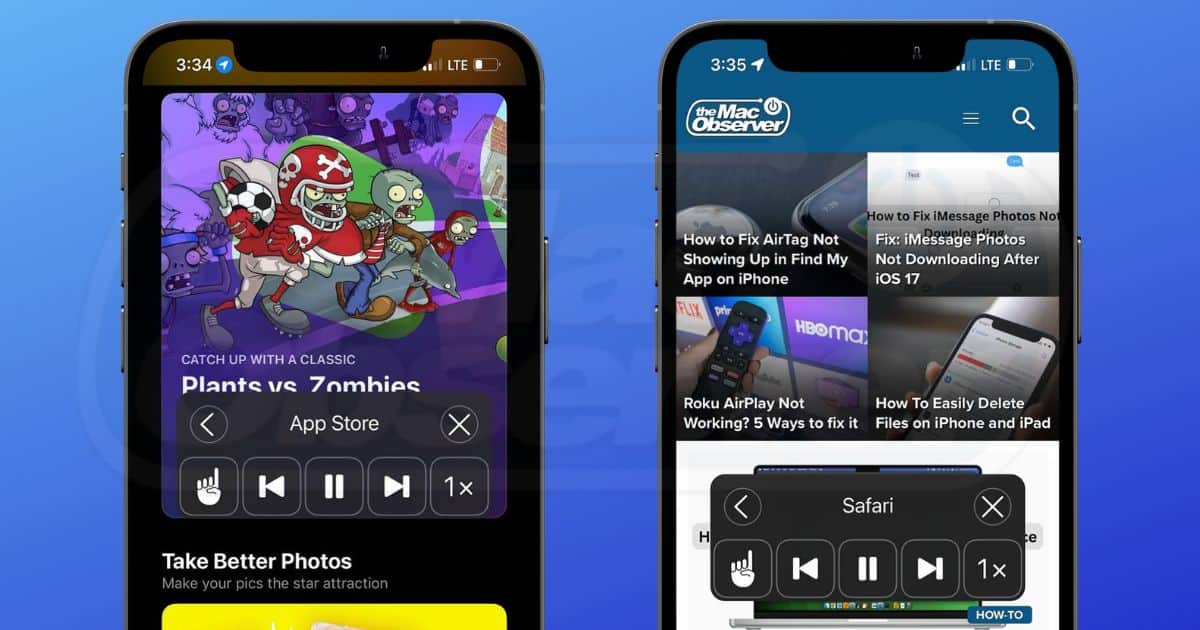
- If you want to adjust the speed, rewind, skip, pause, or end listening to the page, tap the Listen to Page icon located at the bottom left corner and a pop-up will display all these options.
Enable Speak Screen To Use Text-to-Speech for PDFs, eBooks, And More
If you have vision-related problems, it might not be the best idea to spend a lot of time on your iPhone or iPad. But, many of us use these devices to read news, books, research papers, etc. In this case, you can enable and use the Speak Screen feature which will convert all the text on the screen to speech. Here’s how to use the Speak Screen feature to convert Text-to-Speech on iPhone and iPad.
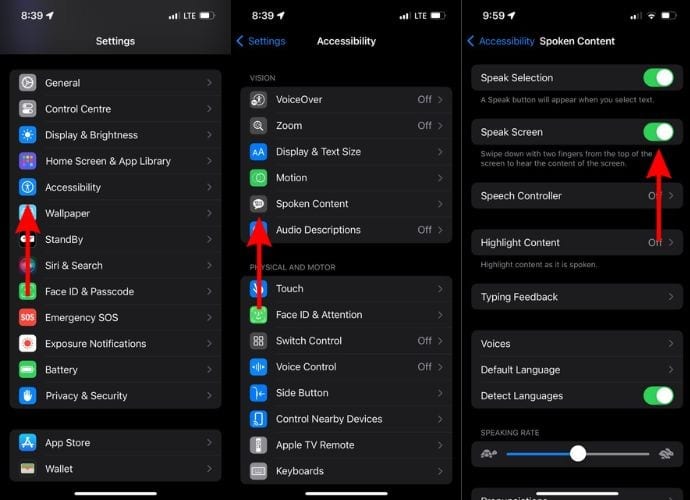
- Open the Settings app on your iPhone and head to the Accessibility option.
- Tap the Spoken Content option.
- Enable the Speak Screen toggle on the next page.
- Now, open any PDF files, eBook, etc. on your iPhone and iPad.
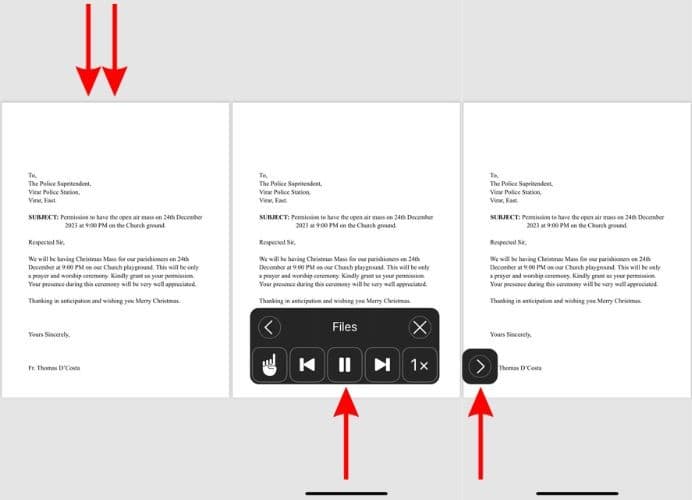
- Swipe up from the top using two fingers and the Text-to-Speech feature will start reading out aloud the contents on the screen.
- The Speech Controller will also pop open. You can use it to play, pause, rewind, skip, and also adjust the speed of the Text-to-Speech feature.
You can use this feature on most apps on your iPhone and iPad. It might take a while to get used to swiping down from the top of the screen with two fingers. You might even fail many attempts, but will eventually get used to the process.
Ask Siri To To Use Speak Screen Text-to-Speech on iPhone and iPad
Swiping down using two fingers to activate the Speak Screen feature is not very convenient. Moreover, you might even accidentally open the Notification Center or Control Panel while trying to do so. Therefore, a simpler method to activate the Speak Screen feature is to ask Siri to do it.
- Open the Settings app on your iPhone and head to the Accessibility option.
- Tap the Spoken Content option.
- Enable the Speak Screen toggle on the next page.
- Now, open any app of your choice where you want to use the Text-to-Speech feature to read aloud text.
- Activate Siri and say, “Hey Siri, Speak Screen.”
- Siri will start reading out text on the screen. You can control the speed, play, pause, and rewind using the Speech Controller.

Customize Text-to-Speech Voice and Speed
Don’t like the way the Text-to-Speech voice sounds? Is it too fast to understand or so slow that it takes forever to read aloud a single sentence? Don’t worry if you’re facing any of these problems. Because, you have total control over these factors and can easily change them. Here’s how you can customize the Text-to-Speech settings on your iPhone and iPad.
- Open the Settings app on your iPhone and head to the Accessibility option.
- Tap the Spoken Content option.
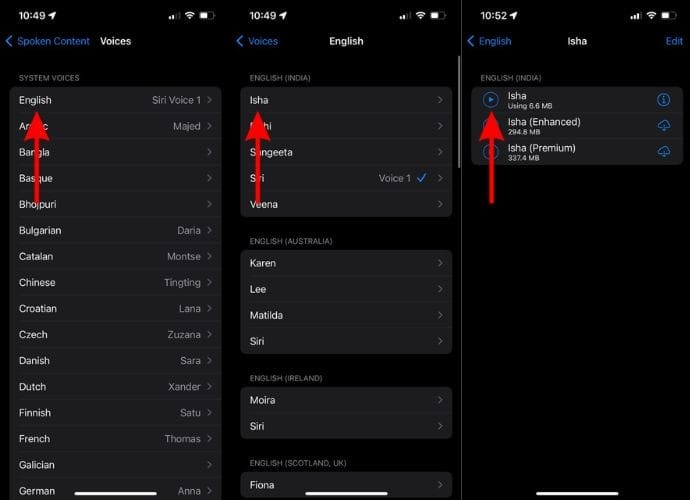
- On the next page, tap the Voices option.
- Select a Language of your choice from the list of available options.
- Now, tap on a voice under the preferred accent.
- On the next screen tap the Play button to listen to that voice.
- If you like a particular voice, tap on it to set it as the default Text-to-Speech voice on your iPhone or iPad.
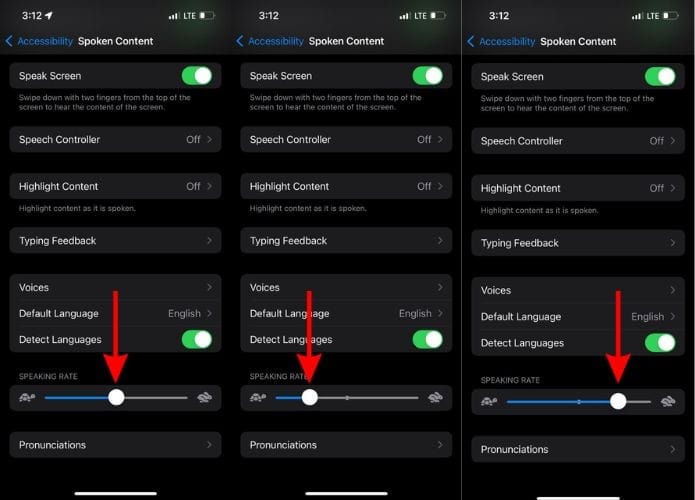
- Go back to the Spoken Content page.
- Here, drag the Speaking Rate slider to adjust the speed of the Text-to-Speech feature.
We hope this guide helps you learn how to use the Text-to-Speech feature on your iPhone and iPad. If you have any doubts, please let us know in the comments below.
