Every day we receive spam text messages from sales companies, scammers, etc. You might miss out on important notifications because of these spam text message notifications. Fortunately, you can block these unwanted messages in Messages and FaceTime on your Mac.
In this guide, we’ll help you block unwanted spam messages. Moreover, we’ve also listed down the steps to block contacts and even block numbers in advance. Also, you need not block the contact in FaceTime, Messages, and the Phone app individually. Even if you block the contact in one of these services on your Mac, they’ll be blocked from contacting you on all Apple services.
How to Block Someone in Messages on Mac
There is no way to prevent someone from contacting you through messages if you do not have their number. So, any unknown contact can send you messages. However, once they’ve sent you a message, you can block them and prevent them from contacting you in the future.
Also, you can block a contact in advance and leave them no chance to contact you through Messages. The only condition is that you need their contact number. Read along to learn how to block someone in Messages on Mac.
Block a Contact in Messages on Mac
Whenever you block a contact in Messages on Mac, it will also be blocked on other Apple services. Moreover, if you block a contact on Mac it will also be blocked on your iPhone, iPad, etc., if they’re signed in with the same Apple ID. With that said, read along to learn how to block text messages and iMessages in the Messages app on Mac.
Time needed: 2 minutes
Steps to block a contact in Messages on Mac.
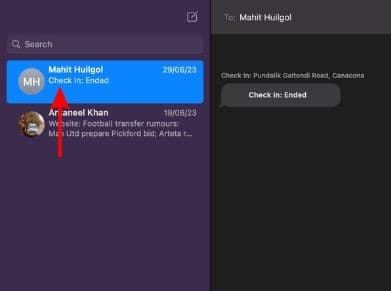
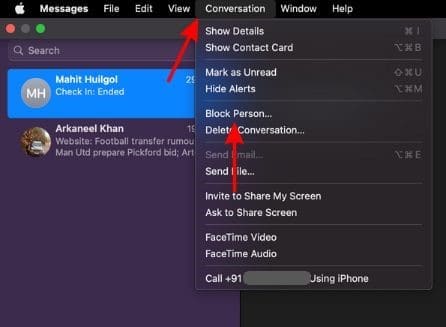
- Open the Messages app on your Mac and click and open the conversation of the contact you want to block.
- Now, head to the menu bar and click the Conversation option. Here, select the Block Person… option from the contextual menu.
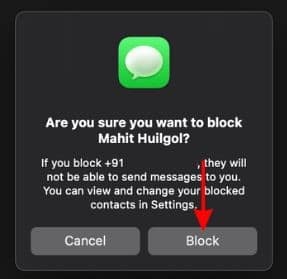
- A dialogue box will pop open asking, “Are you sure you want to block X.” Click the Block button to confirm your selection.
Block a New Number on Mac
There is no native feature that allows you to block messages from unknown numbers automatically. However, if you have the phone number or email address (for iMessage) of the person you’d like to block before they try to contact you, here’s how to do it.
1. Open the Contacts app and create the contact of the user you want to block in advance.
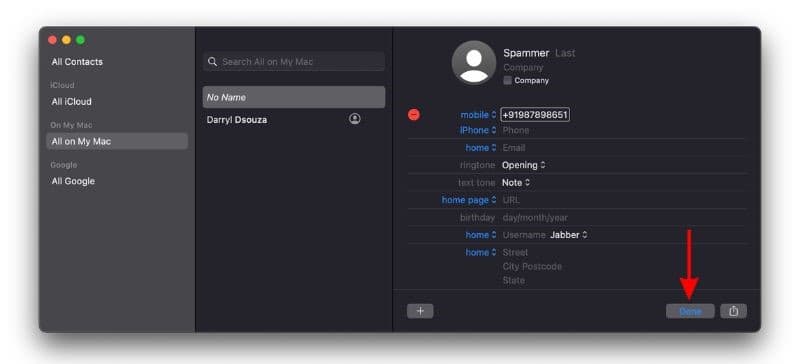
2. Open the Messages app, head to the menu bar, click the Messages option and select Settings… option from the contextual menu. Alternatively, you can even press the Command + , key combination to open Messages Settings.
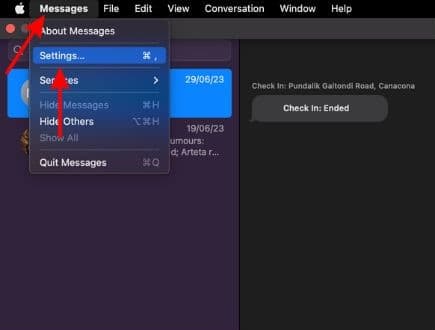
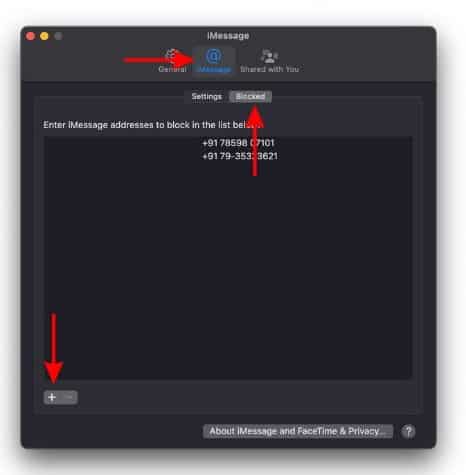
3. Now, head to the iMessage tab and select the Blocked tab below it.
4. Here, navigate to the bottom right corner of the window and click the + Add button.
5. On the next screen, search and select the contact you want to block from the contacts list.
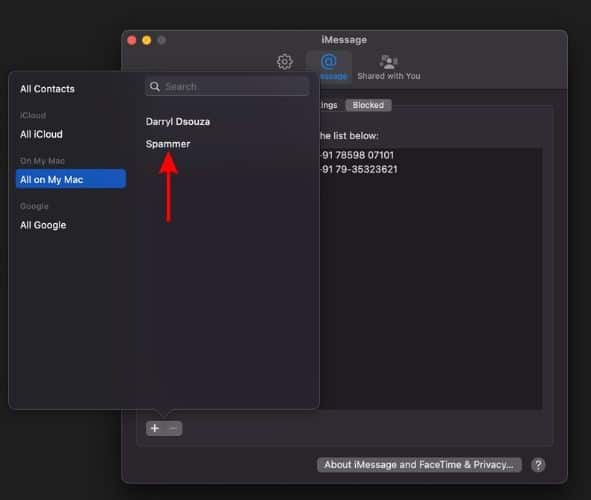
6. The contact will be added to the Blocked list and won’t be able to contact you anytime in the future.
Even if there was a native solution to block unknown numbers on Mac, it would backfire in certain ways. For example, many of us have set up two-factor authentication and receive one-time passwords from these companies whenever we try to log in to their service. So, if we were to block messages from unknown numbers it would also block these messages. Which would ultimately work against you.
How to Prevent Unwanted Messages on Mac
We’ve already established that there is no native solution to block unwanted text messages on Mac. However, you can certainly avoid viewing these unwanted messages. While you will still receive messages from unknown numbers, they won’t be displayed in the Messages app. Read along to learn how to prevent unwanted messages on Mac.
1. Open the Messages app on your Mac.
2. Head to the menu bar and select the View option.
3. Now, click the Known Senders option from the contextual menu.
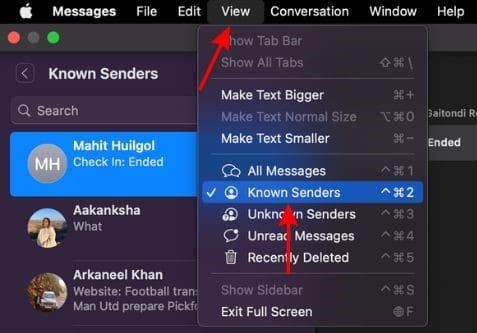
After you’ve applied this setting even though you will receive messages from unknown numbers, they won’t be displayed to you. Also, if you do not want to be notified about new text messages from anyone for a certain period, you can resort to using the Do Not Disturb Focus on your Mac.
How to Block a Contact in FaceTime on Mac
Ignoring unwanted text messages is not that hard. Sadly, the same cannot be said for unwanted calls, especially FaceTime calls from strangers and scammers. With the rise of AI and how scammers are using deepfakes to extort money. So to prevent falling prey to such scammers, learn how to block a contact in FaceTime on Mac.
1. Open the FaceTime app on your Mac.
2. Control-click/ Right-click on the contact you want to Block.
3. Select the Block This Caller option from the contextual menu.
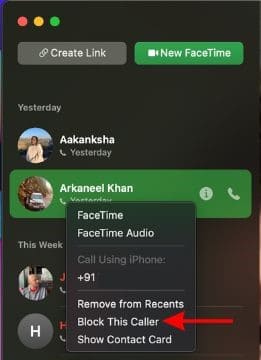
If the caller isn’t in your contacts, you can’t block them using the above-mentioned steps. To block an unknown caller, you must create their contact after which you can block them. So, if you have the person’s contact information, you can block them on FaceTime by following the steps mentioned below.
1. Open the Contacts app and create the contact of the user you want to block on FaceTime.
2. Open the FaceTime app on your Mac, head to the menu bar, click the FaceTime option and select the Settings… option from the contextual menu. You can also press Command + , to open FaceTime Settings.
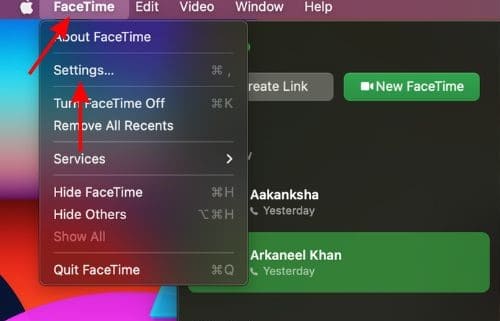
3. Now head to the Blocked tab in FaceTime Settings.
4. Click the + Add button at the bottom right corner.
5. On the next screen, search and select the contact you want to block from the contact lists.
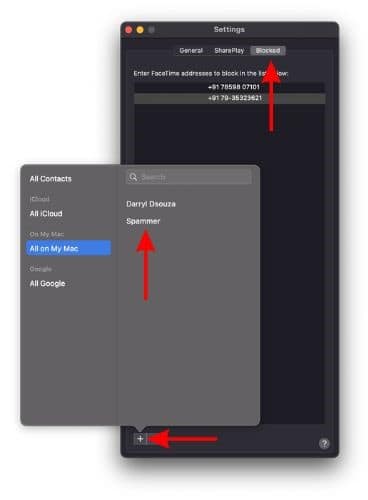
6. The contact will be added to the Blocked list and will be blocked throughout all Apple services like Messages, Phone, and FaceTime.
How to Check Blocked Contacts on Mac
Apple services do not display if a contact is blocked or not. However, you can still check which contacts you’ve blocked. Here’s how to check blocked contacts on Mac.
1. Open the Messages app, head to the menu bar, click the Messages option and select Settings… option from the contextual menu. Alternatively, you can even press the Command + , key combination to open Messages Settings.
2. Now, head to the iMessage tab and select the Blocked tab below it.
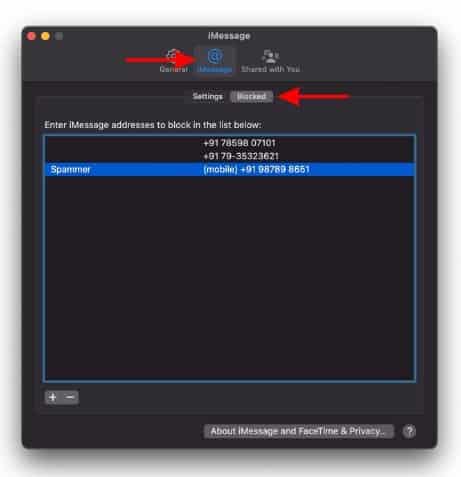
3. You can check all the blocked contacts in this tab.
How to Unblock a Contact on Mac in Messages and FaceTime
You can easily unblock someone you previously blocked on your Mac. Also, iCloud syncs the account activity throughout all your devices. So, you just need to unblock the contact from one location and they’ll be unblocked from every Apple service and all your devices. Read along to learn how to unblock a contact in Messages and FaceTime on Mac.
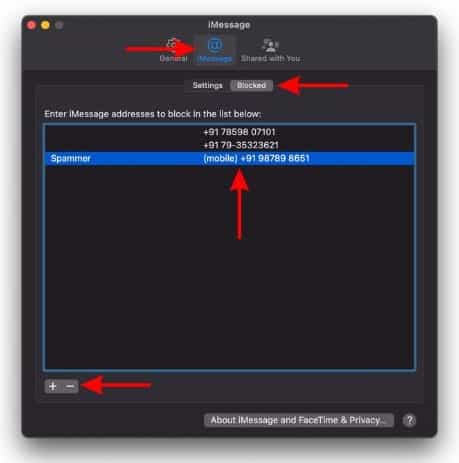
1. Open the Messages app, head to the menu bar, click the Messages option and select Settings… option from the contextual menu. Alternatively, you can even press the Command + , key combination to open Messages Settings.
2. Now, head to the iMessage tab and select the Blocked tab below it.
3. To unblock any contact from the Block list, select the contact and click the – Remove button at the bottom right corner. The contact will be unblocked throughout all Apple services like Messages, Phone, and FaceTime.
Keep Scammers at Bay by Blocking Them
There are no downsides to blocking scammers or anyone who’s harassing you. Go ahead and block such people and companies in Messages and FaceTime. If you have any doubts regarding this article or if you’re aware of any better methods to block unwanted messages on Mac, please let us know in the comments below.
FAQs
Follow the steps mentioned below to unblock a contact in Messages on Mac.
Open the Messages App > Messages option in the menu bar > Settings… > iMessage > Blocked > select the contact you want to unblock > click the – Remove button at the bottom right corner.
Follow the steps mentioned below to unblock a contact in FaceTime on Mac.
Open the FaceTime App > FaceTime option in the menu bar > Settings… > Blocked > select the contact you want to unblock > click the – Remove button at the bottom right corner.
I just now received text spam while my phone and iPads were in other areas of the house. Remembering that I had long ago designated a few contacts as blocked spam contacts (some were so egregious as to merit their own contact record), I simply assigned the phone number of the offending party to one of those contacts. Though a subscriber can’t manually add numbers to its contact record, this is how NumberGuru works.