Let’s look at how to delete custom ringtones with iTunes 12.7. Yesterday, I showed you how you can install custom and third-party ringtones using the new version of the software. Unfortunately, I didn’t know then what I know now. Thanks to Allison Sheridan of Nosillacast, I can show you what you need to do to get rid of those unused ringtones.

Tell iTunes You Want to Manually Manage Media
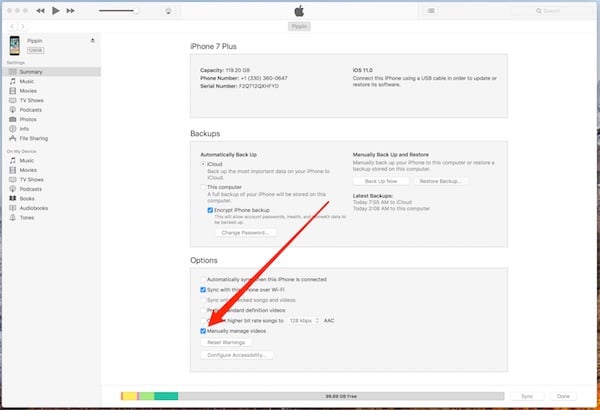
The first thing you need to do, as we did yesterday to add ringtones, is go into iTunes. Click the iPhone icon in the top bar, and then click Summary. You’ll see one of two options (that I’m aware of), depending on whether or not you subscribe to Apple Music. You might see “Manually manage music and videos,” or you might only see “Manually manage videos.”

Click on that option, whatever it says. For our purposes, it means the same thing and does what we need. Click Done, and your changes will be saved.
Delete Custom Ringtones With Ease
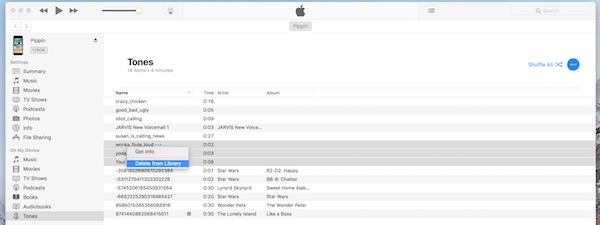
With that option selected, you’ll be able to manually delete ringtones. Click on Tones under On My Device, and secondary-click (right-click, for those from Windows world) on the ringtone you want to delete. You’ll see an option to delete the ringtone from your library. Go ahead and click on that option, and the ringtone goes away.

This even works for multiple ringtones at a time, so feel free to choose all of the ones you want to delete in one fell swoop. Your device will delete the old ringtones, and you can go on to finding new and exciting ringtones to use instead.

Unfortunately this didn’t work for me … I set to manual, synced my phone … but although the purchased ringtone shows up on my phone, iTunes on my MacBook says I have no tones.
Since the ringtone in question played a song named after an ex, I would really like to get rid of it!
Update: I tried iFunbox with no results, but AnyTrans worked, fyi.
For example, I always download ringtones from this site … and there are no problems for me!
THANK YOU SO MUCH!
I was also able to edit the artists name.