Remember that time when you mistakenly deleted an important picture from your iCloud Drive? How disappointed you were to have lost that core memory.
The good news is that iCloud Drive allows you to recover deleted items. However, the bad news is that it might be too late. This article explains all you need to know about recovering recently deleted items on iCloud Drive and much more.
iCloud Drive: Apple’s Cloud Storage Management Platform
Microsoft has OneDrive, Google has Google Drive, and Apple has iCloud Drive. Apple’s dedicated cloud storage management platform allows you to store and backup your photos, videos, and documents. iCloud Drive also allows you to share files or folders with family, friends, etc.
With one iCloud account, you can access stored files on iCloud Drive via your Mac, iPad, iPhone, using iCloud for Windows, or web-only access on iCloud.com for other non-Apple devices. So, when you delete a file in iCloud Drive on one device, it disappears on your other devices signed in to the same iCloud account.
Apple offers free 5GB of cloud storage on iCloud Drive when you sign up for a new iCloud account. You may choose to expand this storage to 50GB or more for a fee. One limitation of using iCloud Drive to store files is that you cannot upload a file that exceeds 50GB in size, regardless of how much free storage space you have.
How to Recover Recently Deleted Files on iCloud
Now, if you deleted that picture or video you’re looking to recover more than 30 days ago, it’s gone, forever. If it was within the last 30 days, however, you’re in luck! iCloud Drive retains any item you delete from it or your On My [Device] folder for up to 30 days in the Recently Deleted folder. You need to hurry though, time is ticking.
You can perform the file recovery on your Mac, iPad, iPhone, or use web-only access for non-Apple devices.
Recovering Recently Deleted Files Using Your Mac
If you deleted a file on your Mac, it will usually go to the Trash bin first.
Time needed: 1 minute
To recover your recently deleted files using the Trash app, there are just two steps.
- Click on the Trash icon in the Dock to open it.
- Locate the file you want to recover, right-click on it, and select Put Back. The file will be restored to its original location.
Alternatively, you can use iCloud’s website to recover the files. Just follow these steps.
- Go to iCloud.com.
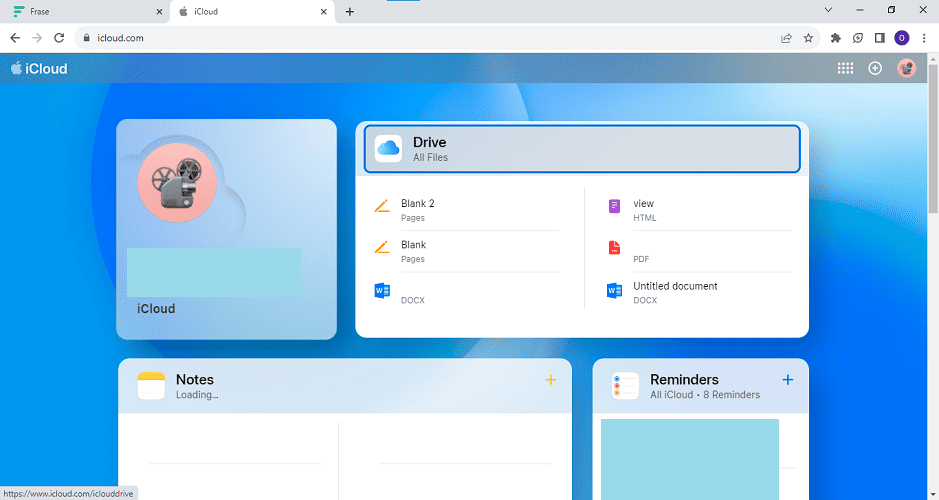
- Sign in with your Apple ID and select Drive from the list of apps.
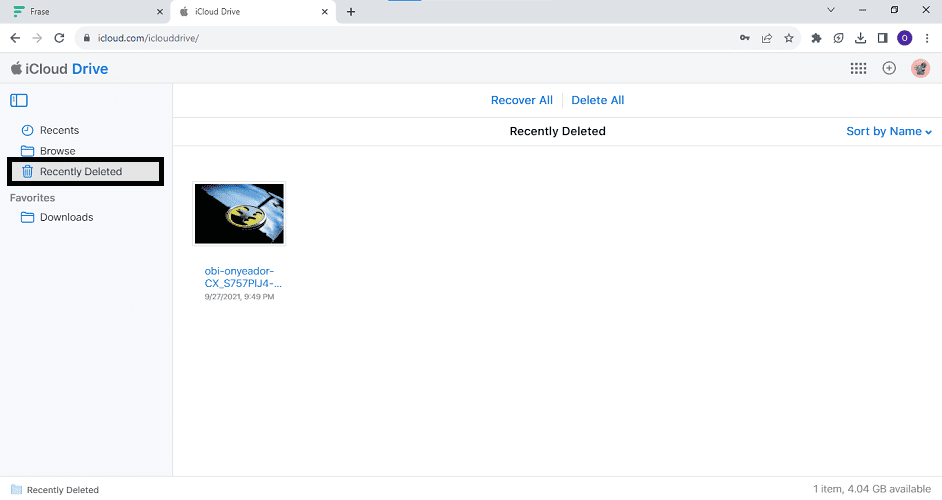
- Click on Recently Deleted in the left-hand menu to access the recently deleted files. A list of recently deleted files will appear, including photos, documents, and other file types.
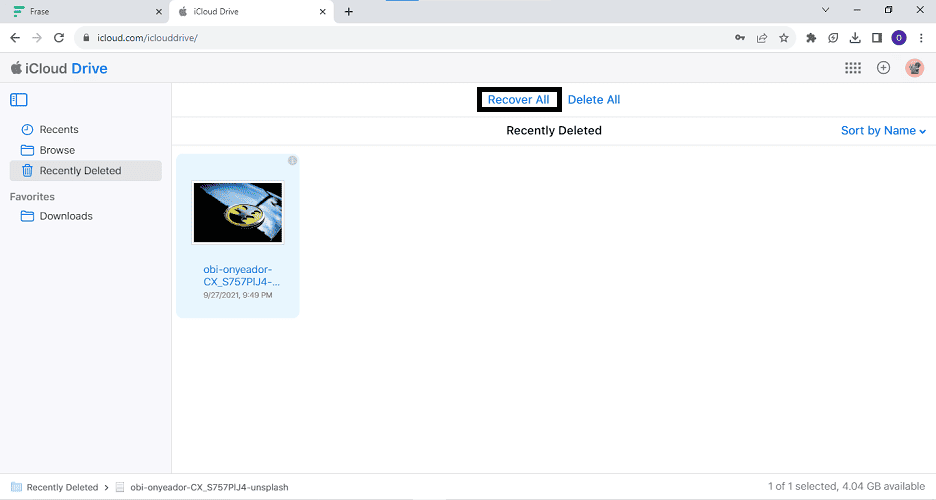
- Select individual files and click Recover to restore the file to its original position.
Recovering Deleted Files on an iPhone or iPad
If you’re attempting the file recovery process on an iPhone, iPad, or iPod Touch, here’s what to do:
- Open the Files app on your device.
- Tap the Browse option to access your files.
- Find the Recently Deleted folder under Locations.
- Tap the folder to view the recently deleted files.
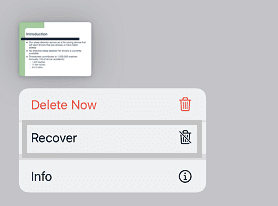
- To recover a specific file, tap and hold the file, then select Recover. Alternatively, you can tap Select in the top-right corner, choose the files you want to recover, and then tap Recover in the bottom-right corner.
- The file will be restored to its original location.
When You Need to Do iCloud File Recovery from the Web
Finally, if you’re carrying out the file recovery using iCloud.com on a PC or other non-Apple device, these are the steps you should follow:
- Open a web browser and visit iCloud.com.
- Sign in to your iCloud account using your Apple ID and password.
- Select Drive from the list of apps.
- Click on Recently Deleted to access the recently deleted files. A list of recently deleted files will appear, including photos, documents, and other file types.
- To recover a specific file, select it, and then click on the Recover button. The file will be restored to its original location on iCloud Drive.
- To recover multiple files, use the Shift or Ctrl (cmd on Mac) key and click on the files you want to recover. Then, click on Recover to restore them.
- To recover all files in the Recently Deleted folder at once, simply deselect any selected files and click the Recover All button at the top of the window.
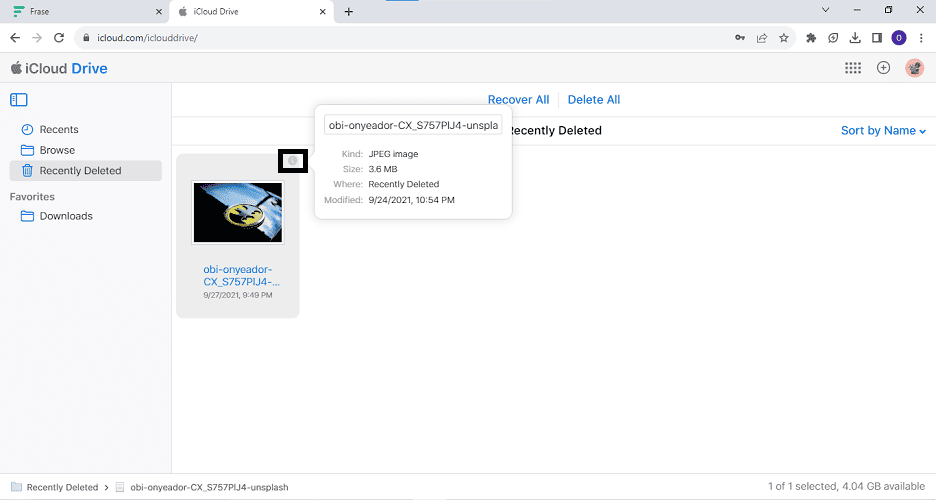
You can view information about an item in the Recently Deleted folder such as its name, size, iCloud Drive location, and last modified date. To do that, simply click on the little i icon that appears at the top corner of the item’s borders when you select it. A small pop-up with these details will appear.
Do Even More With iCloud Drive
You can recover so much more with iCloud Drive in the event that your iPhone or iPad gets lost or meets some other tragedy. You can restore earlier versions of your contacts, calendar, files, Safari bookmarks, and reading lists.
Here’s how to do all of that.
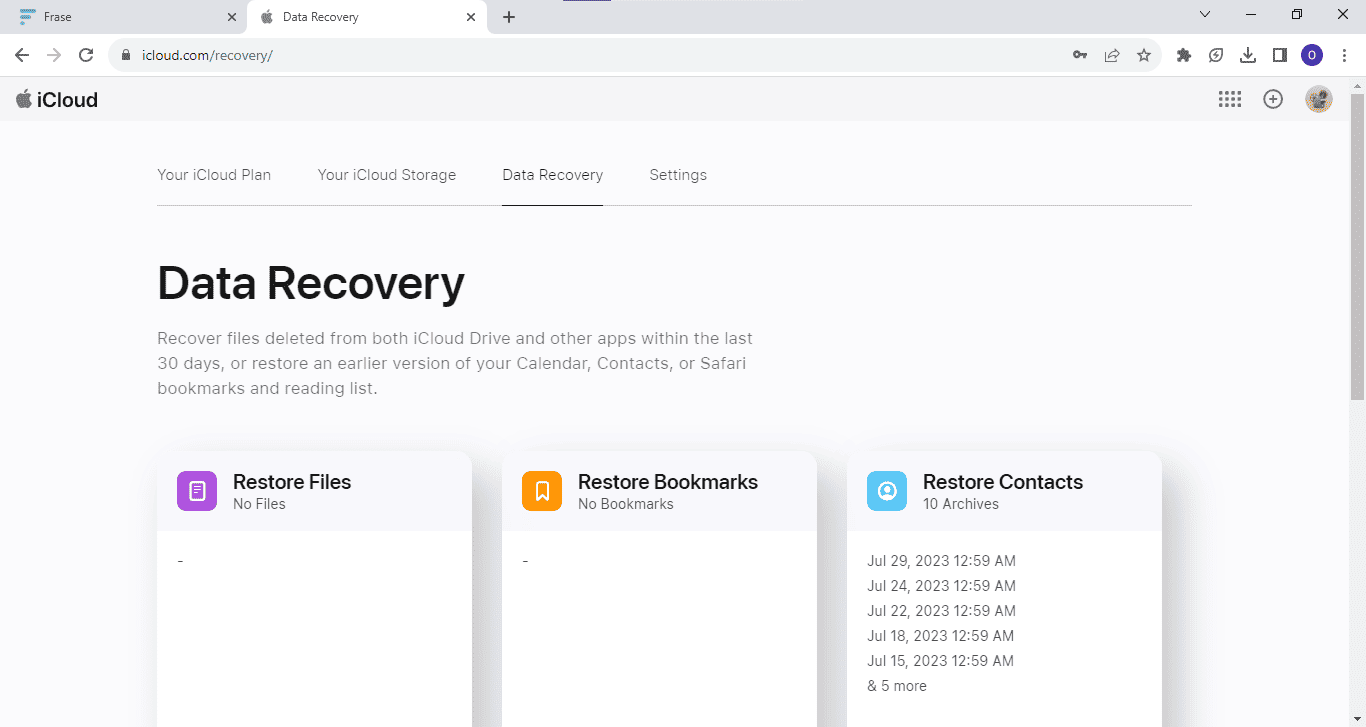
- Sign in to iCloud.com on your Mac or PC using your Apple ID and password.
- Click the profile icon.
- Choose the Data Recovery tab.
- Select the tab corresponding to the items you want to recover from the Restore Contacts, Restore Calendar, Restore Bookmarks, and Restore Files options.
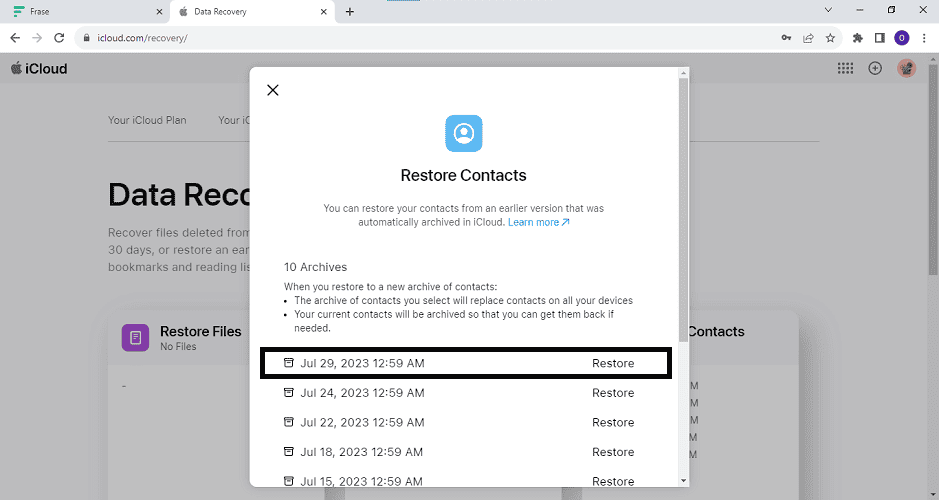
- A list of archives for each item, organized by the date the archive was created, will be revealed.
- Select Restore next to an archive to recover it.
Note that restoring one of these contact or calendar archives will replace the current ones on your devices. However, your current contacts would be archived in case you need them back.
Restore Photos and Videos Using the Recently Deleted Album in the Photos App
The Photos app on your Apple devices also allows you to restore deleted photos and videos within 30 days of deleting them. Items you delete within the app are transferred to the Recently Deleted album in the Photos album, where you can find and restore them or permanently delete them.
To find them,
- Open the Photos app on your Mac, iPad, or iPhone.
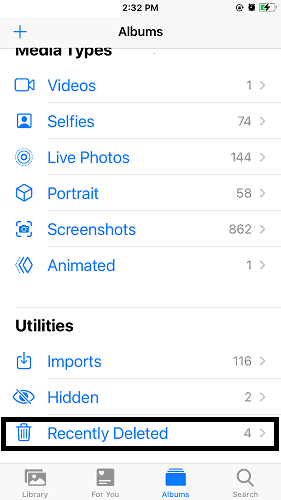
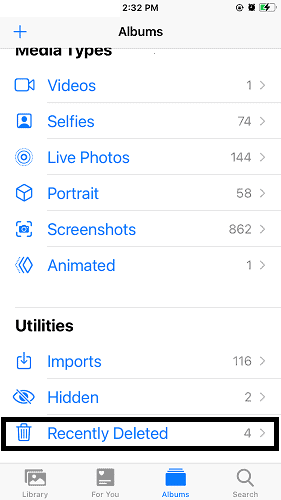
- Go to the Albums tab.
- Scroll down to the Utilities list and tap Recently Deleted.
- Select a deleted photo or video and tap Recover in the pop-up to restore it.
Understanding iCloud Drive Folder Structure
iCloud Drive is a simple tool for managing the content of your iCloud, from photos to videos, documents, and app files. The Files app on your Mac, iPad and iPhone offer a window into this file management system, allowing you to manipulate the files and folders you move in there.
iCloud Drive’s folder structure is straightforward and mirrors the traditional file system found on most operating systems:
- iCloud Drive: This is the main folder where all your files and folders are stored. It can be accessed from the Files app on iOS devices or Finder on macOS.
- Documents: This is the default folder where files created within apps that support iCloud Drive are stored. For example, if you create a document in Pages or Keynote, it will be saved in this folder.
- Desktop: On macOS, you have the option to store files from your desktop in iCloud Drive. This enables you to access those files on other devices linked to the same iCloud account.
- Shared with You: In iOS 15 and later, this folder contains files and documents that other people have shared with you through Messages, Mail, or other compatible apps.
- Recently Deleted: Deleted files from iCloud Drive are moved to this folder and will be permanently deleted after 30 days.
- Third-Party Apps: Many third-party apps integrate with iCloud Drive, creating their own folders to store app-specific files.
Maintaining a well-organized file structure in iCloud Drive can save you time and make it easier to find what you need. Here are some tips to help you.
Tips for Effective File Management To Help You Maximize the Potential of iCloud Drive
- Create Folders: Avoid storing all your files directly in the root of iCloud Drive. Instead, create folders to categorize your files logically. For example, you can have separate folders for work, personal, projects, etc.
- Use Descriptive File Names: Give your files meaningful names that accurately describe their content. Avoid generic names like “Document1” or “File2,” as they can quickly become confusing.
- Keep it Synced: Ensure that all your devices are connected to the same iCloud account and have iCloud Drive enabled to keep your files in sync across all devices seamlessly.
- Regular Cleanup: Periodically review your files and delete those that are no longer needed. This helps prevent clutter and keeps your iCloud storage space optimized.
- Use Tags and Metadata: Leverage tagging and metadata features in macOS to add additional information to your files. This makes it easier to search for files based on different criteria.
- Offload Old Files: For files that you rarely access but want to keep, consider using the Optimize Mac Storageoption on macOS. This automatically offloads older, larger files to iCloud while keeping their metadata and thumbnails locally.
- Share Folders Collaboratively: iCloud Drive allows you to share entire folders with others, making collaboration on projects easier. Be mindful of the permissions you grant to collaborators.
- Backup Important Files: While iCloud Drive is a cloud storage service, it’s essential to have backups of critical files elsewhere, just in case.
Frequently Asked Questions
Yes. Simply go to iCloud.com, and select iCloud Drive. Find the blue link Recently Deleted with the number of deleted items at the bottom right corner of the window. Click that and a list of recently deleted items will appear. Alternatively, go to Files > Browse > Recently Deleted.
Files remain in the Recently Deleted folder on iCloud for about 30 days. After this period, they are automatically and permanently deleted from iCloud Drive.
No, once files are permanently deleted from the Recently Deleted folder on iCloud.com, they cannot be recovered. It’s essential to restore files within the designated time frame before they are permanently removed.
Conclusion
iCloud Drive is a very useful productivity tool, especially if you’re already locked into the Apple ecosystem. Starting a project on your Mac and picking it up on your iPad is so convenient; once you taste that, you just can’t go back.
Now, you have even more skill in using this valuable tool. Never lose a photo or document to mistaken deletion. Take things a step further and learn how to clean your iCloud storage in this guide.

