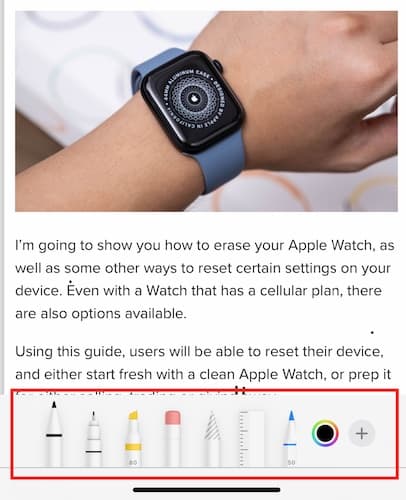
Introduced in iOS 11, the Markup feature made many folks who owned an iPhone or iPad happy. That’s because the Markup tool allowed users to draw on and annotate images, screenshots, and documents without the need for a third-party app. Aside from the drawing feature, Markup also gave folks access to the text tool, signature, magnifier, shapes, lasso tool, and more. But did you know that you can change the opacity (and even size) of the Tools in Markup on your iPhone or iPad? Read along to know how.
How to Access the Opacity Feature of Tools in Markup
Before we proceed in learning how to access the opacity feature of tools in Markup, you might be asking what’s so important in knowing this. Honestly, not pretty much, except that having the ability to change the opacity of tools in Markup would make your life easier. That is if you’re using the Markup tools heavily in your documents, images, and screenshots on iPhone and iPad.
Ready to edit your documents, images, screenshots, and more?
Time needed: 1 minute
Follow the steps below to access the opacity feature of tools in Markup.
- Open a file that you want to edit.
- Select the desired tool (i.e., pencil, marker, highlighter).
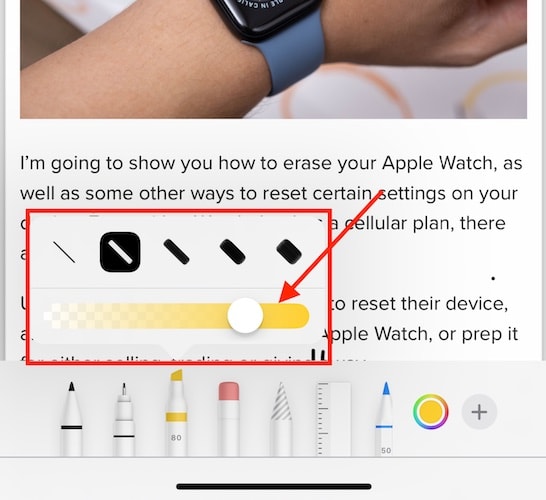
- Tap on the selected tool one more time to reveal the opacity feature.
- Tap your desired width of the Markup tool.
- Tap and hold the slider, then slide it to your desired opacity.
At this point, you should know that the Markup feature is available to all Apple iPhone and iPad stock apps. But the way to access the feature will vary depending on what app you are using.
In the Notes app, you need to tap the Markup icon, which looks like a pen tip, to access the drawing tool. Folks who use an Apple Pencil with their iPad just need to write directly within the document.
The method for accessing the tool in the Photos app is a bit different. First, tap Photo > Edit. Then tap the ellipsis icon (…), then tap Markup.
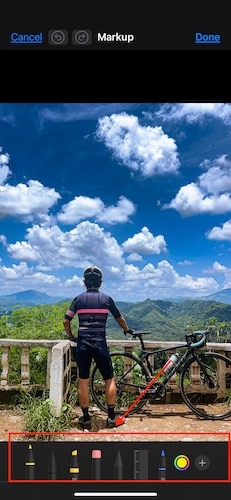
When you’re using the Mail app, look for the Markup icon above the keyboard. If you can’t see it, you may need to tap the arrow icon to reveal more options. The Markup option should be one of them.
Finally, in Messages, you can tap on the Camera icon to take a photo or tap the Photos icon to open an existing photo from the Camera Roll. Then tap the image, and then tap Markup.
And that’s how easy it is to change the opacity and size of tools in Markup on your iPhone or iPad.
Some Additional Tips on Markup Tools
The Markup feature provides you with four drawing tools, namely, pen, marker, pencil, and the fill tool which is available only for iPad. It’s worth remembering that each of these tools differ in their appearance but each of them responds to touch depending on whether you are using an Apple pencil or just your finger. In addition, when using the pen or pencil tool, the speed of your stroke could determine how thick or bold the sketches will be. Faster strokes produce thicker or bolder sketches in the pen tool while slower strokes can make bolder lines when using the pencil tool.
Draw the Perfect Line or Shape
Now, here’s a tip when drawing the perfect line or shape. Draw as you normally would but don’t release your finger yet when you’re drawing. Wait for the line or shape you drew to become a perfect line or shape before releasing your finger. Also when drawing a shape, make sure to draw in one stroke.
Use the Ruler Tool
Another tool that you might find useful is the ruler tool. You can use the ruler when drawing straight lines. All you have to do is to tap the ruler tool and use your finger to drag it around the screen. You can adjust its angle using two fingers to rotate the ruler tool.
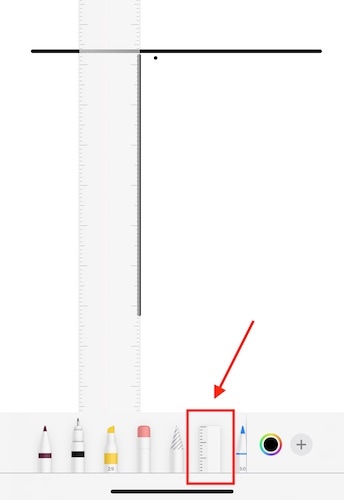
Additionally, when you’re using the ruler tool, you may notice a tap of haptic feedback at 0, 45, and 90 degrees. This will help you position the lines at the right angle. To make the ruler disappear when you’re drawing straight lines, simply tap on it again.
Use the Annotation Tool
Finally, another useful tool is the annotation tool which as its name suggests allows you to annotate texts, objects, and shapes. Compared with Scribble, you can annotate text, objects, or images using your finger and there’s no need for an Apple Pencil.
Advanced Adjustments in Markup
Aside from adjusting the opacity of tools in Markup, you can also adjust the opacity of drawing tools specifically for drawing straight lines. Additionally, you can adjust the line weight of drawing tools. You can do so by simply tapping the tool and selecting one of the five thickness options available.
If you want, you can also change or adjust the color of a tool in Markup. Simply tap the Color icon at the right of the toolbox. From there you can select a color from a palette in grids, color spectrum. You can also adjust the RGB components manually by choosing Sliders.
For iPad users, you can also hide the Markup toolbox or move it around in supported apps. You can also enable Auto-minimize so that the toolbar can be minimized when you typing or drawing text. Simply tap the extension icon with an ellipsis to turn it on. To hide the Markup tool, simply tap its icon, then tap Done.
Other Important Things You Need to Know About the Markup Tool
The Continuity Markup Tool on Mac
What we discussed above pertains to using the Markup tool on your iPhone or iPad. But the Markup tool is also available for your Mac. The Markup tool on your Mac lets you write, sign, and draw on, crop, or rotate PDF documents and images.
What’s more, if your iPhone or iPad is nearby you can use the Continuity Markup to mark up the file on your device and the changes will instantly show up on your Mac. Additionally, to use the Continuity Markup feature, your devices must have Wi-Fi and Bluetooth turned on, and meet system requirements which you can check out from the Apple Support document.
Markup Tool Accessibility Features
Folks with a disability can also use the Markup tool on iPhone and iPad. Thanks to Apple’s accessibility features that include voice-over support or assistive touch. For instance, the icons for the Markup tool can be magnified using the iOS Zoom feature. The pinch gesture can also be used to magnify photos/PDFs in the Markup Tool.
Furthermore, you can also let your iPhone or iPad read aloud the icons for the Markup tool through the VoiceOver feature. You can also use this feature to adjust settings including color, and opacity, and even reveal other information about the drawing pencil.
Optimizing the Markup Tool for Different iOS Devices
Using the Markup Tool on iPad with Apple Pencil
When it comes to using the Markup tool, iPad owners are a bit lucky since they can have an easier time with the Markup interface using the Apple Pencil. If you haven’t done so before, below are some useful tips when using the Apple Pencil in the Markup tool.
Draw the Perfect Shading with the Pencil Tool
Like a real-life pencil, you need to tilt the Apple Pencil when shading. The pencil tool also responds to the pressure you apply when drawing or shading. This means that you can darken or lighten the stroke accordingly. But since it’s not a real-life pencil, you may need to practice your skill to achieve the perfect drawing or shading.
Draw the Perfect Shapes
Speaking of drawing, to achieve the perfect shape you need to pause before completing the drawing. This will allow your iPad to predict the shape you are trying to draw and automatically draws the perfect form of the shape. If you don’t pause, the iPad will draw the shape as you draw it with the Apple Pencil.
Disable Finger Interference
Here’s some sort of a hack tip for preventing other people to imitate the Apple Pencil to draw on your iPad. You can try this hack via the settings. Take note that this setting will only allow the Apple Pencil to draw and not the finger.
- Go to Settings > Apple Pencil.
- Toggle on Only Draw with Apple Pencil.
It’s also worth noting that this setting will work with Notes, Photos, or anywhere else that you can use the Apple Pencil.
Insert a Drawing Into to Email
For those who are unaware, you can insert a drawing into an email message. This feature was available since iOS 11. So, this should serve as a reminder in case you forgot about it. To insert a drawing into an email message, simply double-tap with an Apple Pencil while writing a message, then tap the arrow options. Select Insert Drawing and you’re good to go.
Use the Apple Pencil Even if Your iPad is Locked
When you’re in a hurry and need to quickly write down a note before it vanishes from your memory, simply tap, hold (for a millisecond), and release the Apple Pencil on the Lock Screen. A fresh note should appear on the screen so that you can jot down what you need to remember.
Markup Screenshots and Documents
It’s easy to mark screenshots while using your iPad. And with the Apple Pencil, it becomes easier. To do so, simply tap the Markup tool, select the pen/marker you prefer, choose the color, and write or draw whatever you want to markup on the screenshot.
Sign Documents On the Go
Finally, aside from having the ability to scan documents using the Notes and Files app, did you know that you can also digitally sign the document wherever and whenever? Follow the below steps to do so.
- Open any document in the Photos, Notes, or Files app.
- Tap the Markup tool icon.
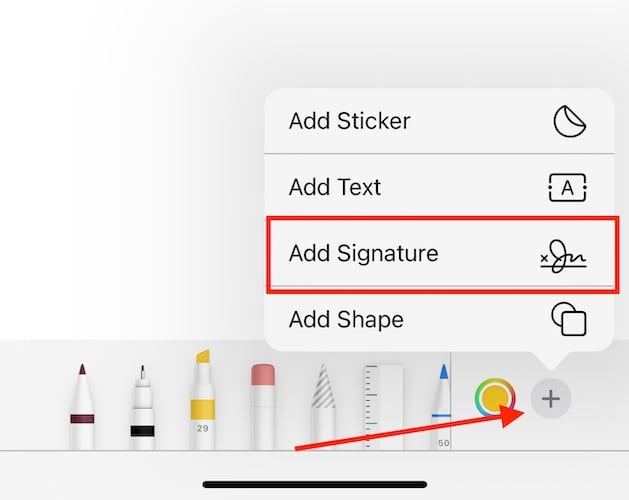
- Select the + icon and then Signature.
- Use your Apple Pencil to sign the document.
Educational Use of Markup
In today’s education environment, the use of digital resources and devices has become a norm for many institutions. Apple knows that and so it has been positioning the iPad (and even the Mac) to be at the forefront of the educational system. And if there’s one feature of the iPad and iOS in general that has great use in the educational sector, it has to be the Markup tool.
With the Markup tool, students can easily annotate educational materials, and share them with professors and classmates. Collaboration can also be achieved through the Files app whereby files can be shared easily. Students can also use third-party cloud apps to send files and have their peers access and work on them in real time. The Files app also allows students to markup PDF documents within the app. Plus, there are other more features that the Markup tool, iCloud, Notes, and Files app that the educational sector could find beneficial. Those are just waiting to be explored.
Professional Use of Markup
If the Markup tool is useful for the educational sector, the same could be said about its business applications. Employees can use the Markup too for annotating presentations and documents. They could also easily share them with colleagues in real-time for editing and commenting.
Conclusion
The above-mentioned features of the Markup tool proved that it can be a very useful tool when working with text and when you need to draw images and shapes on your documents as well. With ample explorations and constant usage, you may soon realize how valuable the Markup tool can be. We encourage you to use it regularly to find the settings that work best for you. And yes, explore the potential of your iOS device by mastering Markup’s features today.

